by successfulbob | Lumix GH4, Lumix Lounge, people photography, photography creativity, photography education, photography gear, photoshop tutorial
Anatomy of a self portrait
Sometimes it’s good to push yourself.
I had an assignment from a game of Survivor we are playing in the Arcanum (a place of growing your photography skills at your own pace with a group of like minded folks. Click the link for a peek under the Arcanum’s hood)
The assignment was to shoot a self portrait to help share a bit of who you are. So I decided to make it a learning experience. Here’s the thought process I went though.
First I wanted to give people an idea of how busy it can be in my head. So the title became ‘Under the Hood’.
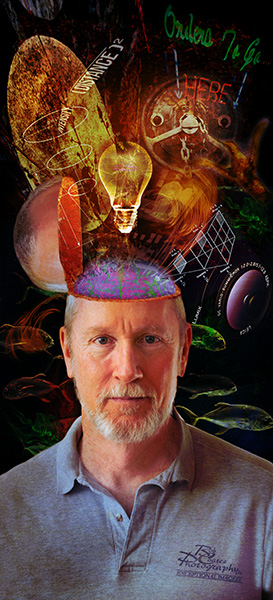
Let’s see what’s under the hood in Bob’s Brain…
Set up the photo
Start with a solid head and shoulders studio self portrait. Main light forward and bounced off the wall to get a large source with medium contrast. Two strip light soft boxes with egg-crate grids attached were set to camera left and right slightly behind pointing to skim and add separation and spice to the look. Lumix GH4 camera with the 42.5mm 1.2 Nocticron lens mounted on a tripod with the Wifi activated allowing camera control from my IPhone. I use Paul C Buff lights and modifiers because of the good value, selection and great service when needed.
On to the Photo Art
Original concept was to have a zipper peeling back from my forehead to allow the reveal. After some experimentation that didn’t feel like it was going in the direction I wanted. Next thought was to cut off the top of the head and tilt it back but that made it difficult to show what was coming out of the head. Finally, on the third try I took the top of the head and tilted it to the left and got the base image for which I was looking.
Adding Photo Elements to Tell the Story
Then the search was on to search for and create elements that were to tell the story. Inverse square law. Brain. Smoke brushes. Neon signage. “Wait I’ve got an idea, a light bulb went on in my head.” Textures for blending element together. All images were layered in Adobe Photoshop using various blend modes. You can see the Layers and their Masks used to put this together. Got a question? Give me a shout…

Photoshop Layer stack showing Layers and masks…
Hope this inspires you to take a project and push yourself to a new limit.
Yours in Creative Photography, Bob
by successfulbob | 4K photo mode, Lumix GX8, macro, photography, photography education, photography software, photoshop tutorial, wildlife photography
Choose your focus later.
The photography world is changing around you as I write this post! At least it feels that way as new cameras and features are introduced in short order. I’ve never been on the front edge of technology before and it’s fun trying to figure uses for features as they come out. A lot of the new capabilities is driven by possibilities not available before 4K mirrorless cameras came on the scene.
This is a very interesting new feature called Post Focus.
This is for stable non-moving subjects where you might not be sure of the focus point you want and would like to have options to choose later for a totally different look and feel to a subject of a scene.
Here’s how it works. The camera makes a quick video of a scene while moving the focus point throughout the frame. Because the camera is automatically set for Photo Mode each still frame can be extracted from the video as an eight MP file. At the end of processing after a few seconds you can see the individual frames on the back of the camera and choose any that you would like to save out as individual jpeg photos.
Want to be able to choose later? Not a problem. Download the video file and take it in an editing program like Adobe Premiere, Final Cut Pro, or Lightroom. There you can step through each frame and choose at your leisure on a large screen and save out your file.
I decided to see if I could use the system to help with the capture of Macro images and the process of focus stacking to get deep detail in an image.
And guess what ?? It works!
I Imported the MP4 file into Adobe Premiere and used the right arrow to move through each individual frame. Selected the ones I wanted to work with and pushed the save as an image (camera icon) and saved the images out as a TIFF. Then it’s off to Adobe Bridge.
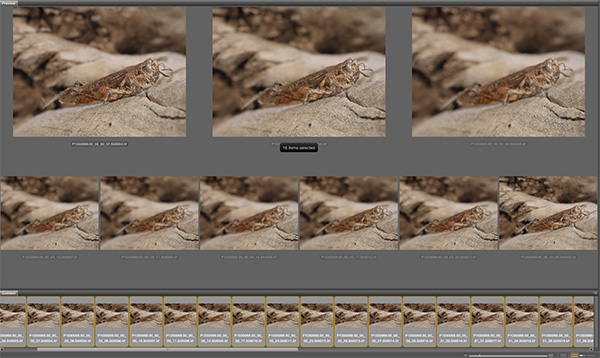
Screen capture of Bridge selections with all 28 files selected with the still captures pulled from the video.
With files selected the next move is Tools > Photoshop > Load Images into Layers
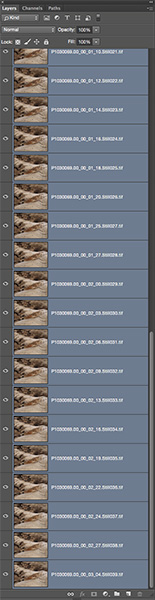
Layers Palette with all layers selected in preparation for Photoshop magic.
Once all layers are selected they need to be put in registration because a change in focus changes the size of the image. Menu Edit > Auto-Align Layers.
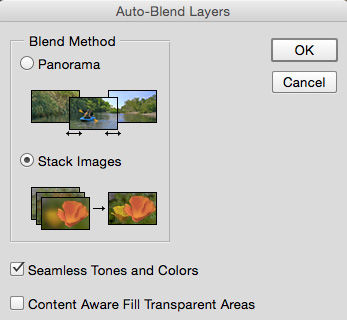
Once layers are aligned Menu Edit > Auto-Blend Layers with the Stack Images and Seemless Tones and Colors checked. Depending on the number and size of your files the the RAM horsepower of your computer this could take a little while but it’s doing all the work you see below masking in all the sharp portions of the images.
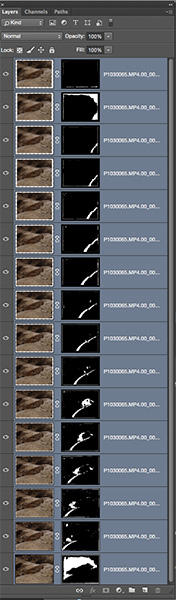
Palette window with proper selections for picking and masking in all the sharp bits it can find in the images. Making all of these masks would be super time intensive. Sometimes the individual masks may need a little tweaking if you didn’t get enough detail or colors and tones are very close.
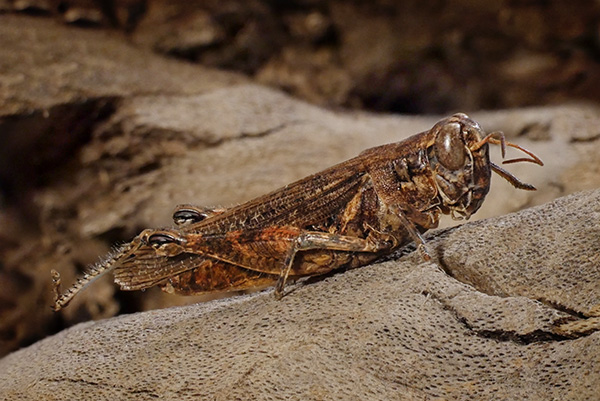
Grasshopper with detail and depth of field exactly where I want it.
The image was captured with the Lumix GX8 and the 45mm f2.8 Macro lens set at f9 in Post Focus Mode. “Why f9 and not f22 and be done with it Bob?” When photographing close-up Macro subjects the DOF is very shallow even at f22. In addition as the aperture gets smaller diffraction is introduced starting to blur details. (learn more about diffraction and check out your camera lens combo to find the sweet spot here)
Yours in Creative Photography, Bob
PS – No grasshoppers were harmed in the making of this tutorial. The grasshopper was already mummified when I found it on my porch.
by successfulbob | fine art musician portrait, musician photography, photography, photography creativity, photography education, photoshop tutorial
Photoshop Tutorial Creating Photo Art
Let’s go into a little more detail on the creation of the photo art for the Sound Bites Grill ‘Wall of Fame’ with guitarist Ottmar Liebert as the subject.
The process is one I’ve dubbed Photo-Synthesis taking multiple images and using Blend Modes, Layers, Masks, Fx, Adjustment Layers and more to create the final piece. First here is the final piece as it now hangs at Sound Bites…
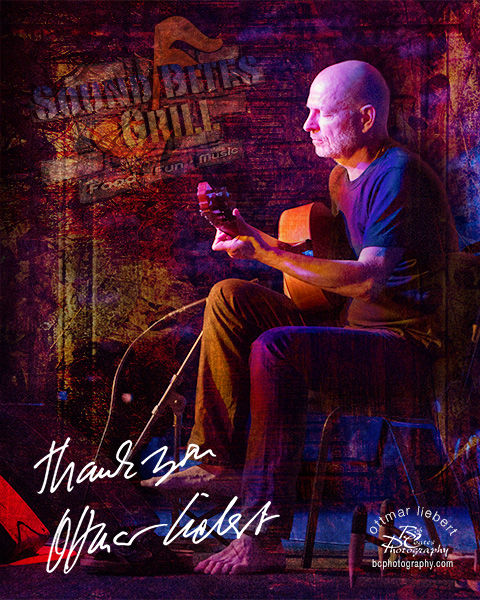
Finished ‘Wall of Fame’ image featuring Ottmar Liebert

Raw materials for the final photo art.
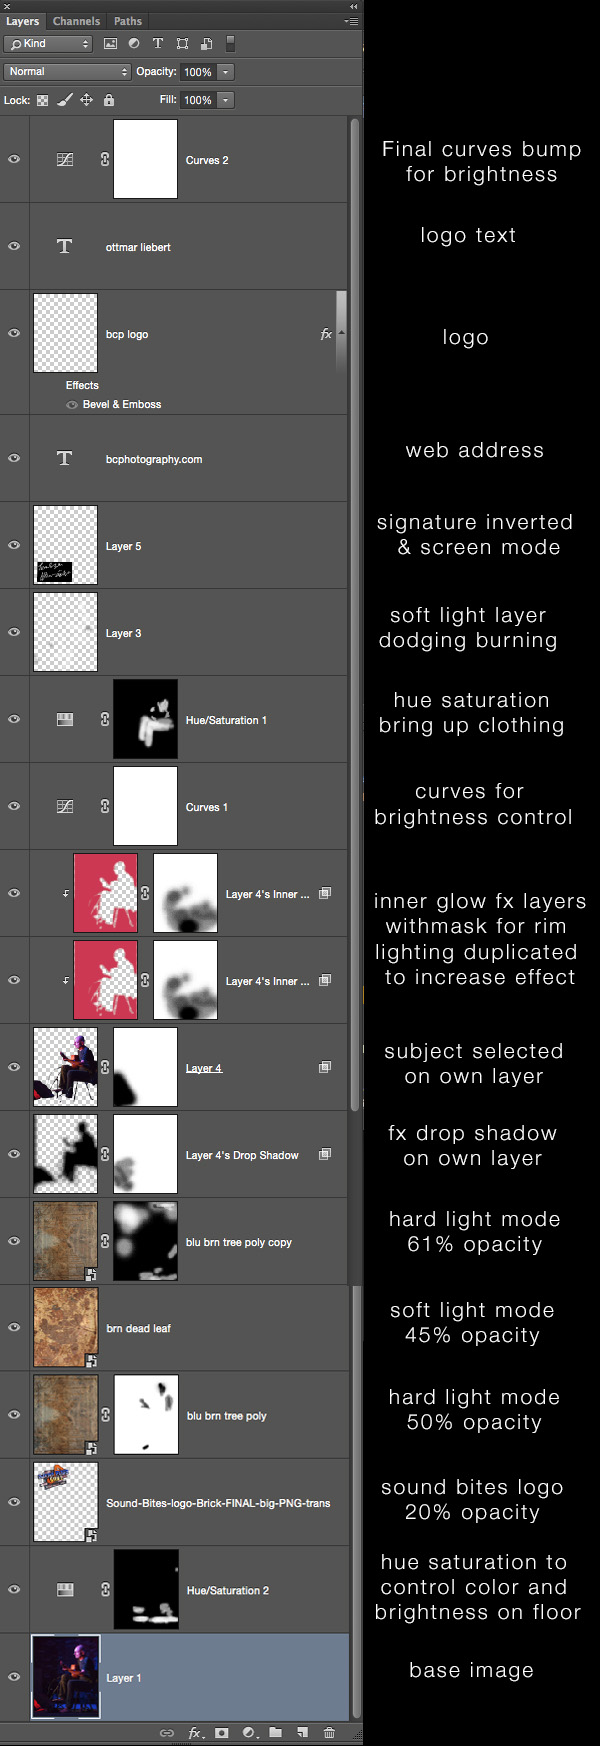
Here’s the Layers Palette with Layer Modes and Opacity Levels indicated. I recommend reading from the bottom to the top to get a better feel of my process.
I usually start with the base Layer and add a texture I feel will blend well. Then I experiment with different Blend Modes and Opacities to get the effect for which I am looking. On the MAC if the Move Tool is highlighted then holding the Shift key and hitting the + & – keys you can scroll through the various Blend Modes seeing their effects in real time.
This should give you an idea how I work with Adobe Photoshop in creating photo art projects.
Have any questions?? Let me know.
Yours in Creative Photography, Bob
PS – Textures are available everywhere. Even from fellow photographers. I have a large library of different kinds of texture but for some reason I found myself attracted to two textures from one of the people who inspire me, Thom Rouse. That’s a link to some amazingly fantastic images. Thanks Thom!! BTW if you ever get the oppourtunity to see Thom speak don’t miss it. It’s a fabulous walk through the art world
by successfulbob | black & white, infrared photography, landscape photography, Lumix G6, Lumix Lounge, photography education, photoshop tutorial
OK. I went back to the same file I worked on yesterday and reprocessed using a couple different techniques. Here is the new version captured with the Lumix G6 and the 7-14mm f4 lens.
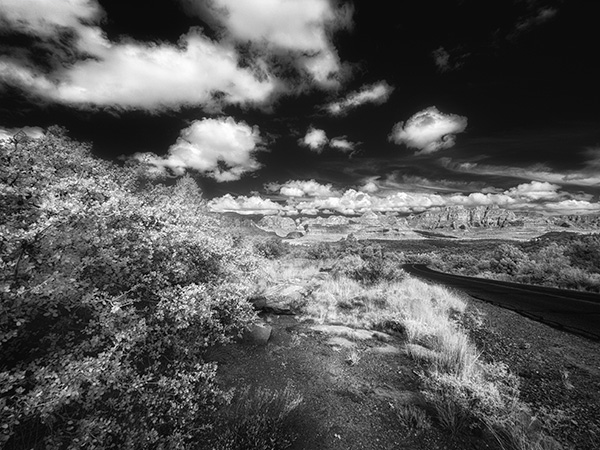
Different processing led to a cleaner more detailed IR image.
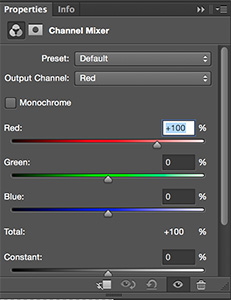
First I used Adobe Camera RAW to process the file twice. Once for the foreground which was in shadow and again for the background which was in full sun. Using a Layer Mask I blended the two files together. Then using the Channel Mixer I swapped the Red and Blue Channel information as this file is still comprised of RGB information. When you first open the Channel Mixer adjustment Layer you’ll see the Output Channel set to Red at 100%. Change this to 0%. Go to the Blue color and change it to 100%. Then change the Output Channel to Blue and make the Red color 100% and the Blue color 0%. This is to give a ‘blue sky effect’. I didn’t like that effect so I kept going.

Swapping the Channels gave me a better image ultimately so I will keep this as part of my IR processing in the future.
Next using NIK Silver FX Pro 2 I converted to Black and White adding some mid-tone structure and fine structure. in NIK Color FX Pro 4 I added a bit of Glamour Glow with neutral color. This helped increase the IR look. A little goes a long way before you blow out some highlights so be careful here. Final bit of tweaking is a blank Layer set to Soft Light Mode using the Brush Tool with Black or White color to dodge and burn the image just a bit to control where the eye travels throughout the photograph.
Looking forward to working in IR more often. Gives a great look to noon-day sun images when you would normally refrain from making image captures.
Yours in Creative Photography, Bob
by successfulbob | architectural photography, commercial photography, Lumix GH4, Lumix Lounge, photography, photoshop tutorial
Trying to add just that little bit extra…
Been photographing the Phoenix Airport Hilton lately after their eight million dollar remodel. There are some photos it can be a little more difficult to make sexy but lighting and awareness can make them stand out.
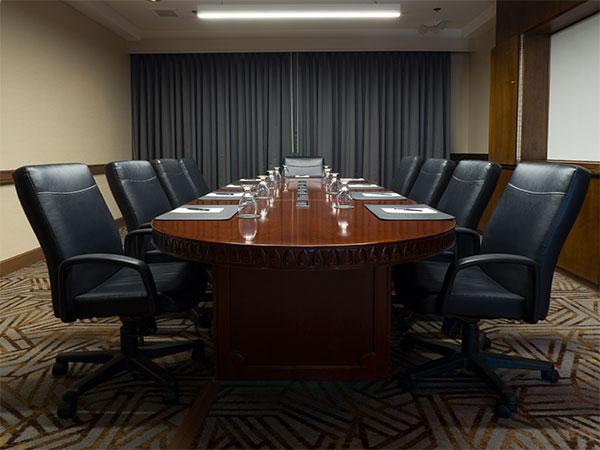
Take, for example, a boardroom photo. Here’s a utilitarian room with office chairs around a large table. We looked at a number of angles and one of the things I thought set the room apart was the fact that A – it had a window and B – there were palm trees outside the window. The wonderful thing about collaboration is that some of my best ideas come from other people!.
Mike Manginelli has been heading up the photography project from the hotel side. We discuss each photo, the use, how they want to present it to potential clients then we set up the shot. Mike said, “Hey what if the photo was taken from here?” As soon as I set the camera in place I was all over it. Once that decision is made…
Then it’s time to make the room shine from a lighting standpoint. I work with multiple images for different exposures of different areas. Inside in shadow. Inside room lighting. Outside daylight needs a totally different exposure from indoors. And then some additional accent lighting which adds that ‘certain something’…
Here’s the base exposure. Curtains are closed so I can control the glare on the tabletop to allow the wood and grain to show and not be blown out from the reflection.
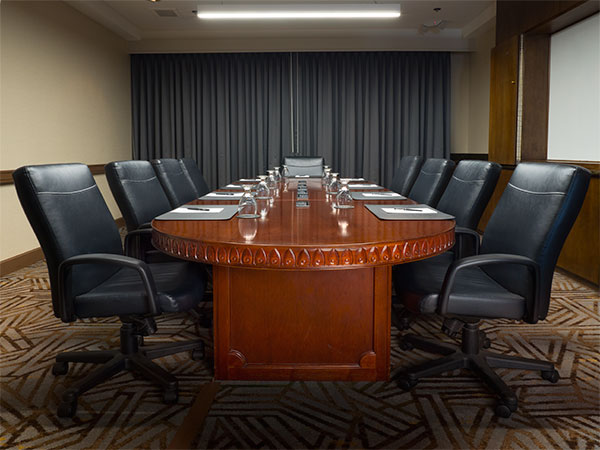
Added a flash exposure to highlight detail and throw some light into the shadow area under the table.
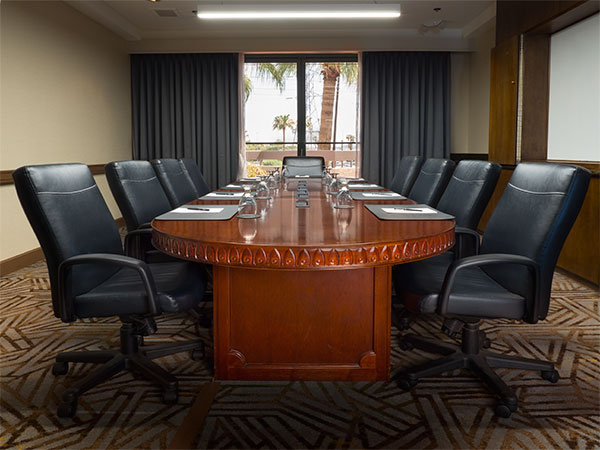
Curtains were opened to obtain exterior view. Flash added to curtains to not have trouble blending inside/outside from flair around window. A little of the reflection was allowed on the tabletop.
Final boardroom image with a Curves Layer to open up shadows just a bit.
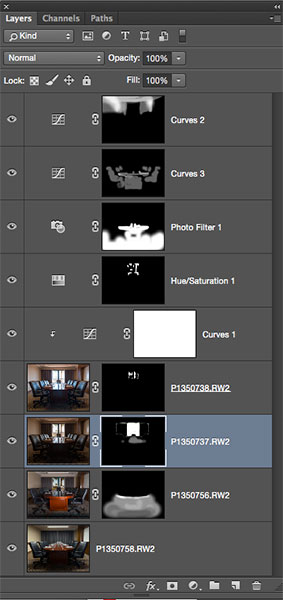
Layers Palette from boardroom photo showing various Layers and how the Masks were applied.
A handy feature on my Lumix GH4 is the built in WIFI that talks to my Ipad (or Iphone or Android) via ‘Image App’ (free download from Panasonic) so I can control the camera without touching it. All controls including shutter release and bracketing are available on the phone or tablet. When shooting multiple exposures, making adjustments to the camera, like exposure changes, firing the shutter, etc. makes it much easier to blend the images together in post production when the camera is mounted on a tripod. I used the 7-14mm f4.0 lens for this. There is no distortion in the lines on this lens. It’s one of my favorites for architecture work requiring a wide angle view.
Questions? Let me know…
Yours in Creative Photography, Bob
by successfulbob | Lumix G7, photography, photography education, photography gear, photoshop tutorial
Just got my hands on the new Panasonic Lumix G7 – Lumix G7 w 14-140mm lens ($1098) or G7 w 14-42 ($798) – and have been putting it through some paces.
There are some beautiful desert plants that my wife has been landscaping the yard with vs having water-sucking plants since we live in the super dry climate of Sedona, Arizona. This is the bloom of the Apache Plume plant.
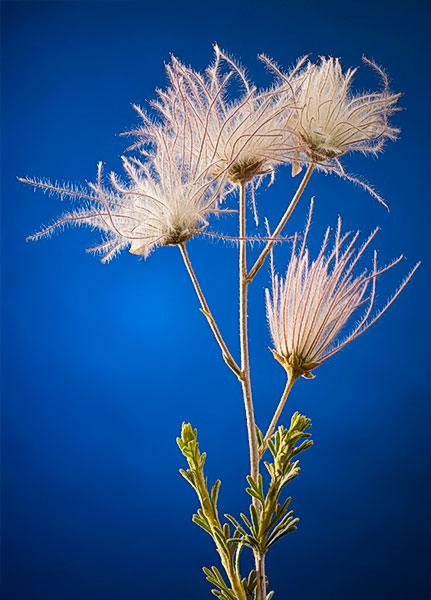
Apache Plume Bloom
Capture info
I used the 45mm f2.8 Macro to make the details of the ‘plume’ feathering jump. In order to get the most detail I set the aperture to f8 and used studio flash. Shoot through umbrella to the side and just behind the plant with soft reflector fill opposite. Black background paper lit with flash with snoot and 2 layers of blue gel. Used the Wifi from the camera to allow the Ipad to run the camera changing focus using the free Panasonic Image APP. Never having to touch the camera makes for better, easier blending because there’s no camera shake or movement.
Here’s How to Focus Stack
I captured fifteen exposures with focus through the image and used Photoshop to stack them together and achieve sharpness from front to back. Take the images into Adobe Camera RAW and tweak any color or shadow/highlight settings. From the Tools menu ask Bridge to Load Files into Photoshop Layers. Highlight all Layers in the Layers Palette. Under the Edit Menu > Auto-Align Layers. With all Layers still selected, Edit > Auto-Blend Layers with the Radio Button Stack Images Selected with Seamless Tones and Colors checked. Then go through your image and look for areas that might not have been blended perfectly by Shift clicking on the individual Layer Masks to see if there is a sharp image that might be blended better. **Note – Subjects that contain a lot of white will have more issues with Blending the Sharpness in this process than others with more color and contrast.
Initial Thoughts on the G7 (more to come in future posts)
This camera would make a great back-up to the GH4 if you are a pro on a budget. Controls are slightly different but not so much you would have a problem switching in the middle of a job or if you are doing a two camera shoot. Pros – VERY light weight, super-easy 4K Photo Mode, interchangeable lenses, image quality on par with GH4. Cons – Tripod plate needs to be undone to get to battery and SD card compartment, smaller battery, built on plastic body vs magnesium.
If you are really on a budget two or three of these cameras would make great kit to have pro backup capabilities.
Yours in Creative Photography, Bob