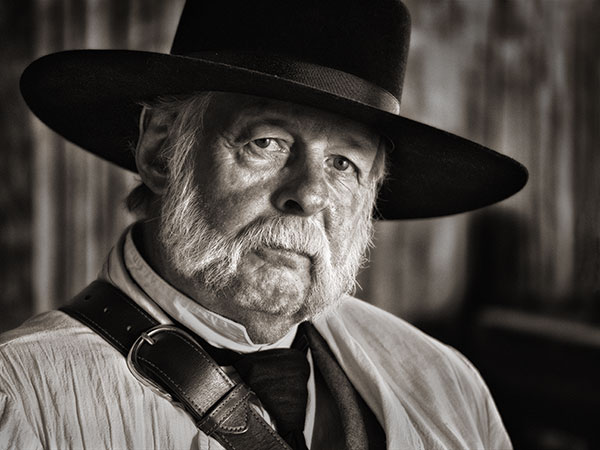
I’m working on a video for a future seminar being hosted by the Arizona Professional Photographers Association (AZPPA) in the fall and here is an image of one of the character actors expected to join us in a western setting. Steve AKA the ‘Sheriff’ is a pleasure to work with as are all the people who will be dressed in period costumes at the event.
‘Sheriff’ Steve in costume.
Steve was captured with the Lumix GH4 and the 35-100mm f2.8 Lumix Vario Lens. Natural light from a somewhat overcast but bright day coming through a doorway camera right and behind Steve so I could shoot into the shadow side of his face to add depth, dimension and drama to his features.1/15th sec f3.2 ISO 1600 in Aperture Priority with a slight bump in Exposure Compensation to open shadows just a bit.
Post processing often plays into the creation of my images. As Ansel Adams proclaimed, “The negative is comparable to the composer’s score and the print to its performance. Each performance differs in subtle ways.” So here is the original digital capture with no adjustments.
Straight Out of Camera (SOOC)
Top Image was processed in Silver FX Pro 2 to convert to Black and White.
Then some small retouching moves, mostly dodging and burning to control the contrast of the scene.
NIK Color FX Pro 4 Bleach Bypass Filter. Used a Layer Mask to bring back some detail that got whacked.
Back into NIK Color FX Pro 4 to use the Tonal Contrast Filter to highlight details and bump contrast.Layer Mask to control specific areas.
Added a Soft vingette.
Soft Light Blend Mode Layer added to retouch and add extra life to his eyes.
Then a conversion to Sepia Tone using a Hue Saturation Adjustment Layer with the settings Hue 30 Saturation 10 Lightness 0 and Colorize checked. (Got this recipe, or something very similar, about 15 years ago from longtime photographer friend Tom Cheswick)
Step and Repeat Level 4 is a continuation of Photoshop Tutorials using repetitive individual photo elements in a geometric pattern to create artistic images. Although this tutorial stands on it’s own for advanced Photoshop users you might want to check out the Step and repeat videos Number 1-3 before viewing this one. You can start here.
You may notice the Arcanum. It is a different way of learning and you can check it out here http://thearcanum.com
Step and Repeat Level 3 is a continuation of Photoshop Tutorials using repetitive individual photo elements in a geometric pattern to create artistic images. Although this tutorial stands on it’s own for advanced Photoshop users you might want to check out the Step and repeat videos Level 1. You can start here. Then also view Level four.
You may notice the Arcanum bumpers on the video. What’s that? I am a Master in the Arcanum and invite you to come take a look around at a different way of learning. You can check it out here http://thearcanum.com
Step and Repeat Level 2 is a continuation of Photoshop Tutorials using repetitive individual photo elements in a geometric pattern to create artistic images. Although this tutorial stands on it’s own for advanced Photoshop users you might want to check out the Step and repeat videos Level 1. You can start here. Then also view Levels three and four.
You may notice the Arcanum bumpers on the video. What’s that? I am a Master in the Arcanum and invite you to come take a look around at a different way of learning. You can check it out here http://thearcanum.com
Step and Repeat – Step and Repeat – Step and Repeat…
Oh wait! It’s the individual elements in a photo that I’d like to ‘Step and Repeat’ not the words themselves.
This is an interesting way to take your images to another place. I’ve been sharing it with my ‘Photo-Synthesis’ class attendees and because of the interest expressed by my students I’m going to share a series on how to use the idea in creating photographic artwork
I hope you enjoy and will share your efforts with me. Please when sending images for me to peek at make the longest dimension 600 pixels and save as a jpeg…
I have the new Firmware upgrade on the Lumix GH4 and there is a bonus feature called 4K photo mode and I like it. You can set the camera to 4K capture and still have the choice to set your aspect ratio where you want it. But you can choose 16:9 to match your video wide screen or go 4:3 or 3:2. Even square will give you a 2880X2880 pixel size image to work with.
Years ago when I first heard about the idea of pulling still frames from video I was very skeptical. “What now I have to look through 1000’s of frames to make my choice?? NO way!”
Well that was then and this is now. It’s actually much easier than I thought it would be. You watch the video. When you see what you want stop the video move forward or backward a couple frames and capture it. Done!
Want a series from a child’s first birthday cake? Choose exactly the expressions you need with no, “Man, I wish I had caught that cute little smile…”
Capturing a lightning storm?
Hummingbirds at a feeder?
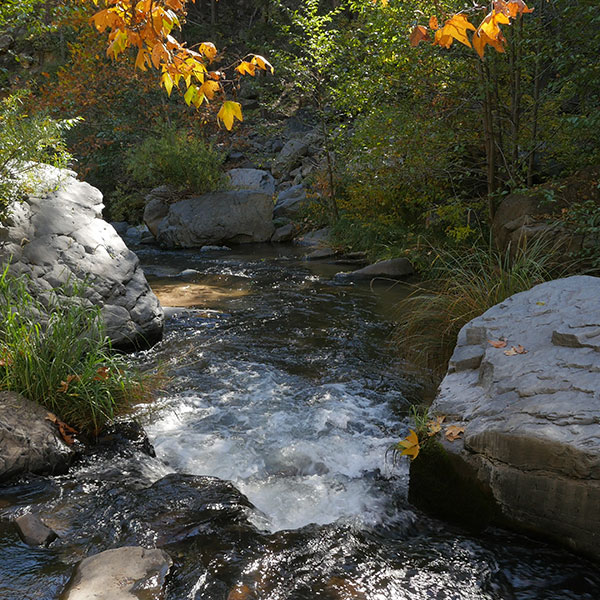
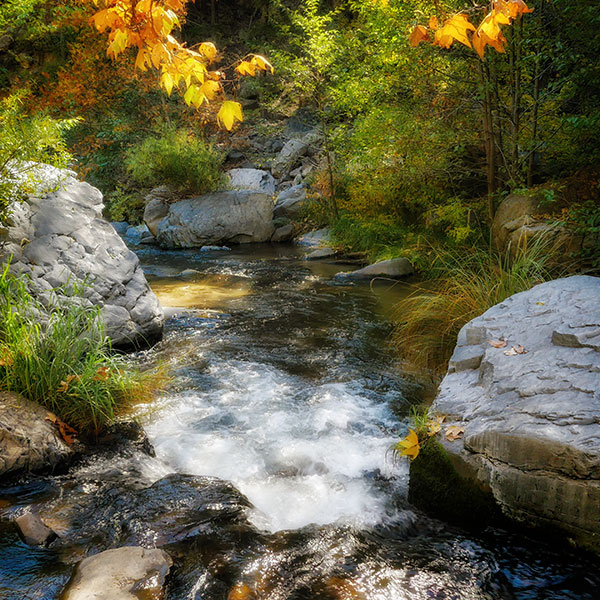
A stream with splashing water?
Bride and groom walking down the isle?
Roll some video and make your choice. With the Lumix cameras you can even play back the video and grab your still frames right in the camera before downloading! I’m sure you can think of many different instances where this feature could come in handy. I know I did when I started pondering more…
Let’s face it, no matter how good the technology is in our cameras mages need a little work in post to bring out their best. Here’s a still video capture from Oak Creek. I was experimenting with some ideas that didn’t work out involving water and Photoshop Blend Modes but I had this nice little bend in the stream captured as a square. Here’s how I gave it a little zing.
Original capture frame grab from 4K video.
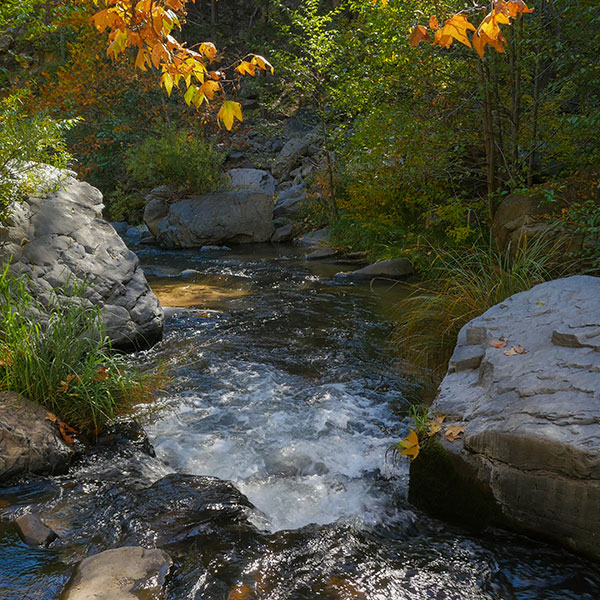
There were a couple small hot spots addressed with a bit of cloning.
This needed a little curves bump to add contrast and a light vingette.
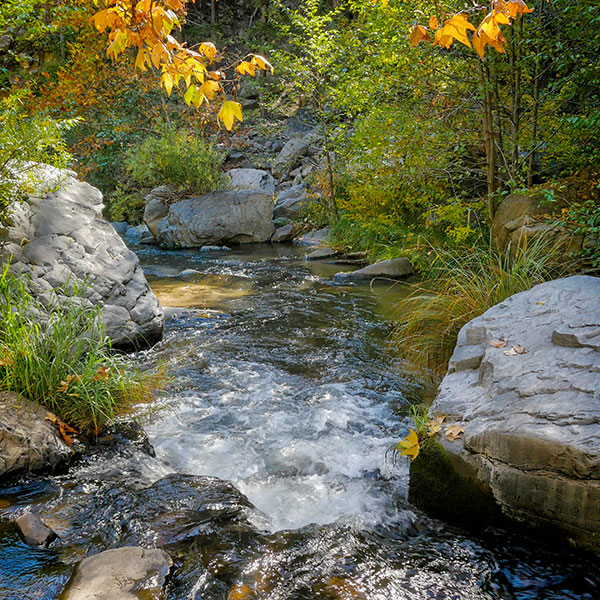
To add even more snap and ‘tooth’ to the rocks NIK’s Tonal Contrast filter was added.
A final NIK filter called Glamor Glow was used with a mask to keep the rocks sharp detail to contrast with the rest of the photo.
For infrared conversion of my cameras I use LifePixel. Infrared allows you to put an older camera to use and opens up a new time time of day for productive image creation.
Learn Photoshop in a fun environment. Aaron Nace applies the right amount of fun with easy to understand and follow tutorials. Actions and brushes are included with lessons!
Best embroidery ever. Give Queensboro a try, get a $20 instant credit to get started by clicking on the logo! They specialize in great quality custom logo apparel and promotional products with the best customer service.
Platypod has become a great resource for being creative in getting your camera gear easily into unusual places. As an Platypod Pro I get to work/play with the gear even before it comes out. Head over to Platypod, subscribe to the newsletter and you will get special discounts reserved only for subscribers.