Commitment in Photography – Marketing Monday
by Skip Cohen
I’ve written a few posts in the past based on excerpts from the Walk the Talk series. They’re just short thoughts that get me thinking about this amazing industry we’re all a part of.
I found this from Abraham Lincoln…“Commitment is what transforms a promise into reality. It is the words that speak boldly of your intentions. And the actions which speak louder than the words.
It is making the time when there is none. Coming through time after time after time, year after year after year. Commitment is the stuff character is made of; the power to change the face of things. It is the daily triumph of integrity over skepticism.” – Abraham Lincoln
As photographers, whether you’re shooting a wedding, a portrait or a commercial shoot, think about your commitment. Are you committed to your clients, to the quality of the final image and most important of all, that little voice inside your heart that represents the passion for the craft you need to succeed?
People trust you to capture some of the most important moments in their lives. There is no room for compromise and there are no shortcuts. You owe them the very best your creative skill set will allow and your commitment isn’t just to your clients, but to yourself.
There is no place for a been-there-done-that attitude. It’s all about your clients and to give them the very best your education is the key. It simply can never stop. New techniques, skill sets, pushing the edge of the envelope as if every client was your very first one has to be your mantra. Shoot as if the images you’re about to take are the only photographs people will ever see of your work.
My buddy, Scott Bourne, talks about all of us being the high priests of memory protection. That’s a big commitment and responsibility. Think about what that really means…then take a few deep breaths and smile every time you’re working with a client, because nobody can capture memories like you can!
Skip Cohen has been involved in the photographic industry his entire career and previously served as President of Rangefinder/WPPI and earlier, Hasselblad USA. He founded SkipCohenUniversity.com in 2013. Skip is a co-host for “Mind Your Own Business” and “Beyond Technique,” webcasts through Photofocus.com, writes for several publications including Shutter Magazine and is actively involved in several advisory boards for non-profit organizations.
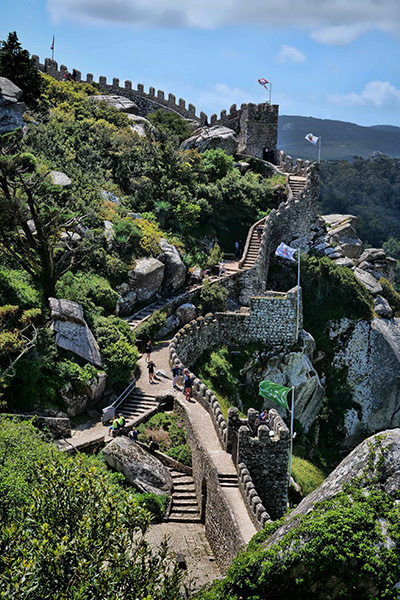
A five minute walk downhill brought me to my second stop, the Moorish Castle. The castle was constructed during the 8th and 9th centuries, during the period of Muslim Iberia. The castle was centrally located in an area that was primarily agricultural, and was necessary for protection of the residents. It was a strategic point during the Reconquista, but was taken by Christian forces after the fall of Lisbon in 1147. Settlers occupied the castle during the 12th and 13th centuries, but its military importance was progressively diminishing, and inhabitants were abandoning the castle for the old village of Sintra. In the beginning of the 15th century a small group of Jews occupied the castle until being expelled from the country by Manuel I of Portugal.
The 1755 Lisbon earthquake caused considerable damage to the chapel and castle. It wasn’t until King Ferdinand II began work on the Pena Palace around 1840, that he took up the task of improving the condition of the old Moorish Castle and walls. The castle is built on very rugged terrain with slopes reaching 40% gradients. The hike around the castle walls is bound to elevate your pulse! A stop at each watchtower allows you to catch your breath and enjoy the magnificent views.
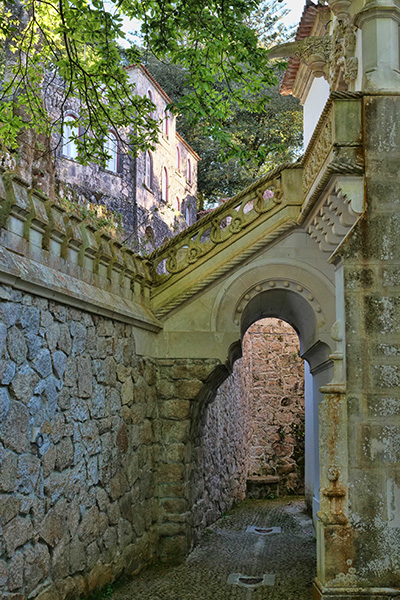
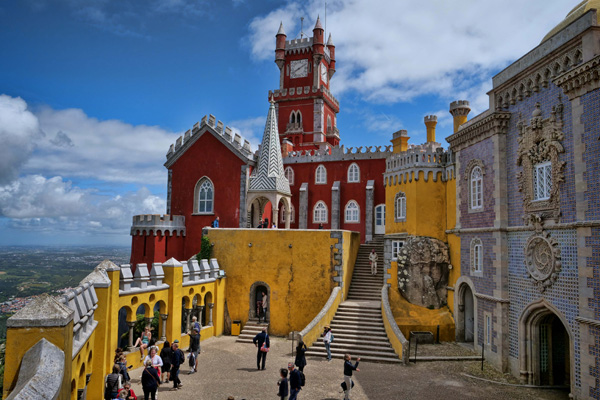
Secluded archway leading to the palace. Examine the rope detail on the sides of the stairs.
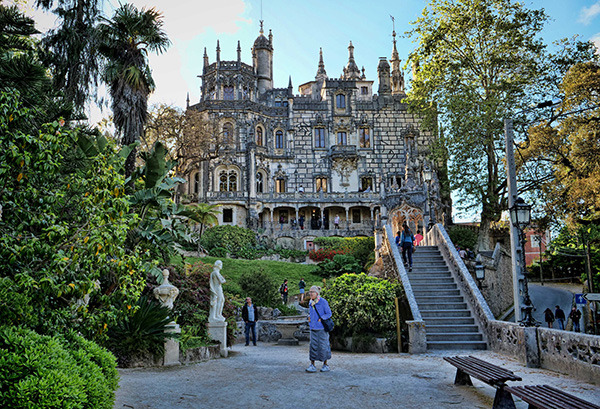
Having navigated the castle walls, I retraced my steps – also uphill – to where I’d parked the car. Returning to back to Sintra, I visited the Quinta da Regaleria. This highly decorated, ornate Gothic styled, multi-story 20th century residence is situated in Old Town. The original house dates back to the 1800’s. Over the years, subsequent owners have made renovation, the most recent being about 1904, when carved gargoyles, Gothic turrets, exotic woodwork and other ornate features were added. Additions by an Italian architect evoked Roman, Gothic, Renaissance, and Manueline styles. Located within the park is the palace and chapel, and a luxurious park with walkways, lakes, grottoes, wells, benches, statues, and fountains.
The Quinta da Regaleria palace and stature gardens.
The true wonder of the Quinta da Regaleria are the grounds, which were inspired by the owner’s mystic ideologies. Hidden within the grounds are references to the Knights Templar, the Masons, and dark alchemy. The well, one of the strangest features, has a concealed circular passageway that descends 88 ft. downward, then connects to a series of tunnels that run the length of the garden. The well symbolizes the initiation ceremony for the Knights Templar. As you walk through the gardens, you’re also awarded occasional glimpses of the Moorish Castle and Pena Palace high up on the mountain above you.
I’d packed all three sights into one day, so my feet were happy to settle into a comfy booth at one of downtown Sintra’s cafes! Shortly thereafter, I returned to the villa, and enjoyed a quiet nights’ sleep.
Ken has always loved to travel, so when he made a common connection with the fact that either a long day pounding the streets of some foreign city, or shooting the last dance at a wedding, a good part of his physical weariness came from lugging around his big heavy DSLR. That’s when he started looking at alternatives – and ended up selecting Panasonic Lumix Micro Four Thirds gear.
Ken is rarely without a camera, and the next great photo travel experience – whether local or abroad – is always in the back of his mind! A longtime resident of the Four Corners, and when he’s not out on the road, he enjoys some of the great outdoor opportunities found there – mountain biking, hiking, and Jeeping.
Not quite ‘nectar of the gods’ but I’ve found some serious joy in my morning coffee. It was a gradual process to see the pleasure I now have in the morning ritual and enjoyment of grinding beans, brewing and enjoying coffee.
Java Presse Coffee image square format final crop
It started with some friends showing the benefits of grinding beans for French Press coffee. Good stuff.
I found myself getting frustrated with the ‘static cling’ that was generated by using an electric grinder that had a plastic bin for catching the grounds and left little trails of tiny grounds scattered along the counter. This led to looking for a mill that had a stainless steel basket. Research showed that prices were more than I wanted to pay. Which turned out to be a good thing! Because that led me to the stainless steel coffee grinder from Java Presse.
The grinder led me to lots more information about the whole process of roasting coffee, the freshness of the beans and proper preparation for the French Press that I use. Thanks to Java Presse the entire experience has turned my morning coffee into an enjoyable ritual. And who knew that freshly roasted beans, ground fresh just before brewing could make such a difference.
I’m a coffee convert.
Photography Process
And, now on the photography section of the making of a commercial image of the product. You can see the final photo at the top of the post above. Below is how the photo was built.
Good, solid commercial images should look effortless and clean. It takes a bit more to achieve the look. I make this happen by creating several images with different lighting patterns which are later combined in Adobe Photoshop. This comes in handy for items that have different levels of reflectance such as the stainless steel of the grinder and coffee storage container as well as making sure logos are readable.
Note the harsh light patterns in the metal especially the one crossing through the logo on the grinder
Using a reflector I reshot the scene to give more pleasing light on the stainless steel, but now the reflections that give the image life are gone
See the difference between the two blended images. Logos are a much easier read, and there are highlights right where they are needed without distraction
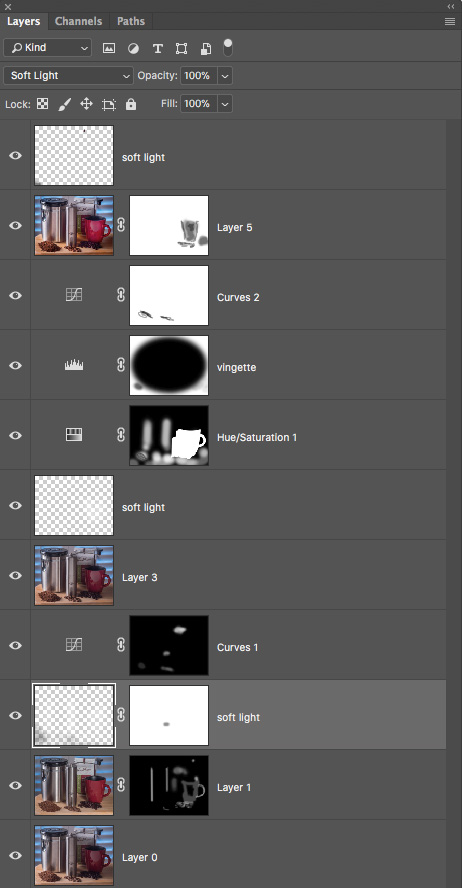
Photoshop Layers Palette is showing some of the work with Masks used to help create the final image.
I also used Skylum software (formerly MacPhun) software called Focus CK. CK stands for Creative Kit. It is a very handy sharpening and blurring tool for directing attention where you want. I often use the ‘Macro’ setting on its layer and mask in what I need.
It’s probably ten years ago I wrote my first post about giving back to the community. It’s such an important part of building your brand that it deserves to be at the very top of your priority list. As business picks up in the fourth quarter, you need to make sure you don’t lose sight of how much it can help you build your reputation.
Helping Hand Graphic – Bob Coates Photography
Years ago I had the opportunity to hearJay Conrad Levinsonspeak. Known best as the originator of the expression “Guerilla Marketing”, he talked about the top 100 things Guerilla Marketers need to do. At the very top of the list was “be involved in your community and charities”. Why? Because, people like to buy products from companies they perceive as giving back.
It’s cause-related marketing at its best and it helps build your brand beyond just being a photographer. Let’s face it, you’re looking for the community to be good to you. So, what are you doing to be good to your community?
Finding a charitable cause in your community couldn’t be easier, but you have to take the time. Just read the local paper. What’s going on in your community? If the school tax bill didn’t pass, then the arts are going to suffer, starting with the yearbook, photo club, newsletter etc. All, perfect matches for you to lend a hand as a professional photographer.
Is there an event coming up that might need your skills as a photojournalist? Everything from a walkathon to organizations like Kiwanis, Rotary, Lions and Exchange Club all have a major charity drive each year.
Check with your local hospital, police force, fire-fighters – they always need help and they always have an event they’re sponsoring. Then there are great organizations like Big Brother and Big Sister.
Within the photographic community, there’s NILMDTS (Now I Lay Me Down To Sleep), Thirst Relief, HeartsApart.org and the Josephine Herrick Project. These are just a handful of non-profits as examples. They all involve photographers and are dedicated to helping make the world a better place.
Although no longer serving let’s not forget PPA Charities, founded over fifteen years ago by Bert Behnke. I’m proud to have been one of the original members of the team along with Helen Yancy, Steve Troup, Dennis and Lori Craft, just to name a few.
Skip Cohen has been involved in the photographic industry his entire career and previously served as President of Rangefinder/WPPI and earlier, Hasselblad USA. He founded SkipCohenUniversity.com in 2013. Skip is a co-host for “Mind Your Own Business” and “Beyond Technique,” webcasts through Photofocus.com, writes for several publications including Shutter Magazine and is actively involved in several advisory boards for non-profit organizations.
I have a preference for ocean sounds after having lived in the Caribbean for 20 years but any water sounds are helpful with calming my mind. I spent about an hour on Oak Creek at Cathedral Rock capturing small moments of the creek experience. I took some time this morning editing the footage so that you can enjoy the experience as well.
The video is two minutes long and shows some of the different water patterns along this section of the creek.
I didn’t have myfull video kit with tripod and fluid head for proper zooming and panning. Did the best I could with a tiny little five-inch tripod that I keep with me in my shooting bag for just such an occasion. The occasion being I didn’t want to hike with the full tripod kit. With the light weight of Lumix gear, a small tripod can come in quite handy! The camera was Lumix G9 with the Leica DG Vario-ELMARIT Professional Lens, 12-60MM, F2.8-4.0 Lens. Sound was also recorded from the mic that is built in to the camera. Shot in 4K 24p mode.
I edited the footage with a screen capture program that is for MAC computers called ScreenFlow from TeleStream.
The video was captured in the middle of September when there is some monsoon water flow.
Ken is a traveling man and uses Lumix gear during his travels. Ken shares his travel photography and stories here on Successful-Photographer as he has in the past. Ken’s camera of choice is Panasonic’s flagship stills camera the Lumix G9 with the Leica DG Vario-ELMARIT Professional Lens, 12-60MM, F2.8-4.0
Take it away Ken
Situated 30 miles from Lisbon is a fairy-tale village named Sintra. Driving up from Lisbon on heavily forested, narrow and very twisty roads, I was shocked when the vibrantly colored Pena Place burst into view! I continued on to the quaint town of Sintra, where I’d reserved a villa, nestled in the cliffs, hundreds of feet below the palace. I was told the villa was once the king’s stables.
After a sumptious breakfast, I joined the parade of cars snaking up the mountainside to my first stop, the Palace of Pena. Situated atop a rocky peak, the palace has a commanding view of the surrounding valleys.
The rear of the palace, with views stretching all the way to the North Atlantic Ocean, on the horizon.
In 1838 King Ferdinand II acquired the former Hieronymite monastery of Our Lady of Pena. The original monastery buildings, consisting of the cloister and outbuildings, the chapel, the sacristy and the bell tower, were built in 1511. These buildings today form the northern section of the Palace of Pena, and are referred to as the Old Palace. King Ferdinand began making much needed repairs to the former monastery, and replaced the fourteen cells used by the monks with larger rooms with vaulted ceilings. About 1843 the King decided to enlarge the palace, and built a new wing with even larger rooms. This section is known as the New Palace.
In transforming the former monastery, the King was likely influenced and inspired by German romanticism found in the castles along the Rhine. When building on the New Palace was completed about 1865, the King began planting gardens surrounding the palace. With winding paths, stone benches, and pavilions at different points along its routes, the King copied the romantic gardens of that time. He also planted over 500 different species of trees, and plants originating from different points around the globe.
The one way tour circuit through the palace is self paced, generally ambling along at a relaxed speed. You see both the Old and New Palace wings, visit the living quarters of the King, their eating area, day rooms, the Great Room, and end up exiting through the kitchen. With original and period glassware, pottery, and furniture throughout the palace, you’ll have a chance to see how life was carried on by royalty of the 1800’s! The Palace of Pena was designated a National Monument in 1910, and classified a UNESCO World Heritage site in 1995.
Ken has always loved to travel, so when he made a common connection with the fact that either a long day pounding the streets of some foreign city, or shooting the last dance at a wedding, a good part of his physical weariness came from lugging around his big heavy DSLR. That’s when he started looking at alternatives – and ended up selecting Panasonic Lumix Micro Four Thirds gear.
Ken is rarely without a camera, and the next great photo travel experience – whether local or abroad – is always in the back of his mind! A longtime resident of the Four Corners, and when he’s not out on the road, he enjoys some of the great outdoor opportunities found there – mountain biking, hiking, and Jeeping.
The Making of
Sound Bites Grill Hall of Fame Image
I’ve often been asked how I create the art images for the Sound Bites Grill Hall of Fame. Thought I might share the process here from start to finish.
Finished Hall of Fame image with Gaelle Buswell and her band members
First, I make photos from the show during the live performance. This is a bit easier said than done as performers are moving in and out of the light, have strange expressions when they reach for THAT note, etc. I need to watch and learn as each performer works and then make sure I’ve gotten enough source material on all the band members.
Then it’s time to download all the images and begin the culling process. Lots of images get thrown away on the first pass. Then I’ll go back through to look for the selects. Those are the photos that have the body position, expression and look I am going for in the final art piece.
The individuals are extracted from their photo and placed upon their own layer so effects such as drop shadows and lighting can be applied individually. Then it’s time to start working on combining all the elements of people, texture, drop shadows, color adjustments and more.
Animated Gif of the various Layers
Above is a Gif showing most of the Layers made in Photoshop to give you an idea of how the pieces work together during the build. Below is a screen capture of the Layers Palette in Photoshop.
Layers Palette of the Gaelle Hall of Fame image
I’m thrilled with the dynamic range of the Lumix Micro 4/3rds camera gear. The camera is Lumix G9 Panasonic’s stills flagship model with the LUMIX G X VARIO LENS, 35-100MM, F2.8 ASPH
Waiting for Your Ship to Come In
Marketing Monday with Skip Cohen
I’ve used this quote by Ross Perot in other posts, because it’s so relevant.
“Most people give up just when they’re about to achieve success. They quit on the one-yard line. They give up at the last minute of the game, one foot from a winning touchdown.
If I ask a group of photographers about advertising, somebody will always say, “We tried it once, but it didn’t work!” Ask some people about trying some different lenses or shooting wide open for a different look and you’ll hear almost the same, “I’ve tried it, but my clients like the look I have!” Ask them to move the lights in the studio, the ones that are put in the same spot every day on the masking tape on the floor, and you’ll get almost the same response.
Well, what if those photographers are all standing on Ross Perot’s one yard line? What if they just needed to run that ad a few more times for people to contact them? What if they only needed a little more patience?
Trust me, I know it’s tough waiting for your ship to come in. But I’ve seen so many photographers who were able to stay focused, stay aggressive in their marketing efforts and believe in themselves and things did come together.
It’s all about taking action, being patient and not giving up. And since Ross Perot put me on the one yard line, might as well stay with a football theme and give Vince Lombardi the spotlight:
“It’s easy to have faith in yourself and have discipline when you’re a winner, when you’re number one. What you’ve got to have is faith and discipline when you’re not yet a winner!”
Skip Cohen has been involved in the photographic industry his entire career and previously served as President of Rangefinder/WPPI and earlier, Hasselblad USA. He founded SkipCohenUniversity.com in 2013. Skip is a co-host for “Mind Your Own Business” and “Beyond Technique,” webcasts through Photofocus.com, writes for several publications including Shutter Magazine and is actively involved in several advisory boards for non-profit organizations.
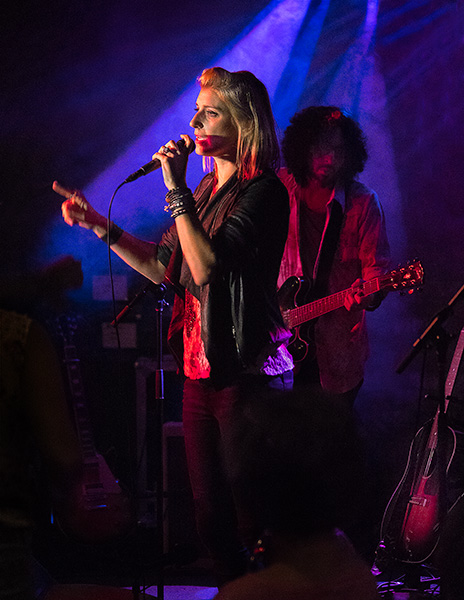
First I want to say what a great show it was at Sound Bites Grillin Sedona, AZ. I photograph musicians at this venue on a regular basis, and it’s a great space. Gaelle is from France, and she brought her A game with her for the performance. I look forward to a return engagement should it happen to come this way.
Gaelle Buswell Live on stage at Sound Bites
Photographing a Live Performance
I want to talk to you about capturing images from a live performance. In the studio, you have control of the lighting, posing, and expression of your subject. Not so much when the performers are live on stage. The lighting is what the lighting is, and while it was set for a specific place on stage, the entertainers often are moving in and out of the preset light pattern. Expressions can be all over the place with closed eyes, weird mouth positions, and strange body positions. To get the best captures that are flattering to the subject you need to study the movements of the performer before beginning to photograph. If you do this, you will start to notice what type of body language will happen with certain kinds of songs. When does the performer close their eyes? And better yet when will they be open? Where is the light best? The study will get you more and better images than if you just start firing away.
Processing the Files
Once you have the capture, it’s time to finesse it in post-processing. There are always improvements to be made. Control of the highlight and shadows. Getting the best color for the situation can be a bit of work because of the LED lighting not having a full spectrum. This can give some bizarre color tones on the skin, and even if everything else is excellent, an unflattering skin tone can kill a shot. Many times I will double process an image and combine. One copy is prepared for the background and the other for the skin tones. Using Layer in Photoshop and adding Masks allow complete control.
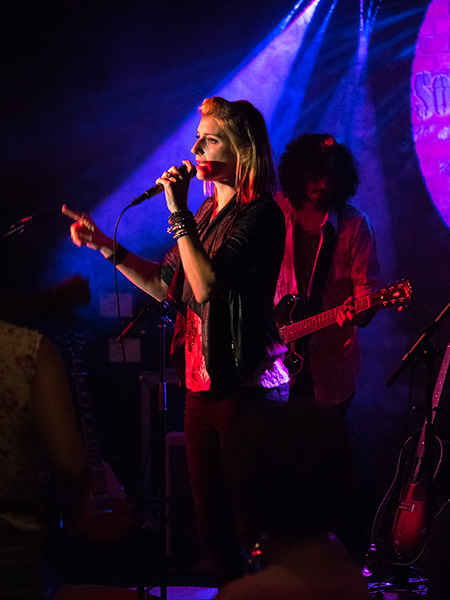
Original image of Gaelle after ACR Process and before tweaks
You can compare the image above with the photo on the top of this post. You will see with a little dodging and burning along with a tiny bit of cloning there are fewer distractions from the performer. Let me know if you can see what the differences are. There are five.
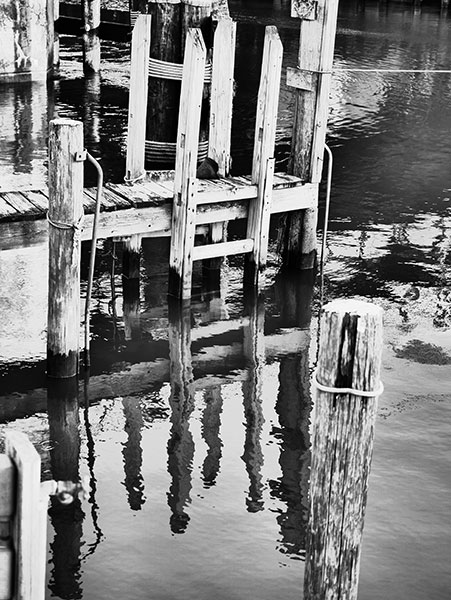
Black and White
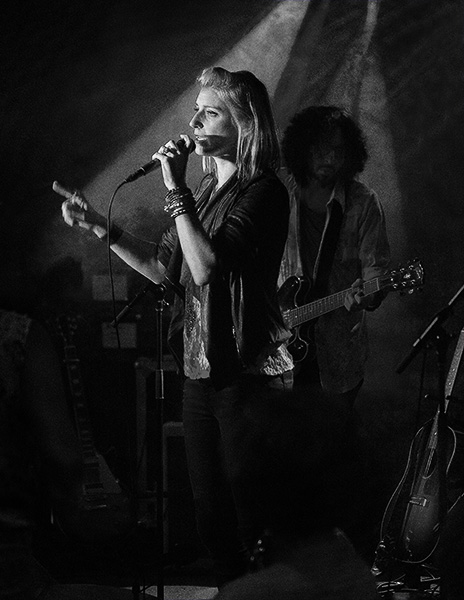
I always process out my images to black and white. One is for my clients use in PR situations. Providing BW images will lead to better quality in print, especially newspapers rather than letting the Paper just do a desaturation. The other reason is viewing a black and white image tells you if your tonal values are on because you are not distracted by the color.
Gaelle in black and white
Camera Gear
As always I am using Lumix Micro 4/3rds camera gear. The camera is Lumix G9 with the LUMIX G X VARIO LENS, 35-100MM, F2.8 ASPH Instead of using the Leica f2.8-4.0 12-60mm when I am shooting in scenes with this much contrast and moving performers I want the speed and control f2.8 of the fixed aperture lens.
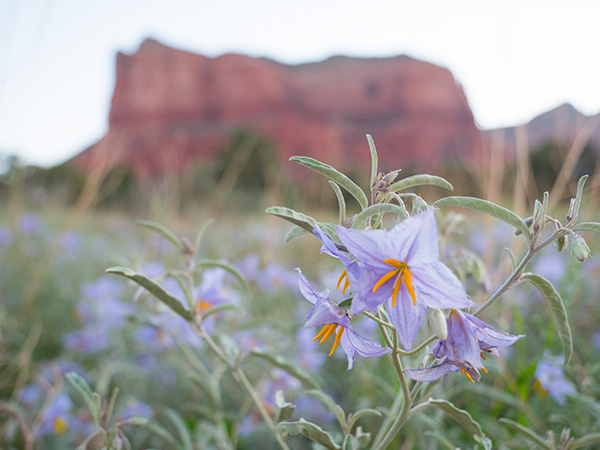
Interpreting the Red Rocks – Juuuust a Little Different
If you have followed this blog and my work for any length of time you know that I often like to take my images further than a ‘straight’ photograph. I have found a weird thing while working on this process. There are times to get a certain look you need to make what I would normally consider a ‘bad’ photograph. One that is either under or overexposed to create the vision in your using certain textures.
Here’s a case in point. The density range for this image was huge in that I was shooting the flower in the shade and the background was in full sun. I originally bracketed this scene to get a ‘correct’ exposure. I processed that, but when I went to work, I found that I had better results with the image that was a single exposure rather than having all the detail that Aurora HDR 2018 software would provide.
Here is one of the bracketed images slightly over-exposed. Little to no detail in the sky.
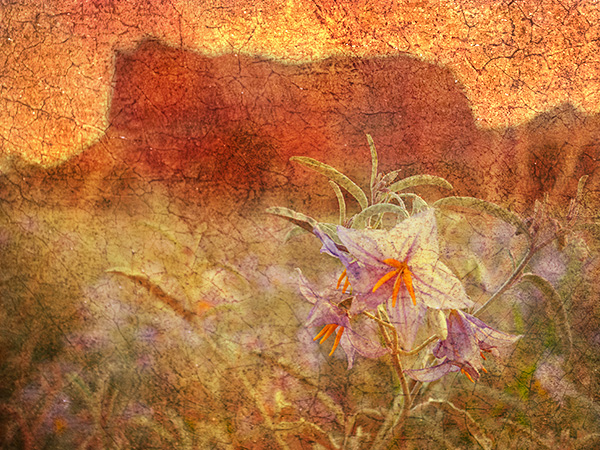
The little to no detail in the sky gives the texture a chance to shine. I used texture from a small section of an old painting in various blend modes to achieve the image below.
Here is my artistic rendition of the image.
I think the plain image needed some help other than making a full range of tones visible. I work photos in many different ways before I find the vision for which I was looking.
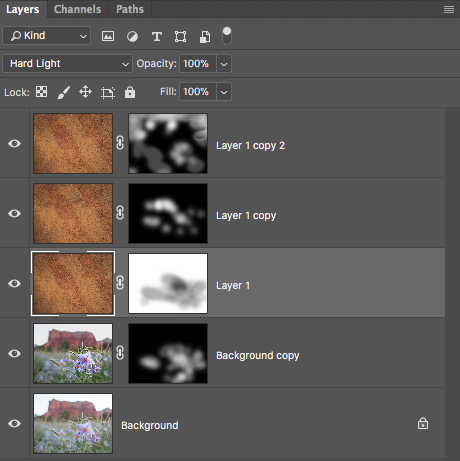
Here is thePhotoshop Layers Palette from the image above. Note: all Layers had a different blend mode applied and Masks were used to extract or cover the information I did or didn’t want.
Lumix G9 with the Leica DG Vario-ELMARIT Professional Lens, 12-60MM, F2.8-4.0 was used for this capture. The fully articulating screen is helpful when framing an image where the camera is low to the ground. Saves getting down to try and look through the viewfinder and also save work in the laundry for clothes that have been doused in dirt!
For infrared conversion of my cameras I use LifePixel. Infrared allows you to put an older camera to use and opens up a new time time of day for productive image creation.
Learn Photoshop in a fun environment. Aaron Nace applies the right amount of fun with easy to understand and follow tutorials. Actions and brushes are included with lessons!
Best embroidery ever. Give Queensboro a try, get a $20 instant credit to get started by clicking on the logo! They specialize in great quality custom logo apparel and promotional products with the best customer service.
Platypod has become a great resource for being creative in getting your camera gear easily into unusual places. As an Platypod Pro I get to work/play with the gear even before it comes out. Head over to Platypod, subscribe to the newsletter and you will get special discounts reserved only for subscribers.

 “Commitment is what transforms a promise into reality. It is the words that speak boldly of your intentions. And the actions which speak louder than the words.