In a previous post I showed you a finished time lapse video captured from the parking lot of Mariposa Restaurant in Sedona overlooking the red rocks after having lunch there last Sunday afternoon. While having a great lunch we were watching the clouds clear after a bit of weather. And you guessed it, I had to run home and grab my gear. Today I’d like to share some ideas on what settings to look at when thinking about creating your own time lapses.
Depending on your scene and how long you would like to cover it you should decide the space between your image captures. Math comes in handy here and you will start to have an idea of your settings almost by instinct. For example, depending upon the speed of moving clouds I’ve found the interval that works for me is between three & five seconds. The rate that the images should be played back is between 12-24 frames per second. The time lapse in the previous post covered a period of about 40 minutes with 3 second intervals and 24 fps. This translated into a video that was about 35 seconds long. Now not being a fan of that much math here is a calculator that will help you figure things out including how much memory you will need to have in your camera to complete your session.
Time Lapse Calculator
Time Lapse Calculator from PhotoPills. You can download your own for your web site or get the App to calculate while on site. Try it right here you’ll like it!
Lumix Time Lapse Processing Features
A great feature in the Lumix cameras like the GX8 used to capture this time lapse is the ability to process the video in camera choosing from a large number of settings in quality and frame rate. When calculating how much memory you need to have on your card remember you’ll need room to process and store the final video as well. I processed out the video using the 4K setting. 4K is four times bigger than HD video which means you can place it in an HD timeline then have room to pan and zoom which adds a lot to the final product. There are many programs you can use but I used Adobe Premiere Pro CC.
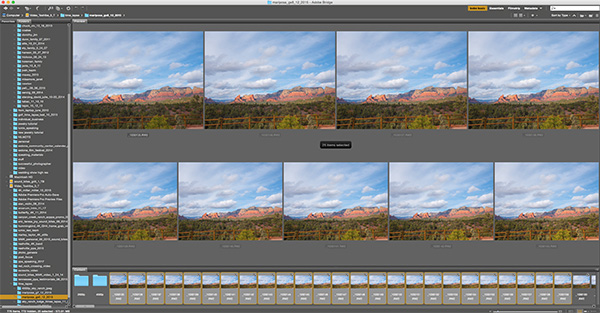
Screen Capture of still files in Adobe Bridge.
I shoot in RAW so I can process the original files for stills or for color tweaking if necessary. Then process out the files into jpegs and use a free program such as Time Lapse Assembler to put your video together. (link for MAC for link for PC. There are plenty of free or freeware programs to choose from. Find the one you like.
Time Lapse Assembler window. I like it because it’s pretty simple and straightforward!
Shoot longer than you think is necessary. The first couple times out my time lapses were only seven seconds which was a little disappointing. Use the calculator above to save yourself some heartache.
As you can probably tell by my lack of posting the last few days it has been extremely busy in bob’s world. Had a full two day shoot for the Sky Ranch Lodge after their remodel. I’ll share some photos with you as soon as the processing is done along with some of the techniques I used to get the images.
In the meantime, I did have a chance to process another image from my infrared photography. I really enjoy black and white images and the infrared adds another whole new dimension to it. I converted my Lumix G6 through LifePixel with a 750 NM (standard) IR filter. This gives you images that are on the pink side and of course need some processing to get them into final shape of Infrared BW images. As I practice and process more I am able to get a better range of tones throughout the photo.
Captured in the Village of Oak Creek, Sedona, AZ. Courthouse Butte is the main rock formation.
Here’s the IR image Straight out of Camera Note the pink cast. Finding I need to underexpose a bit in order to not loose highlights even though the histogram indicates it is with the scope. You have to remember that the histogram is letting you know about visible light not necessarily infrared exposure.
One of the really great things about having a dedicated IR camera is the ability to set recording for RAW + jpeg and have both images to work from in post production. If you shoot only in RAW you don’t get the processing from the camera. I set the camera to capture BW images so I can get a ballpark preview of the scene as I work.
You don’t need to convert a camera to IR you can always go ‘old school’ with a Wratten IR filter in front of your lens. The problem with doing that is your exposure time will be lengthy and focus can be a bit of a pain as IR light rays and visible light focus at a different depth on the sensor so additional calculations need to be made. (although the extended time might be cool for capturing cloud movement!) Might have to pick up an IR filter myself too…
Best part is infrared photography really opens up the mid-day time slot for creatively capturing images as it is usually too much contrast for regular photography.
Time lapse videos are very popular these days and they are now easier to create than ever…
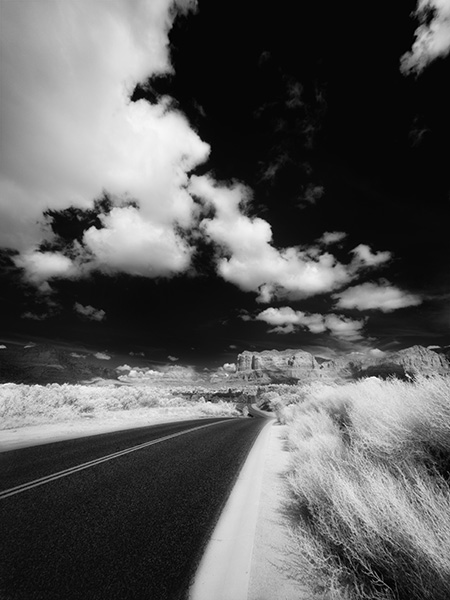
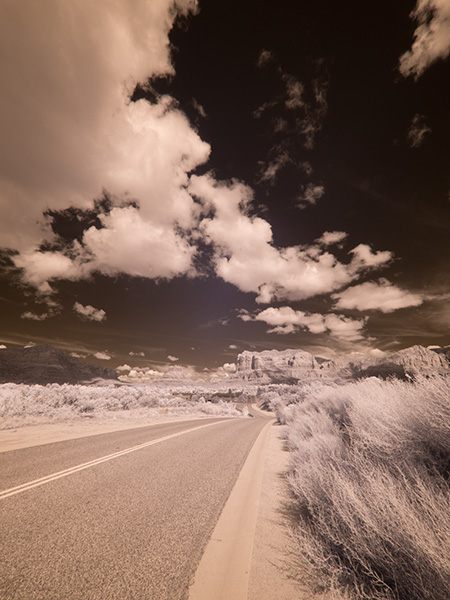
I took new Lumix G7 out for a time-lapse spin. The clouds were streaming over the red rocks with an azure blue sky as an accent. Camera was mounted with the Lumix Vario 12-35mm f2.8. Settings were – time lapse with a three second interval. There were 149 images captured. Inside track note – to save wear and tear on the camera’s shutter you can use the electronic shutter vs the mechanical shutter.
Then it’s to the playback menu on the G7. The Time Lapse setting allows you to choose quality and frame rate for the processing of the video. I choose 4K Video & twelve FPS for this video which came out to be about twelve seconds of finished. The camera tells you how long it will take to render and asks you if you would like it to process or not. When you say yes, a few minutes later there’s a video saved to your card (one note – make sure you have large cards time lapse and the video take up some card real estate)
The next piece of the puzzle is the appearance of camera movement while the Time Lapse is being made. That’s why I choose the 4K Quality setting when rendering the Time Lapse to a movie. I took the resulting movie file straight from the camera and put it int Adobe Premiere on a 1080 timeline. Since the video is four times the size of 1080 there is room to use a Ken Burns type effect to show camera movement. Love the possibilities this brings to mind!!
Thirty second G7 time lapse in the Village of Oak Creek in Sedona, Arizona
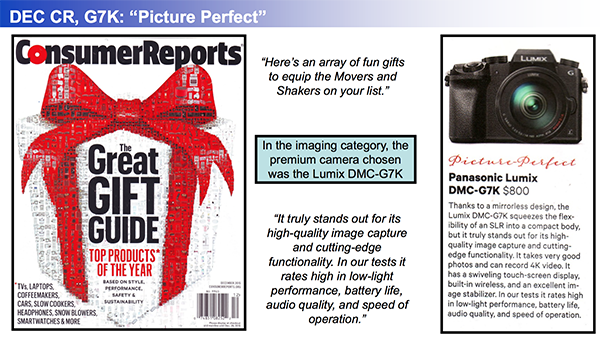
It’s pretty cool when you see others appreciate the tools with which you are working. Consumer Reports Holiday Gift Guide put the G7 on the list as one of the Top Products of the Year for gadgets and gifts.
G7 is listed as on of the Top Products of the Year
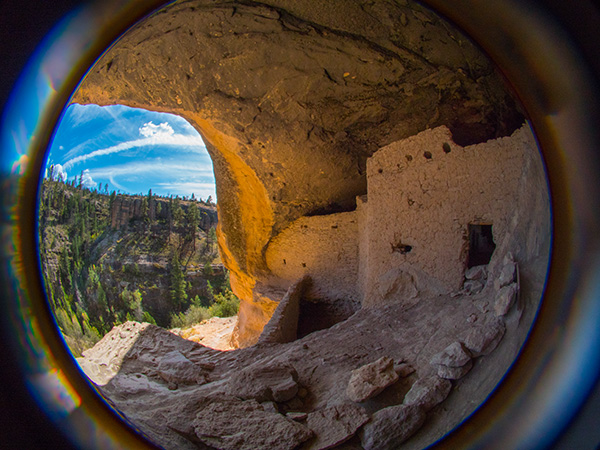
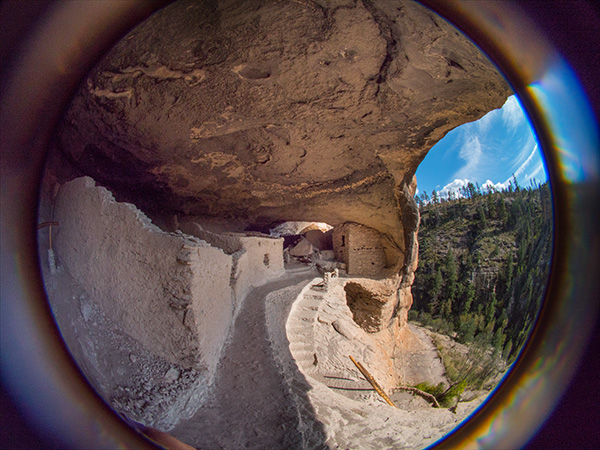
I got all the way up the hill to the cliff dwellings and realized I left the fisheye from Lens Baby in the car. Gotta tell you I almost didn’t go get it. I also gotta tell you it probably isn’t such a great idea to run 15 minutes up a steep hill at 7500+ feet. I was sucking some serious wind when I got back up to the top.
Annnnyy waayy… I thought I try some different things with the fisheye lens because of the relatively small spaces in the caves. Once I got my breath back I mounted it on the Lumix GX8 and here’s what I started to play with.
Here’s a ‘straight’ Circular Fisheye image from the dwellings. The full fisheye effect is a little cut-off because of the micro 4/3rds format.
Gila cliff dwellings photo captured in a different way with the Lens Baby
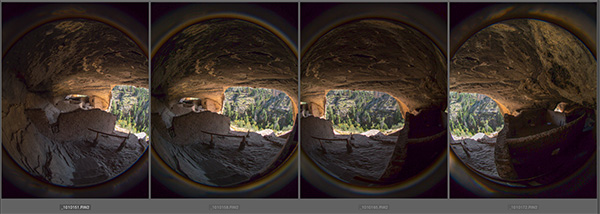
Then I thought I’d try to push the envelope a bit further an do a panorama. Here’s the individual captures…
And the stitched image… Don’t try to have Photoshop stitch this for you it locked up on me. I guess the circular edges gave it fits so I did the stitching the old fashioned way… by hand with masks.
I enjoy trying new and different things and was surprised by the final result.
While on the mountain trip we rode off through the wilderness. Can you say “Curvy Roads!” boys and girls?
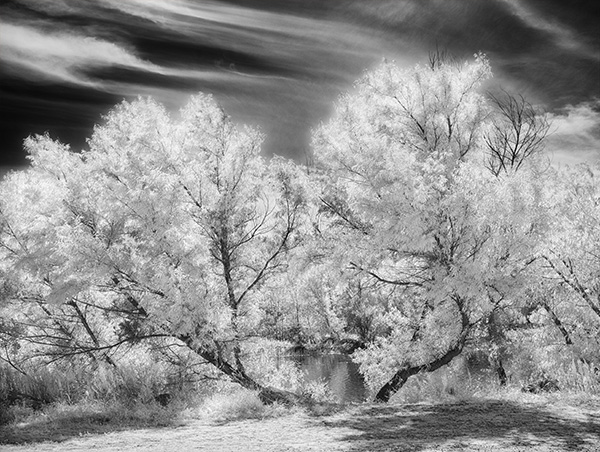
Lots of winding roads through the area but it led to some beautiful places. I had the Lumix G6 that has been converted to Infrared capture by LifePixel. It gives the image a pinkish cast straight out of the camera. I’m starting to find my groove in processing for the final Infrared photo look I am going for…
I enjoy how these trees framed a little window into the water beyond.
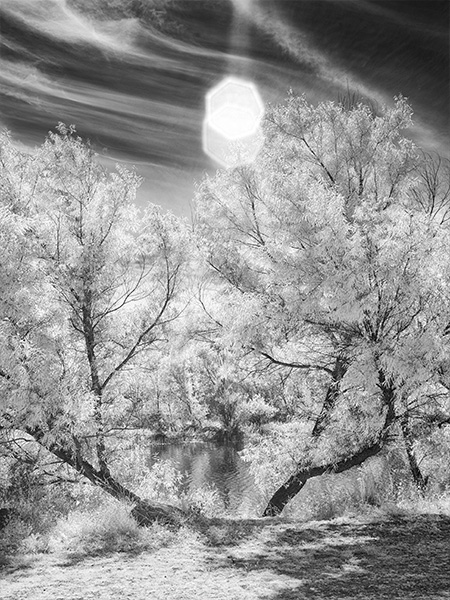
Same trees different composition with a witness to how careful you need to be in shielding your lens from a direct sun hit. Although in this case I think it’s a happy accident and enjoy the flare that found its way into the frame.
Here’s my workflow at the moment as I learn more how the camera ‘sees’ IR light. I capture the scene in RAW plus jpeg with the camera set to capture a black and white image. This give me a pretty good preview of what the IR image will look once it is processed. But since I am capturing the RAW images at the same time I also get all the information that was presented to and captured by the camera for tweaking in post processing. Having all the color information in different channels allows for some very specific processing that would not be available if only the Luminous information was saved.
In addition to the RAW plus jpeg I also bracket exposures. At the moment I am bracketing by seven stops to learn how far to over and/or under expose any particular scene.
Then I choose two of the separate RAW captures with one giving me the tones for the foliage and one for the sky. I process these in Adobe Camera RAW. Then using Masks I blend the two images together feathering the areas using the Brush Tool. I Save the file and merge all into a Layer on top preserving the Masked Layers just in case.
Then I take the file into NIK Silver FX Pro2 to process for Black and White because I still have the color information in the file I have more options for tweaking individual tones. Then I will process the color Layer one more time to vary specific areas even more. Then with the tow BW processed Layers I blend those together using Masks for the final tone blend. Then depending on the look I am going for I may process this Layer in NIK Color FX Pro4 using Glamour Glow and Mask those changes where necessary.
For infrared conversion of my cameras I use LifePixel. Infrared allows you to put an older camera to use and opens up a new time time of day for productive image creation.
Learn Photoshop in a fun environment. Aaron Nace applies the right amount of fun with easy to understand and follow tutorials. Actions and brushes are included with lessons!
Lightning, waterdroplets, sound, time-lapse, HDR sequences, smiles and much more control for your camera!
Cameras Get Smarter -
A High Speed Smart Camera Remote
Best embroidery ever. Give Queensboro a try, get a $20 instant credit to get started by clicking on the logo! They specialize in great quality custom logo apparel and promotional products with the best customer service.
Platypod has become a great resource for being creative in getting your camera gear easily into unusual places. As an Platypod Pro I get to work/play with the gear even before it comes out. Head over to Platypod, subscribe to the newsletter and you will get special discounts reserved only for subscribers.
 Screen Capture of still files in Adobe Bridge.
 Time Lapse Assembler window. I like it because it’s pretty simple and straightforward!