
by successfulbob | Lumix Lounge, Lumix LX100, photography, photography creativity, photography gear, photography lighting resources
Using a Mini-Scrim for Better Photos
A very simple way to control light is through the use of a scrim. For small subjects and objects, a regular 42-inch round scrim or super size scrims of 60 inches or more can be a bit of overkill for just mucking about. Westcott makes a wonderfully portable sized, five-in-one that is only twenty inches and when folded in it’s carrying case is a tiny eight inches for about twenty bucks.
Here’s a quick example using a neighbor’s cactus that was showing some attractive color blossoms. Look carefully at the difference between photos and I think you’ll see that learning to use a scrim can help get you better lighting in your images.
 This first image was captured with full sun as the light source. Colors are bright and you might think that this works. Look at the harsh, deep dark patches in the shadow with no detail. This is the same kind of look you will get if you use on-camera flash.
 In order to tame the harsh shadows, I next captured the blooms in full shadow. This results in slightly less contrast and the color has become muted. I suppose the color could be pumped up in post-production but the shadow are still a bit blocked up.
 Here a scrim was placed between the sun and subject. Even though the scrim is only twenty inches because of it’s close proximity to the flowers it is acting like a very large light source. Very nice overall light with soft shadows and color fidelity. All images were processed with the same settings straight out of the camera. (SOOC)
 A quick grab of the scrim in action. In addition, the kit comes with four other surfaces to reflect or block light in various intensities and colors. Black, gold, silver and white can all also be used to bend light to your will.
You can take this same lesson and apply it to larger subject such as people by using a larger scrim. Practice with it and you will find the larger the scrim and the distance it is to your subject you will be able to control the shadow edge transitions and depth of the shadow on your subject. Moving it further away while still covering your subject will give you slightly stronger shadows. Conversely, the scrim closer will make the light softer.
 Sometimes you just gotta play! NIK filters, Photoshop extraction’ Layers and the Transform Tool.
These photos were captured with the Lumix LX100 the camera I call the ‘Pro’s Point & Shoot.’ A solid little performer built on a magnesium frame for about $700.
Yours in Creative Photography, Bob
Save
Save
Save

by successfulbob | landscape photography, Lumix G7, Lumix Lounge, photography, photography gear
Aerial Photography
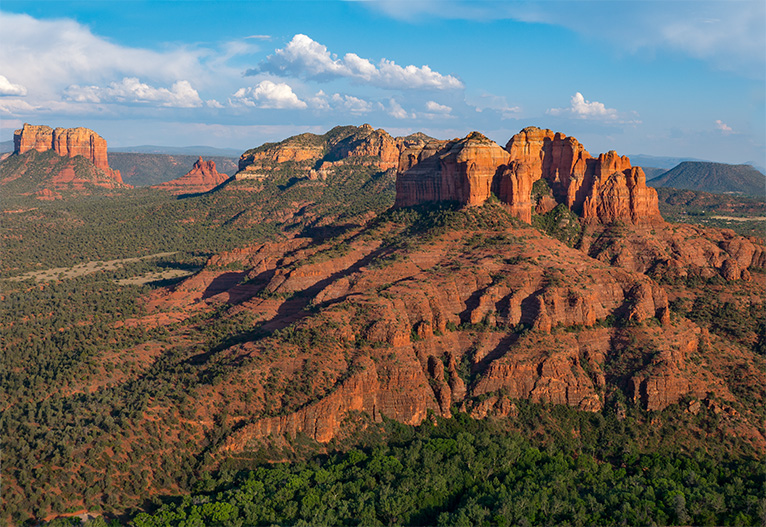
I have been fortunate to live in places with some spectacular scenery and would probably have a hard time living in an urban environment or someplace dull and flat. Sedona, Arizona is the gorgeous place I now get to call home. Red rock vistas and a dry climate that showers us with sunshine two hundred seventy-eight to three hundred days per year.
And, after residing here seventeen years, I still find different ways to view the majestic red rocks thanks to visitors spurring me on. Some visiting friends asked if a helicopter tour would be worth a go and would I be interested in joining them? I said, “Yes indeed!” I was surprised I hadn’t thought to fly the skies with my camera in all that time.
 Sedona’s famous Cathedral Rock from the air.
Lumix G7 with 12-35 f2.8 Vario G lens @f5.6 1/400 sec. 12mm (24mm FF equivalent) ISO 200
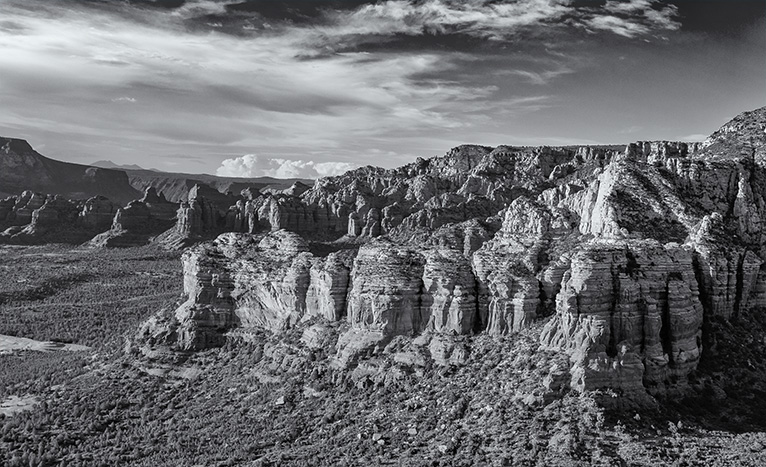 More Red Rock formations. Same gear as above. @5.0 1/400th sec, 19mm (38mm FF equivalent)
Processed in NIK Silver FX Pro2 (available free from Google)
Cathedral Rock is one of the state’s most photographed destinations. I know that I have photographed it on numerous occasions, but never from the air. An artistic rendition of Cathedral Rock was one of my first Merit images in Professional Photographers of America image competition.
Let’s talk about photographing from the air.
I have done photography in the past from the air, but it was always a charter flight where I was calling the shots for the position of the helicopter or plane and the possibility of staying on station or revisiting until I had the shot. With that kind of luxury, there was time to check settings of the camera ensuring they were correct. This flight was going to be a horse of a different color. A sightseeing tour lasting 17 minutes and no do-overs.
I thought about the new technology I have access to in the Lumix cameras and decided to place my trust in it. I’ve talked about this setting once or twice before. It’s called Intelligent Auto. I jokingly refer to it as the ‘Honey, stop the car!’ setting. It calculates the f-stop, shutter speed, and ISO. I have always used it sparingly as I want to make the decisions that control the final look of the image. In this case with no time to devote to changing settings I decided I would concentrate on framing and composition and see how well the camera would do. Shot in RAW to have more latitude to cover exposure but the SOOC files were pretty darn good.
After looking at the metadata for exposure settings (see above) I was surprised to note that the camera had automatically recognized the scene as a landscape and set the camera for ‘Landscape Mode’ – “For landscape photos with background in focus.”
Once again I was pleasantly surprised. Shutter speed was high enough to freeze the scene in spite of the helicopter’s vibration and motion. Exposure was solid for the scene. All-in-all it’s a winner. If this were a commercial shoot for a paying client, I would be working this entirely different but this is a great help in quickly changing situations.
Thinking about visiting Sedona? Check out http://www.sedonaairtours.com for your aerial view of the red rocks. really enjoyed my experience with Sedona Air Tours. They work together as a great team!
Learn more about other attractions in Sedona at the Visit Sedona website.
Yours in Creative Photography, Bob
Save
Save
Save
Save
by successfulbob | black & white, landscape photography, Lumix G7, Lumix Lounge, photography
Photographing Cathedral Rock in Sedona, Arizona
Sometimes you just gotta change your thought pattern to get a better photo.
I was with fellow photographer Ralph Romaguera and his wife Cindy who were on a Route 66 road trip. They stopped by in Sedona as we are just down the road a piece for the Route 66 run. We shared a couple of meals and went out to shoot for a little while. Ralph has been using the Lumix GH4 and wanted to see if I had a few insider tips for best practices in using it. It turns out I could share a few ideas.
Today’s cameras from Panasonic are a bit more like computers with a lens than just a camera.
We talked about the ability of the camera to capture multiple exposures of a scene with just a quick twist of the dial. Many times, especially with landscapes, the dynamic range can be so large the only way to capture detail in the highlight and shadow areas is to use multiple exposures and blend them in post-production.
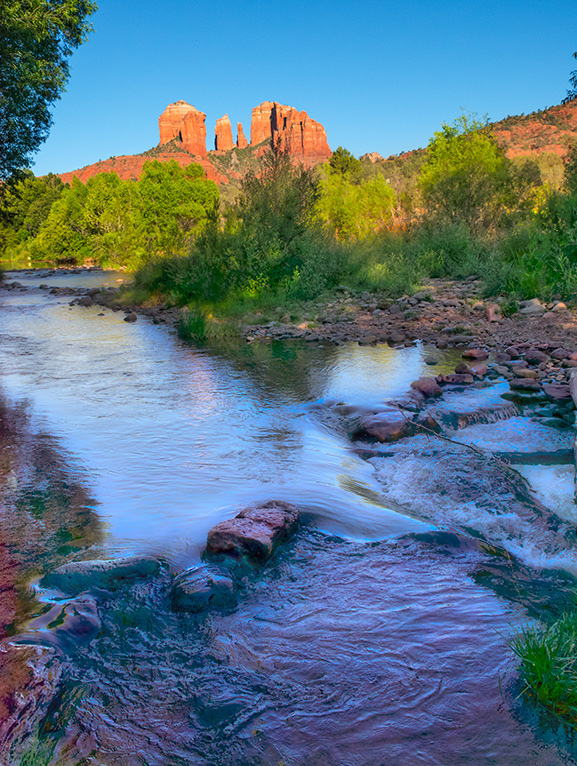 Multiple exposures were obtained to ensure proper detail in shadow areas as well as full sun. Images were processed in Aurora HDR software from MacPhun. Image captured with the GH4’s little brother the Lumix G7.
I usually don’t like how HDR blends skies into leaves or horizons as it tends to leave a bit of a halo. I process another image straight from Photoshop into the HDR software generated image to make the transition clean. Accomplished with an extra layer and layer mask.
Using the touch screen and choosing the exact position of your focus point is extremely handy. You can set the camera to a Mode called Intelligent Auto. With this setting, the camera sets the Aperture, Shutter Speed, and ISO. It provides an amazingly good solid exposure for the scene before it. Am I going to use that all the time? Heck no. But, I leave my cameras set to this mode when I am traveling around. I jokingly call it the ‘Honey, stop the car!’ Mode. It allows you to capture a scene instantly. Then, if the animal or whatever is still available, then I’ll move to one of the other modes to take more control of the final exposure.
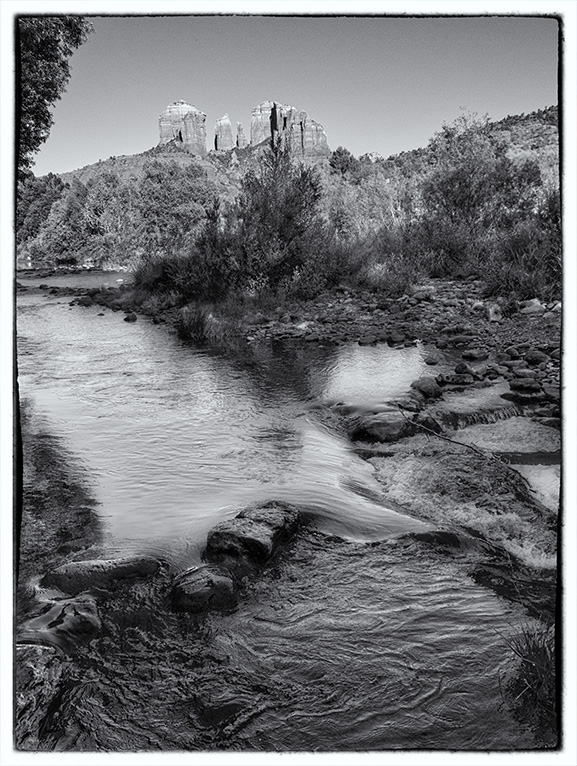
 For an entirely different look here’s a black & white version converted in NIK Silver FX Pro 2 toned to selenium with a border added.
Al in all there’s a significant number of features to help you get the photo and/or video you are trying to capture in the GH4 and the G7. It nice to have photographers come from out of town for a visit that gives you a push to get out and shoot.
Yours in Creative Photography, Bob
“ The G7 makes an excellent camera for someone to grow into, offering all the key features a developing photographer would need access to. It offers some of the best tracking AF we’ve seen on any camera in this class. Video is the camera’s trump card, with the ability to capture high-res video giving all sorts of flexibility, whether you downsize back to 1080p, use it for selective cropping as you edit, or extract 4K stills of the decisive moment. ”
Save
by successfulbob | photography, photography - art quote, photography education
Sunday Photo/Art Quote – Charles Maring
Met Chuck at a WPPI convention quite some years ago.
Impressed I was then. And even more-so now. He has grown and pushed his skills in tremendous ways. He has been at the forefront of creativity, and I have enjoyed watching his growth. He has leveraged technology to improve his photo and art imagery and expanded his skill set to include video production to rival pro houses. He is a great marketing person; I think you should take a look at the Maring’s website. Notice the plural. I would be remiss in not mentioning the Chuck is part of a team. As they say behind every successful man, there’s a strong woman. His wife Jennifer fulfills that role exceptionally well.
Can you tell I’m a fan of the Marings?
Here’s the quote that I grabbed from his art website that led to today’s post.
 “The ability to observe and capture truth with eloquence is an art form that takes instinct. However, even instinct can be honed, and when the experience solidifies one’s sixth sense, it becomes intuition.” Charles Maring This quote continues
I often reference practicing your skills here on Successful-Photographer along with not being afraid to fail as that is one of the strongest ways to learn. I believe what Chuck is referring to in his quote is the ability to push and practice and study until you move to the place where your mind is working so well that you almost don’t even know all the thought that went into the creation of an image.
I’ll ask, to remind you once again, how much have you practiced this week? How much have you studied? Have you pushed enough to make your thought process in creating imagery intuitive?
If the answer is no, time to get on the stick.
Yours in creative Photography, Bob

by successfulbob | Lumix GH4, Lumix Lounge, photography, photography education, photography lighting resources
Lessons from a Personal Photo Project – Strawberry Lesson
“You can’t always get what you want, But if you try sometimes, you get what you need!” Rolling Stones
I am always trying new things for art, for practice or just to see if I can do it to add to my photo skill set. Yesterday I found (what I thought was) a beautiful looking strawberry and decided to see if I could create some art with it.
I was not successful in creating art.
I learned several things, so I consider the shoot a success!
 Strawberry image after a little play in Adobe Photoshop to clean up some of the bruises that presented themselves as the shoot progressed.
Image created with Lumix GH4 and the 45mm Macro Elmerit Lens
I placed the light behind and camera left which created the highlight. The camera right side of the strawberry was lit with a reflection of my hand curved into a cup to wrap the light around the top of the fruit. (note the slightly warmer color because of the skin tone)
• When photographing food with a macro lens any, and I mean any imperfections will be revealed. Lesson learned for future – when photographing food, especially perishables examination of the object should be carried out with a magnifying glass. Even if you think you have the hero make sure there is plenty of other possibilities cause as the set heats up with lights the fruit will reveal more and more imperfections from picking, packaging and handling.
• In a low light situation, I learned that my hand could be used as a shaped reflector.
• Playing with the white balance on the camera and the Fiilex P100 (AKA the Brick) color adjustable LED light can lead to some very interesting different rendering of the subject.
I now have more information about photographing food in case that comes my way.
Yours in Creative Photography, Bob
PS – As I was writing this post I think I may have found a way to process this strawberry into some art… Back to Photoshop for some more PLAY!
