I spent last week in Addison Texas attending Texas School. This was my first time at this week-long orgy of photography education. It is intense. You spend a week with a single instructor getting a deep dive into their techniques in creativity. It was a blast.
The class I choose to attend was with Richard Sturdivant. (Check out Richard’s work and his tool shop) Sturdevant brings an artist and graphic design background to create composite images that transcend photography. To say I learned a lot would be an understatement. Richard’s use of tools in Photoshop is an eye-opening experience. New tools. New techniques. New ways of looking at the world to enhance reality into fantasy with a hyper-realistic look.
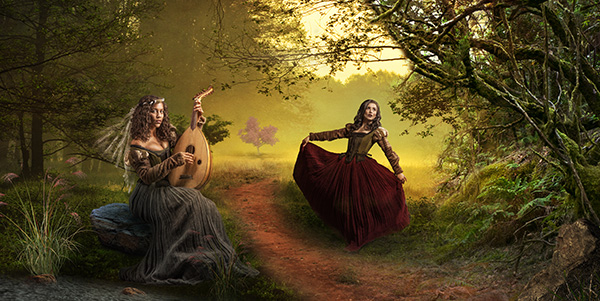
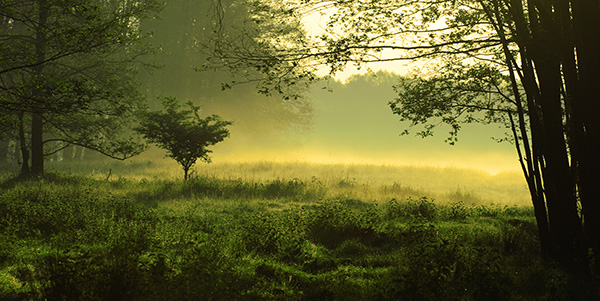
Here is an example of one of the projects which the class worked on.
My finished piece from the class project.
A photo session was shown using MoLights which can change the way you photograph subjects that have movement. A post will follow specifically about that. In the photo session, the model was asked to perform, and these lights fired as fast as the camera could fire. With my Lumix G9 that means twelve frames per second. NO misses!
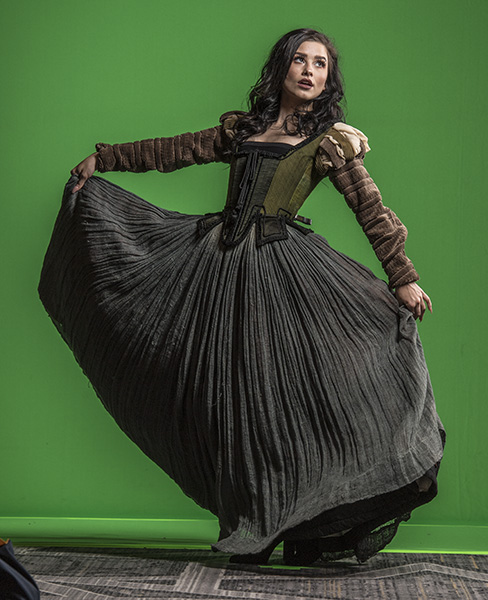
Photos were made of a couple of models in a period dress, and stock files were shared. Each student worked with the images with a base of instruction but each finished piece produced was different. It’s kinda like when you give ten photographers the same subject, and you’ll end up with ten different interpretations.
Below see some of the working pieces from the project. There were tons more, but you get the idea.
Look at the final image and see how many elements were added from the image directly above.
Sedona on-air personality Tom Taback and Bob Coates (That’s me!) recording a program for later playback
Twenty minutes of conversation with Tom about photography, cameras, my recent travels teaching, and art. Tech Talk is on KAZM radio Wednesdays. I had the opportunity to share ideas about new technology in photography. Fun show! Listen now.
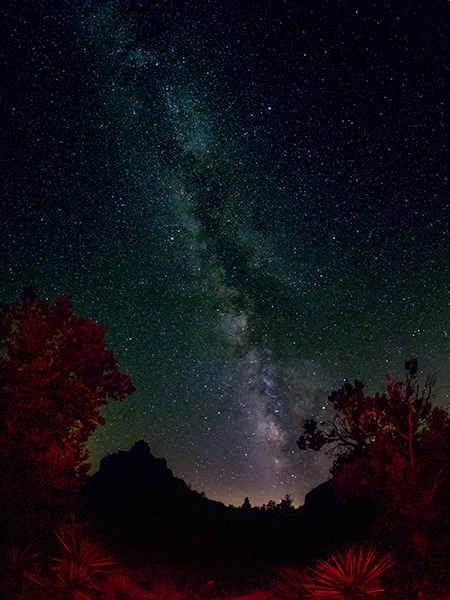
I was always a little hesitant about photographing the sky after dark. Never could quite make it work out. Either the focus was off, or exposures were wrong, or both!
Then it came time for me to start working on those captures as I was jealous of those who were killing it in the night sky photography showing incredible renditions of the Milky Way.
If you have had the same problems let me share some of the things that have made a difference for me.
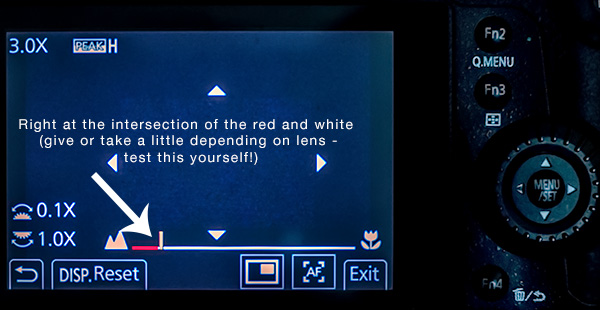
The focus was often a problem for me. Couldn’t quite get the hang of not being able to see my subject in the dark. Either the foreground was out of focus, or the stars were less than stellar until I put in the time and did some serious testing. Using Panasonic’s Lumix cameras has given me a perfect way to set focus and know I am going to get solid detail throughout the image. It’s quite simple and no need to be on scene before dark to get focus. Yay! See the capture of the back of the camera below.
Camera back of the GH5 showing the Manual – Mode focus screen
To get this view set your camera or lens to manual focus mode and touch the focus ring. The assist will give a small 10X magnified view. You won’t need this. Bring your attention to the bar across the bottom. There is a white line that goes from macro to mountain. Just before it gets to the mountain you’ll see a red bar. That’s the sweet spot. Set your focus right in the notch between the red and white portions of the stripe. Done! Test this for yourself.
The other important piece of the puzzle is to use the fastest lens available. Having a very wide aperture allows the sensor to be exposed to the most light allowing for lower ISO settings.
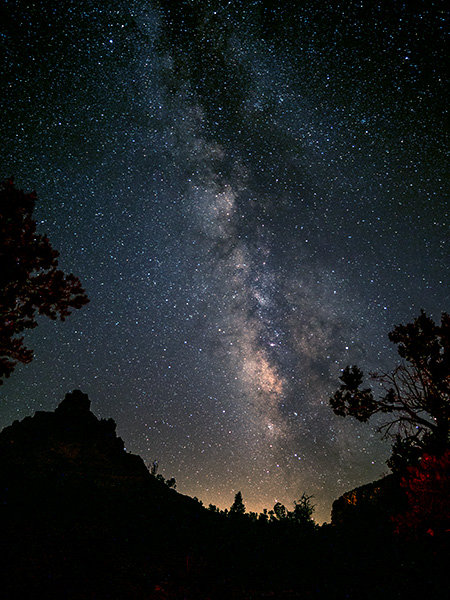
Bell Rock in silhouette to the left with the Milky Way, Sedona, AZ with 12mm Leica DG Summilux f1.4 lens
Images were captured with the Lumix GH5 camera. Lenses listed above.
In another post I’ll share some ideas on post, processing using Adobe’s Photoshop to get the most out of your captures.
The other day I showed you the set for photographing items in the studio with a beautiful radiating feathered edge glow around the subject..(check that post here) The images from that post were cameras which were larger than today products.
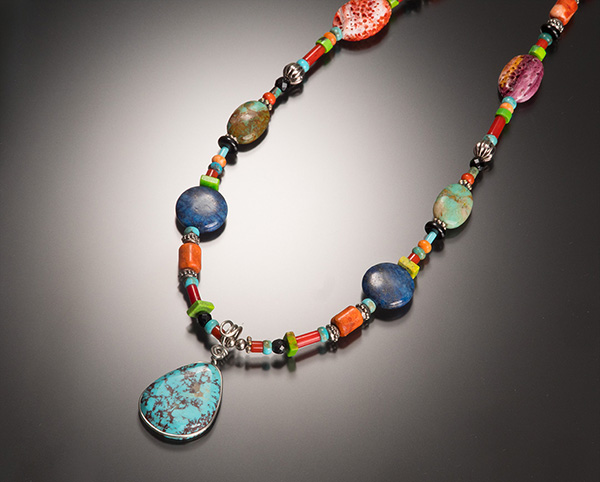
Jewelry is a different subject with different needs but can be on the same basic set. The difference is that the scrim is much closer to the subject than it was for the cameras.
Jewelry is well served in this setting.
In the image above the transitions from light to shadow make the color of the beads and turquoise and out from the background, but still have quite a bit of interest overall.
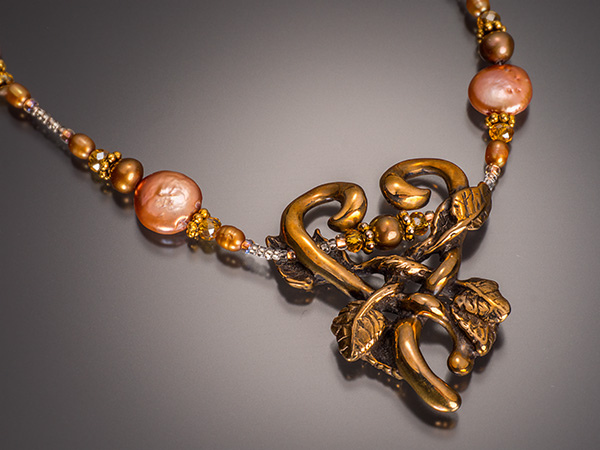
This is a piece of my wife’s jewelry. She noted that it actually could have used a bit of polishing.
When photographing product you need to know what the subject should look like. Since this was a lesson session, I am the final client and think it looks great. If this were a paying customer, I would have noted more information as to the handling of the piece. Also, sets and product must be kept sanitary and dust free. Being very careful while prepping for shooting can save an enormous amount of time in post production. On the job, I will even use a magnifying glass to ensure there is as little schumda in the photo as possible.
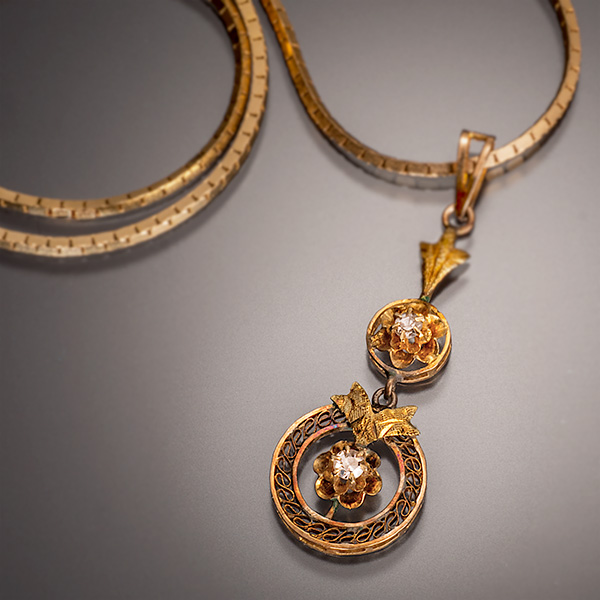
Rose gold and diamonds. Care with chains and their layout is critical. Here also a shallow depth of field takes some attention away from the chain.
Jewelry with facets such as diamonds need a bit of extra thought, care and maybe a few additional exposures. Facets of stones are highlighted by light striking different surfaces. If the light is hitting one surface, it won’t necessarily be showing off another surface. One way to sculpt the stone to best effect in to make multiple images with the light in different positions. Then by layering the exposures, it is possible using masks to show off exactly the stone as you wish.
Let’s look at some more examples of using the Post Focus Photo Mode (see part one here).
The focus is all throughout the image. Detail works in this case.
With the post focus mode used to capture this image there is still a soft bokeh even though the camera used every focus point in the processing. But because the background is so far in the distance the background stays very soft and all the flowers are super sharp.
I’ve been testing the Lumix GH5 and the Post Focus Mode in which the camera leverages a 6K Photo Mode wherein the camera creates a short video clip using all two-hundred and twenty-five focus points. Any one of these points can be pulled as an eighteen MegaPixel file. Or a range of images choosing a set of focus points. Or even better, it will combine all of the focus points into a fully focus stacked final image. This is an amazing technology to secure a look that is not possible in a regular capture with a camera. I love leveraging this tech to create artistic images.
For infrared conversion of my cameras I use LifePixel. Infrared allows you to put an older camera to use and opens up a new time time of day for productive image creation.
Learn Photoshop in a fun environment. Aaron Nace applies the right amount of fun with easy to understand and follow tutorials. Actions and brushes are included with lessons!
Best embroidery ever. Give Queensboro a try, get a $20 instant credit to get started by clicking on the logo! They specialize in great quality custom logo apparel and promotional products with the best customer service.
Platypod has become a great resource for being creative in getting your camera gear easily into unusual places. As an Platypod Pro I get to work/play with the gear even before it comes out. Head over to Platypod, subscribe to the newsletter and you will get special discounts reserved only for subscribers.
 My finished piece from the class project.
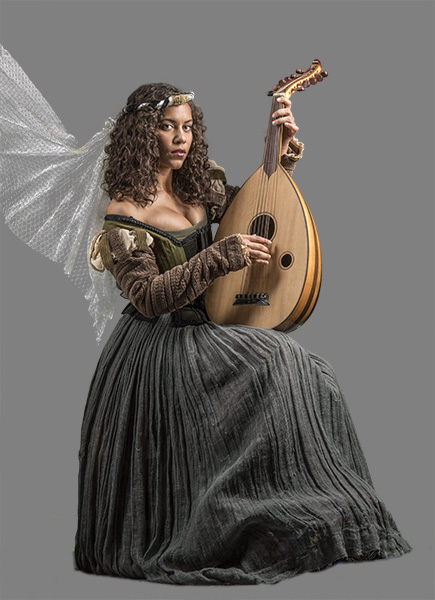

 Look at the final image and see how many elements were added from the image directly above.