Tuesday’s on Successful-Photographer, now dedicated to the art of converting images beyond that of a photograph and converting the image in a more Painterly/Artistic direction. We’ll be taking to look at the artist/photographers who are forging their way forward in creating a new art form with photography at its base.
Today’s artist is photographer Richard Ramsey.
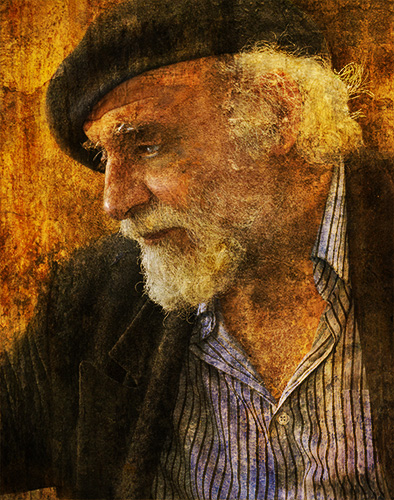
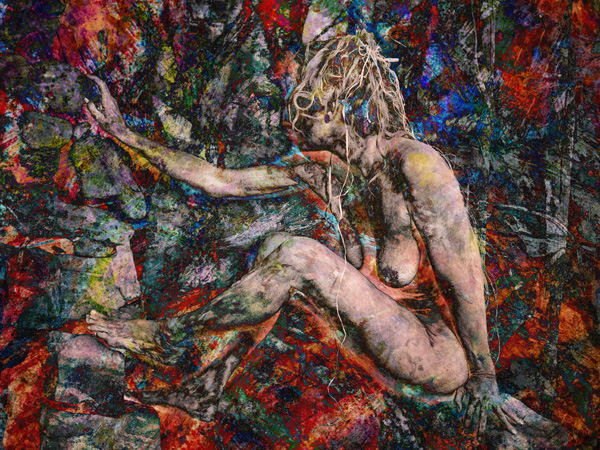
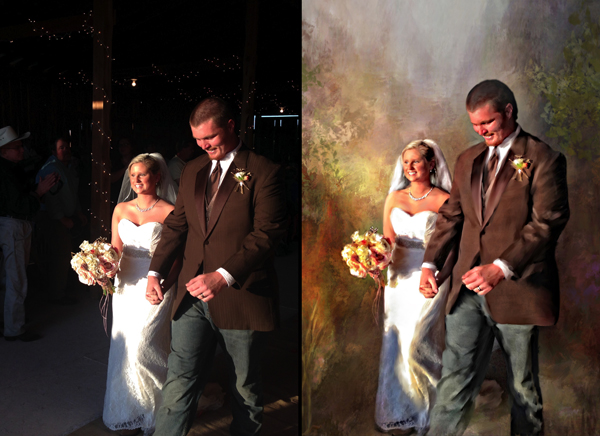
I met Richard through a Mastermind group of which I was a part. I got to see him move forward and develop this technique until I recognized him as an absolute master His work is very painterly in the traditional sense and looks much more like a painting than a photograph sometimes entirely swapping out the background for a different look.
Let’s take a look at some of Ramsey’s work…
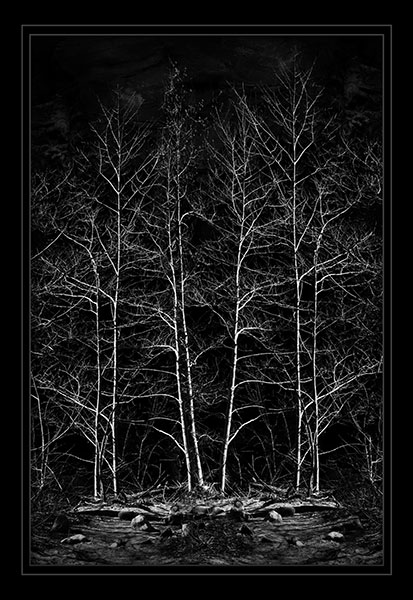
This painting was created from an IPhone capture.
A combination of two source photos was the start of this painting.
Corel’s Painter software program is Richard’s toolset of choice. He has become so good at Painter, he has taught other photographers in the past and created DVD tutorials on Painter 10. As I understand, Richard is working on a new DVD of tutorials to help get photographers on track to creating their own masterpieces. (but like many photographers he’s a bit of a procrastinator) If you want to learn how to use Painter you might check into Richard’s dvds. Richard is in a transition period where he doesn’t have a website with the DVDs on it. For now, send him an email and he will return a flyer showing the DVDs offered. ramsey@bellsouth.net
To see more of his Painter work for clients check this website – ramseyphotography.com
As far as learning Painter on your own, Richard says, “Just be persistent and don’t get in a hurry. Creating a painting is not that complicated. When looking at any program, it can be overwhelming. Hundreds of brushes and controls to deal with but you only need to use a few to create a beautiful painting.”
If you are into learning Painter, get in there and dig around. Use the advice I give my Photoshop students, “Play, play, and play some more!!” (ed.)
So, if you are into learning Painter, get in there and dig around. Use the advice I give my Photoshop students, “Play, play, and play some more!!” I have decided, after trying a few times and taking some classes, that Painter is not for me. If you find that is the case for you but want to offer this kind of legacy product to your clients, hire Richard to make the painting for you. Here’s his email for questions about the Painting program or hiring him to paint for you. ramsey@bellsouth.net
Notice when Richard creates his paintings the entire image is transformed. I’ve noticed during my judging that many photographers new at this leave too much photo realism in the finished piece.
Note Richard’s use of color that is carried throughout his paintings.Couldn’t resist sharing one more!
I am extremely fortunate in many ways, one of which is being named a PPA Approved Juror. This gives me the opportunity to be exposed to photographers creativity in a very intense, concentrated form. Thinking critically about the work and listening to my fellow juror’s opinions. It is an intense education.
Have I told you lately how much I appreciate the educational value of PPA’s Imaging Competition? Both as an entrant and a judge I learn more about photography every time I place images before my peers or sit on a panel sharing my opinions about the quality of work before us.
A painterly image by yours truely
I love to see new areas being opened up and explored. But, I would like to add a word of caution and offer my opinion on a new trend many photographers are embracing. Creating painterly images. There are some magnificent image makers who have embraced this and I applaud a lot of the work I see coming through. A word of caution. Some of this new work is less than stellar.
The reason behind this sub-par (in my opinion) image making is that painting is a whole ‘nother skill set. Those that are producing beautiful work have studied the work of classic art and artists. They have studied and practiced with software like Adobe’s Photoshop and Corel’s Painter programs to replicate the depth and dimension found in paintings. They have learned color. They have learned to balance blending of the painting technique with the photography using the Goldilocks method. Not too much, not too little but jus the right amount.
Other photographers have seen this art trend and tried to get the look via a shortcut. That is what inspired this post. You really can’t just push a button on a software plug-in and think you are creating artistic images. The software that ‘replicates’ a Monet or Degas style of painting does not work. They are flat. There are repetitious strokes that are quite evident in the work which will limit the amount of time anyone will want to be viewing the image.
Just as learning photography has a learning curve so does creating a look in the style of the old masters or any other artistic genre.
So what are the options if you want to offer this product line to your clients?
You can ‘half-a**’ it and push the button on a plug-in.
Or you need to study, learn and practice, practice and practice some more. You will need to want to create this type of art. Immerse yourself deeply in the new art. Explore the new world with the same ferver that you brought to learning your photography skills.
Or you can continue to make your photographic images and hire out the art creation. There are some marvelous photographers who enjoy the creation of the art and are excellent sources for a new product line for your studio.
Over the next couple of weeks, I’ll be sharing art and artists that I feel are transforming true art from their photography images. See if the difference shows from those who are at the top of their game. Hopefully you’ll find inspiration to take your work to new heights.
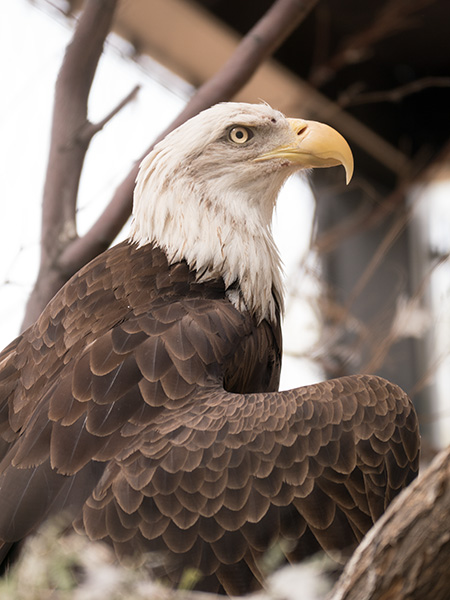
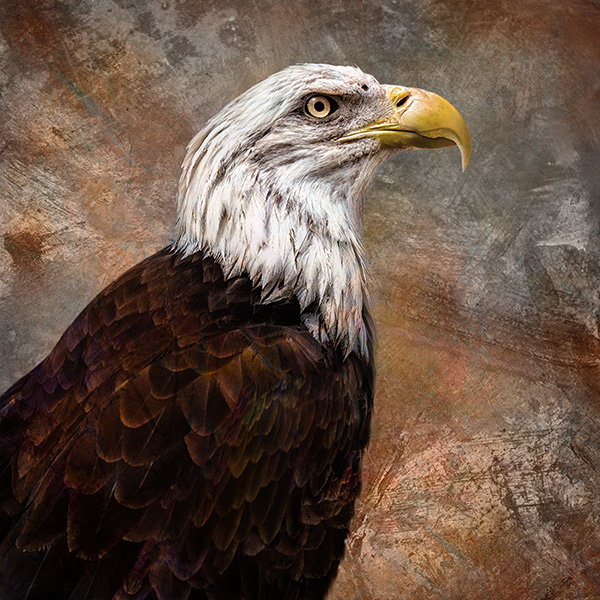
If you look at yesterday’s post you’ll see the capture and processing of an orangutan photographed through a dirty plate glass window which pushed capture and processing skills. Today I want to share an artistic rendition of our countries’ symbol of freedom, the bald eagle.
While we’re looking at this image let’s go back in time with the Steve Miller Band’s Fly Like an Eagle for a little musical accompaniment…
The theme here is to practice skills of photography. What did I get/learn while photographing the eagle that I can carry with me to my regular photography gigs??
Number one – People were moving through on a regular basis, so there were distractions to manage. awareness of surroundings while concentrating of my subject.
Number two – Patience. I wanted the eagle’s beak to be closed and there were only fractions of moments when this was the case. I had to learn this behavior and movement and time it to get the position I wanted.
Number three – The eagle was caged so there was the fencing to account for which meant shooting at a shallow Depth of field and focusing on the eagle and not the fence.
Finally, number four – Processing the image into an art piece that is more than the sum of the parts. Always working on these techniques to improve them. As they say, practice makes perfect…
Original photograph. Captured with Lumix FZ1000 1/400th sec f4 ISO 200 at 420mm (35mm equivilent)
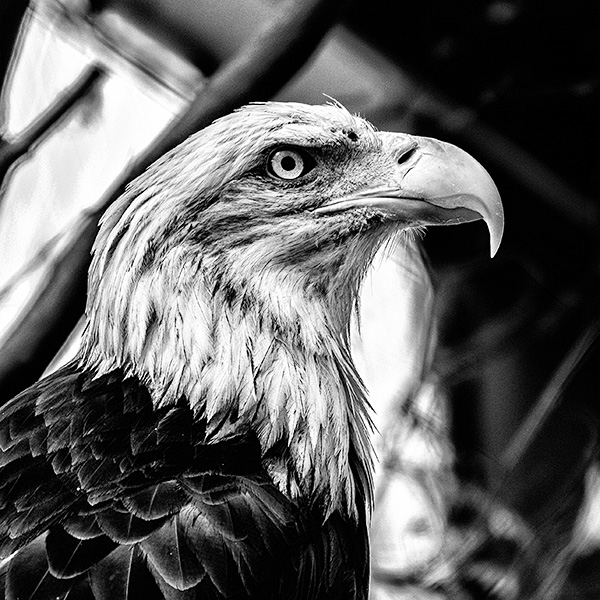
A process through NIK Silver FX Pro 2 gave a very gritty black & white rendition of the eagle. I like the idea of the eagle in a square crop portrait style but not all the cage elements and distracting background.
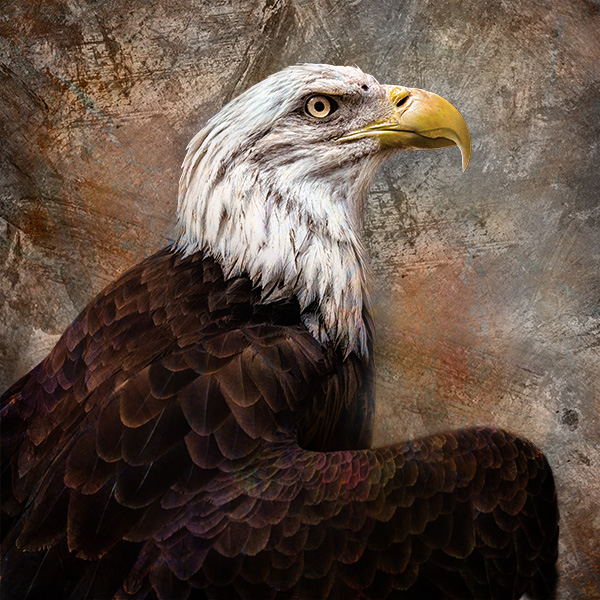
I wanted a larger portrait rendition so I choose a larger crop and started adding my art embellishments.
The artwork is accomplished using photographs of textures and colors combined together using layers and Blend Modes. Utilizing Layer Masks on the texture layers allows for control of specific effects in certain areas of the image.
I thought the eagle was just holding it’s wing up when I photographed it, but it was bothering me. Then my eagle-eyed wife Holly came in and liked the art treatment but also spotted that the eagle’s wing was probably broken hence the residence at the zoo. I did a little plastic surgery for the final image you see below.
The last bit of work was accomplished with Adobe Photoshop. I copied the broken wing onto its own layer. Then repositioned it as if it was folded in its normal place. Using a layer mask to blend it into place.
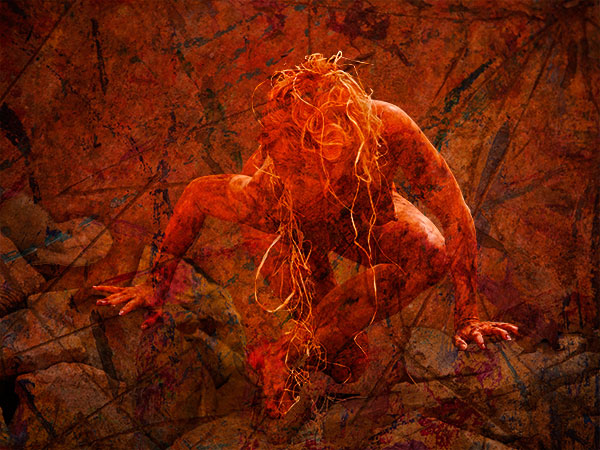
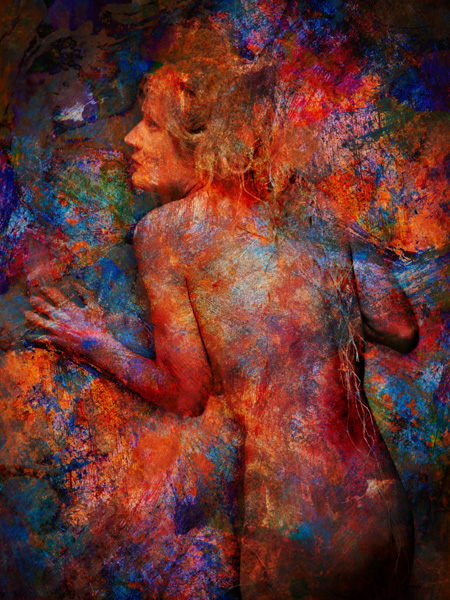
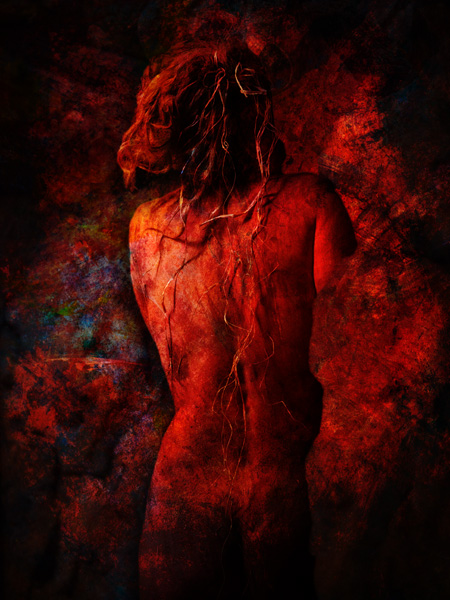
A couple days ago I shared some images from working with Pash Galbavy when she was doing a model posing for a life drawing class. She was posing in the Butoh style, something I had never heard of before documenting this class. See the post here.
One of the great features of the Lumix cameras that doesn’t get spoken about too often is the ability to shoot time lapse sequences. I mounted the Lumix FZ-1000 on a tripod and set it to capture an image every 30 seconds. I was looking to tell the story of the life drawing class and how this particular session of Butoh posing was done.
Pash and the artists at work in the Life Drawing Class over a couple hour period.
These images were given a quick process to control color and contrast and saved to 600 pixel jpegs. For the time lapse 94 images were used at 7 frames a second giving a 13 second film output as an H.264 codec which produces a .MOV file. They were assembled using Time Lapse Assembler a free program for MAC or PC. One thing to remember when creating a time lapse movie that a normal playback speed is using 24 frames per second. which means you often need to capture images about every 1-3 seconds over a long period of time to have a longer final film.
Pretty amazing what we get to learn as photographers…
I was asked by a model friend, Pash Galbavy, (see her site and work with other artists here) to help document a life drawing modeling session she was doing utilizing Butoh posing.
Butoh posing?? What the heck is that? And the continuing education of this photographer goes on…
Butohis a form of Japanese dance theatre that encompasses a diverse range of activities, techniques and motivations for dance, performance, or movement. Following World War II, butoh arose in 1959 through collaborations between its two key founders Hijikata Tatsumi and Ohno Kazuo. The art form is known to “resist fixity” and be difficult to define. If you’d like to learn more check Wikipedia here.
Pash Galbavy of Sedona at Elephantine in an art rendition using textures and colors photographed at the same time.
Pash wore clay and twined straw into her hair to enhance the Butoh look.
Pash is absolutely amazing as a model. She’s able to hold poses for a long period of time with no motion
yet still able to bring emotion forward.
Images were captured with the Lumix GH4 and the Lumix Vario 35-100mm f2.8 lens. ISO’s were from 1600 to 3200…
Images were then taken into Adobe Photoshop where I added layers of color textures from photos and used Blend Modes, Selections and Masks to create the final artwork. In working this way I have numerous renditions with different amounts of color. or lack thereof for each of these images. This is the technique I’ve dubbed ‘Photo-Synthesis’.
Yours in Creative Photography, Bob
PS – If you are ever in the Sedona, Arizona area and need a life model who is incredibly talented make sure you see if Pash is available. She’s truly a work of art in her own right with her posing ability.
Arizona PPA had it’s convention this past weekend. Of course it included the annual imaging competition and as usual I entered images for feedback on new work I am creating. I am always trying to create new artistic looks and it’s good to get feedback from my peers in a formal setting like imaging competition.
My results were favorable. I was awarded the Emil Eger Photographer of the Year Award, first place in the Masters Commercial, Portrait and Illustrative categories. The American Society Of Photographers award was also presented given for having the highest scoring image by an ASP member. This was the 15th time being named to the AZPPA Top Ten in 16 years.
While receiving awards is good for the ego (and sending press releases) the real value is in receiving opinions of fellow photographers to find flaws that were not apparent when working up the images. I found some things to tweak as a result of hearing the challenges between the jurors during judging…
I’ll share my entries here. Wouldn’t mind some feedback from you too…
‘Awakening’ scored 86
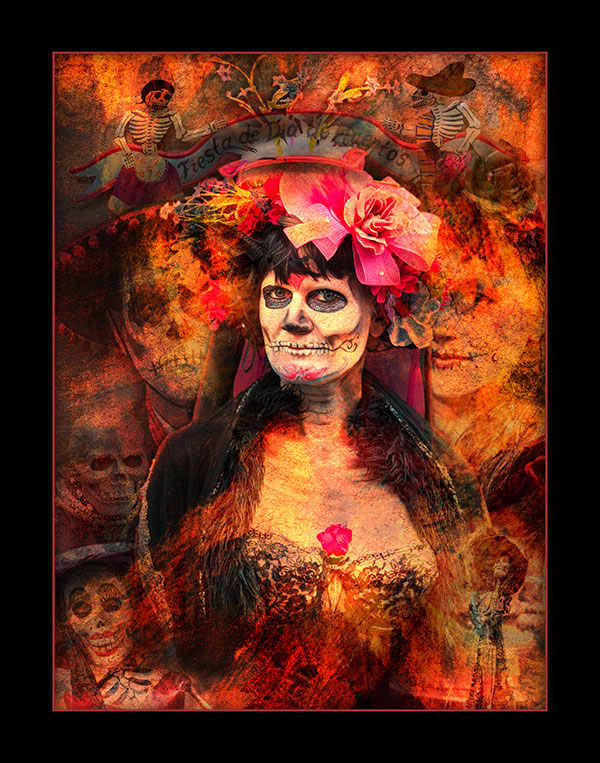
‘Catrina – Day of the Dead’ scored 83
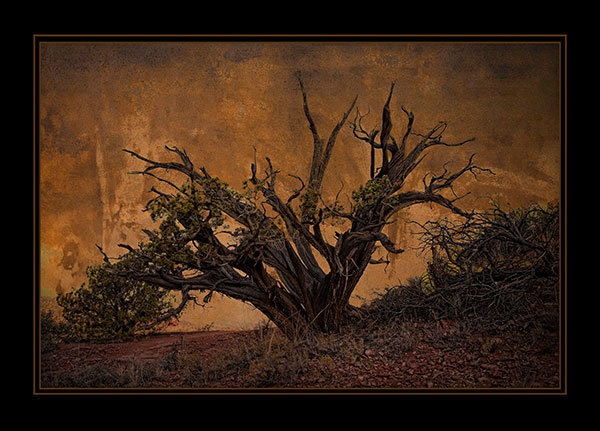
‘Old World Juniper’ scored 81
‘Last Stand’ scored 83
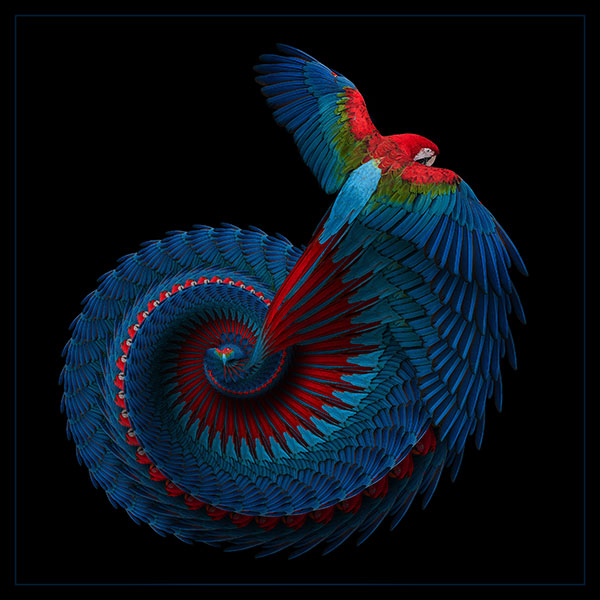
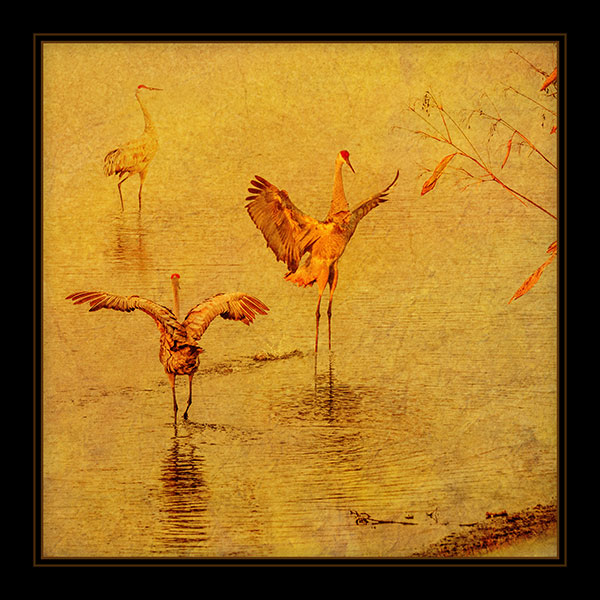
‘Sandhill Cranes’ scored 88
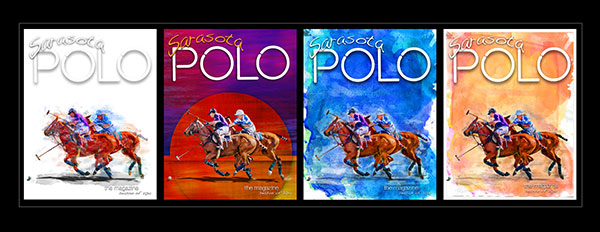
‘Sarasota Polo Magazine Comps’ scored 84
I always recommend getting your images into competition for review. Remember it’s not a competition against the other photographers… It’s against yourself and the opportunity to grow your skills.
For infrared conversion of my cameras I use LifePixel. Infrared allows you to put an older camera to use and opens up a new time time of day for productive image creation.
Learn Photoshop in a fun environment. Aaron Nace applies the right amount of fun with easy to understand and follow tutorials. Actions and brushes are included with lessons!
Best embroidery ever. Give Queensboro a try, get a $20 instant credit to get started by clicking on the logo! They specialize in great quality custom logo apparel and promotional products with the best customer service.
Platypod has become a great resource for being creative in getting your camera gear easily into unusual places. As an Platypod Pro I get to work/play with the gear even before it comes out. Head over to Platypod, subscribe to the newsletter and you will get special discounts reserved only for subscribers.

 This painting was created from an IPhone capture.
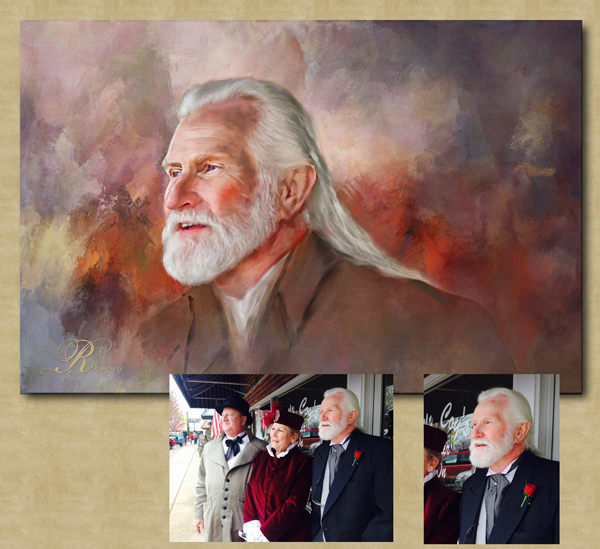 A combination of two source photos was the start of this painting.
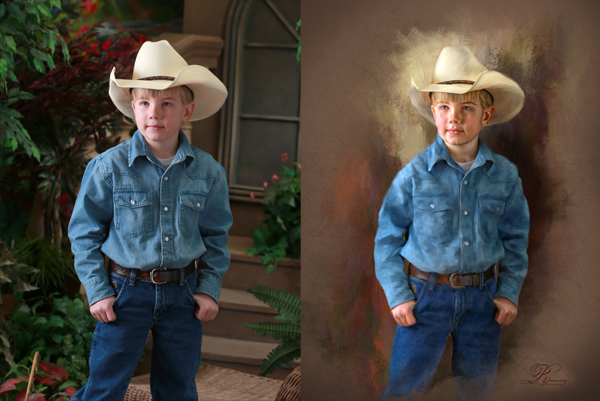 Notice when Richard creates his paintings the entire image is transformed. I’ve noticed during my judging that many photographers new at this leave too much photo realism in the finished piece.
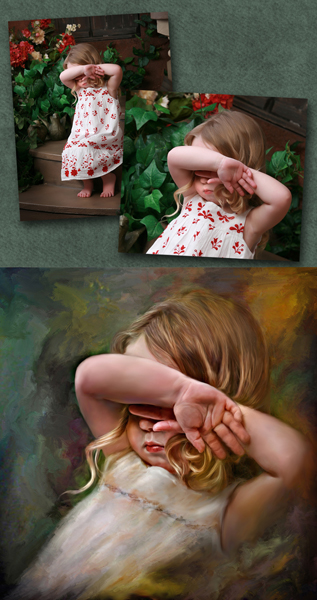 Note Richard’s use of color that is carried throughout his paintings.
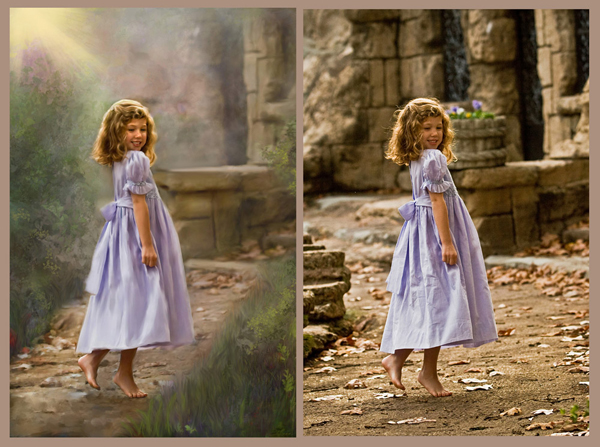 Couldn’t resist sharing one more!