by successfulbob | photographers health, photography, photography education, photography gear, success education
This will be a new series of posts about our health working as photographers. Let me preface this by saying I am not advocating that you follow blindly anything I share here. These are ideas and programs that are working for me. I have found most of these to also be regular problems for other photographers too. Consult with a physician or do your own research before embarking on any ideas shared here in this or other Photographers Health posts.
I reiterate – I am not a medical professional. I don’t play one on TV. I didn’t even stay at a Holiday Inn Express last night…
Computer Work Station Practices for Photographers
We spend an awful lot of time at our computers these days and that can be a severe health issue in and of itself. We hold ourselves in odd positions for long periods of time. We don’t move enough thereby putting ourselves at risk for back and neck issues, carpel tunnel syndrome and more.
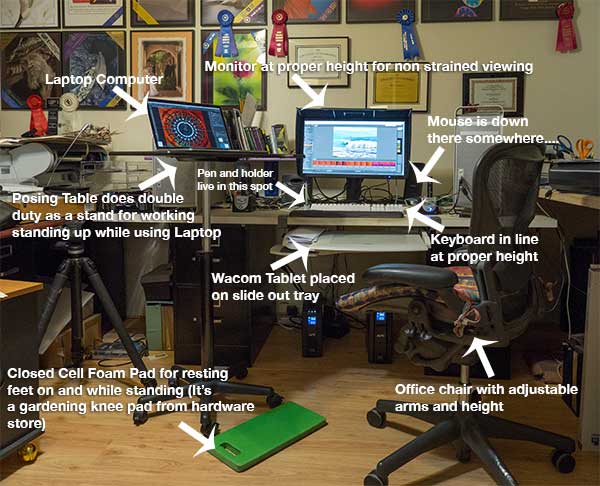 My work station at Bob Coates Photography.
Here’s how I’ve started to take back my health from the computer station.
Here’s a place to find good set up information for your work station. OSHA gets you moving in the right direction.
A quick review of the important stuff.
• Top of the monitor at or just below eye level.
• Head and neck balanced in line with your torso. (You might want to get someone to watch you while you work to make sure you are in a correct position. If no one is around to help you set up a video camera and watch yourself for a while you might be surprised by what you see.
• Elbows close to your body and supported.
• Some support for your lower back.
• Wrists and hands in line with your forearms
• Plenty of room for your keyboard and tablet.
• Feet flat on the floor
Here’s a link to a more in-depth checklist for good practices and to see how your current workspace is helping or hurting you.
As photographers we have an additional piece of equipment to work with that is not addressed in the guidelines above, a tablet. If you are not already using a tablet for your work I’d put it high on your list. “But Bob, I tried a tablet and I can’t get used to it. I hate it!” “No Excuse!” I reply. The way to fall in love with your tablet is to hook it up. Make sure the settings are correct for the click and double-click sensitivity and pen pressure. Yes there are settings and preferences and ways to test all that before you get started. Most who don’t like a tablet didn’t realize that this machinery is also software driven to customize your experience. Once you’ve got the settings correct for you disconnect your mouse for four to five days. By the end of that time you will be an old pro and realize not only the health benefits of not having your hand in an awkward position trying to make selections with your mouse leading to possible Carpel Tunnel Syndrome, but the time savings. Where you put the pen on the tablet is where your Curser will appear. This seems to be one of the most difficult things for newbies on the tablet to grasp. You don’t drag your Curser from place to place. You put your pen where you want it to be. Very cool.
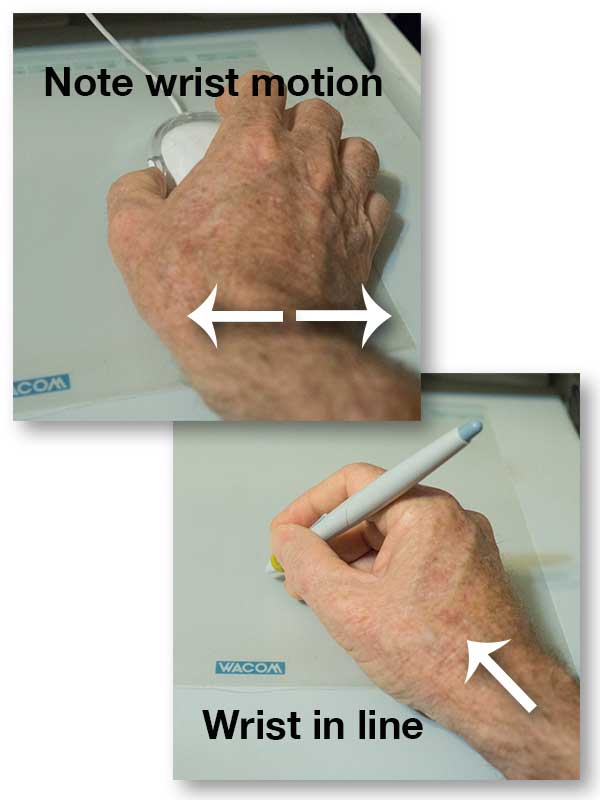 When you use a mouse you do a lot of work moving your wrist back and forth. When using the pen tool your wrist is held in a more neutral position using your arm and fingers to do more of the work making it much easier to make selections. This is a classic tablet I bought well over ten years ago. They design them a bit more sexy these days!
My tablet of choice over the years has been the Wacom brand. They have all different types, sizes and styles of tablet at different price points to meet every need and every budget. That sounds like an ad but it’s not. It’s an industry standard piece of equipment. I have a larger Wacom Tablet for my work station in the office that I bought a bunch of years ago and a smaller one for when I teach on the road with my laptop. If you have a question about which might be best for you drop me an email with info on the type of work you do, how long you do it, in the office? on the road? etc… and I’ll give you some ideas.
I mount my tablet on a roll-out tray so it is right in front of me. My keyboard is on the desktop right in line and above that and the monitor straight above that.
This is probably enough info for today. This has definitely turned into a two part post! In the next installment I share more ideas on staying healthy while working on your computer. Please don’t hesitate to share your ideas here too!
Yours in Photography, Bob
by successfulbob | fine art photography, fine art portrait, Lumix GX7, Lumix Lounge, photography, photography education
Using a watercolor photo treatment that looks right was very difficult in the past. Most automated WC actions look like they had are done by a machine. I have a feeling that getting all the subtle nuances inherent in watercolor into a math equation would be amazingly difficult. It’s still not easy even when you do it by individual strokes.
Enter England’s Tom Shelbourne. He has developed a watercolor palette for Photoshop CS6 and CC that can move you way down the road to having more realistic watercolor techniques at your fingertips. You can go to Russell Brown’s website and download it for free. It takes you step by step, inch by inch (OK Layer by Layer) through a technique that helps you with the line drawing, setting up brushes and the opacity for laying down washes and getting more detail oriented as each layer is completed. This is NOT a push button watercolor system, but it will move your imagery much further in a realistic direction. Watch a video explanation of the WC Palette here.
If you like what you see there but feel the limitations you can go to Tim’s web site The Artists Quarter and Tim Has tutorials that take you even deeper into creating fine watercolor art with unlimited variations. I bought his watercolor tutorial ‘Fast and Loose’ and it really opens up the creativity and possibilities!
I wanted to create a tribute as a thank you for the Code Talkers service performed during WW2.
 Bill Toledo – WW2 Navajo Code Talker in Albuquerque, New Mexico
Here is the original photo I started with of a Navajo Code Talker taken with the Panasonic Lumix GX7. I wasn’t able to get Bill to a cleaner background but we did move under an overhang so I could get some better light on his face for depth with a bit more shadow. You can see it’s a busy background. Fortunately, when creating paintings you have the option of only showing what you wish to show.
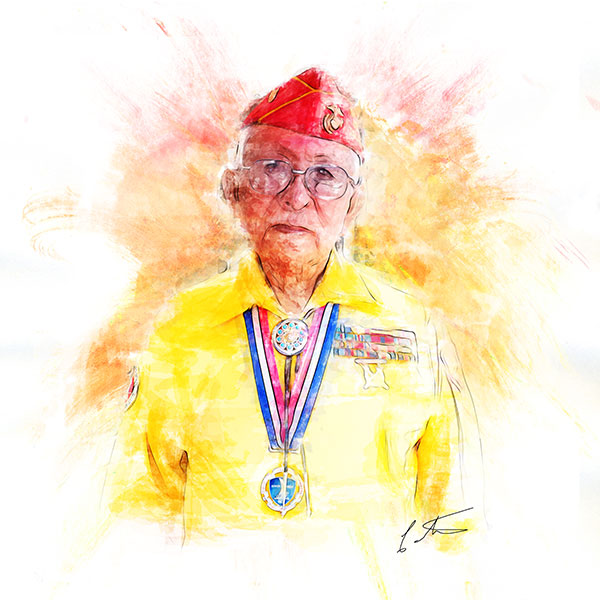 Digital Watercolor of Bill using some of Tim Shebourne’s techniques
Here’s the same photo after spending some time working with a few more of Tim’s techniques. I haven’t finished the tutorial yet so I know there’s even more realism down the road in creating Fine Art Watercolors with my photography as a base. I highly recommend you check out Tim’s tutorials if you want to have realistic digital watercolor as part of your offerings.
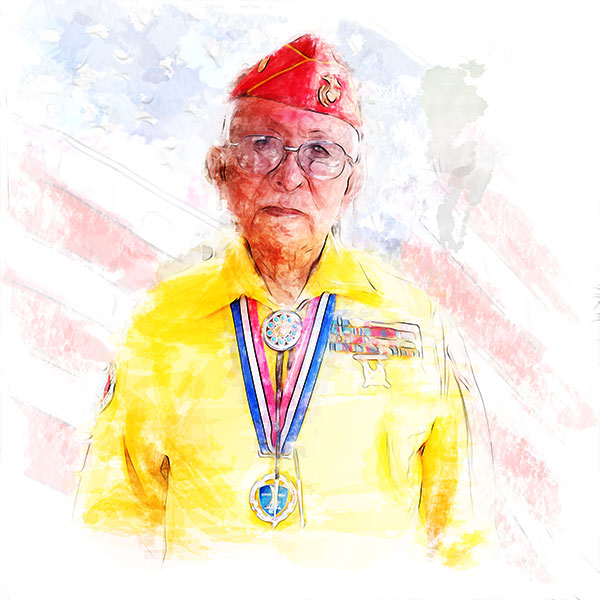 Another watercolor version combining a US flag to help tell the story.
The images are created in honor of the Navajo Code Talkers service to our country, but I would like for you to take time to remember all of our veterans, living and fallen during this Memorial Day. As General George Patton said, “It is foolish and wrong to mourn the men who died. Rather we should thank God that such men lived.”
Yours in Photography, Bob
by successfulbob | photography - art quote, photography education
Two quotes grace today’s Sunday Photo/Art Quote. Since they are from the minds of sixth graders I will not try to expand on their thoughts because I don’t want to color your interpretation of their words…
 “Art is your emotions flowing in a river of imagination.” Devin, Los Cerros Middle School, 1999
 Art is the colors and textures of your imagination.” Meghan, Los Cerros Middle School, 1999
Simple changes of words, tremendous change of meaning. I invite you to start the conversation here…
Yours, In Photography, Bob
by successfulbob | Lumix GX7, Lumix Lounge, photography
These bad boys do blend in. This was taken during a hike in Sedona with my Lumix GX7 and 35-100 f2.8 Vario Lens. It reached out pretty far and rendered the animal tack sharp. I like how there are so many different textures in the scene.
We see the ‘Trickster’ as the Native Americans refer to them, on a regular basis. This is from Wikipedia – “The name “coyote” is borrowed from Mexican Spanish coyote, ultimately derived from the Nahuatl word cóyotl, meaning “trickster”.[10] Its scientific name, Canis latrans, means “barking dog” in Latin.[11]”
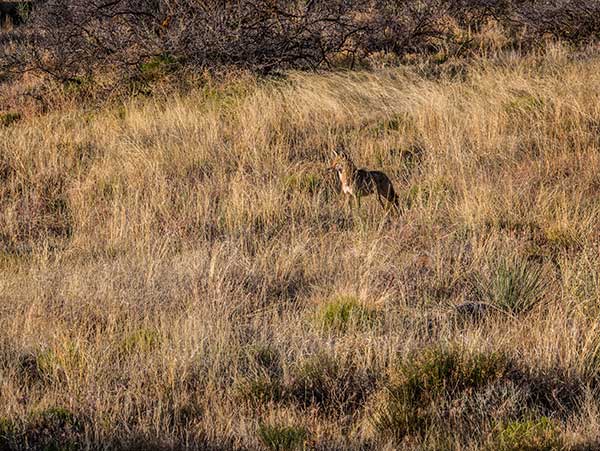 The ‘Trickster’ AKA coyote during dawn hike in Sedona, Arizona
Part of that I believe comes from how coyotes hunt and the fact they have a dual voice-box capable of making many sounds and seeming like there are multiple coyotes when there is only one. The calls a coyote makes are high-pitched and variously described as howls, yips, yelps, and barks. These calls may be a long rising and falling note (a howl) or a series of short notes (yips). These calls are most often heard at dusk or night. You can learn more about the Coyote here.
Your in Photography, Bob
by successfulbob | photography
Conductor Russell Fox of the Verde Valley’s thirty – plus piece Sinfonietta said, “We really enjoyed being Eric’s back up band for his classical music debut!”
Eric Miller on guitar during his Classical Music Debut in Sedona, AZ.
Eric Miller a fabulous accomplished guitarist in flamenco, samba, rock and eclectic music emerged into classical music playing Vivaldi’s Concerto for Guitar & Strings. My wife Holly and I have enjoyed Eric’s music for years and are big fans. He’s an incredible talent. What’s very interesting is that while Eric can read music he tends to learn and play by ear. It was a wonderful performance and we applaud Eric’s expanding horizons. If you want to checkout some of Eric Miller’s musical accomplishments you can find some on his link above… I highly recommend his Eclectic Music CD… It’s subtitled Elevator Music for Cool People. With the music composed by and most instrumentation performed by Eric it’s wonderful music to have in your collection.
Anna Han at Emerging Artists concert. Next stop Julliard School of Music in New York City
A huge bonus to us was the second Emerging Artist at the concert, Anna Han, who played Beethoven’s Piano Concerto No. 5 AKA ‘The Emperor’ an amazing piano concerto that was Ludwig’s last composition before he started loosing his hearing. Her deft playing with incredible subtleties was nothing short of outstanding. I literally had tears coming to my eyes during portions of the concerto. Oh, did I mention she is just about to graduate high school? Following that she’ll be heading to Julliard School of Music in New York.
The Verde Valley Sinfonietta performs several concerts each year. If you live in or are visiting Sedona you should make it a point to enjoy the fabulous music produced by these dedicated musicians.
Following the concert I overheard a knowledgeable patron of live musical arts say, “You could not have heard a better concert concert anywhere in the world! Fabulous!”
I was not working but wanted to record images for my friend Eric but obviously didn’t want to disturb fellow concert goers. My trusty Lumix GX7 comes to the fore again. I was able to set the camera in silent mode. This allowed me to capture the images with no disturbance to those around me. Very important! I used the 35-100 f2.8 Vario lens for the close ups
All in all a beautiful day….
by successfulbob | photography
This Sunday’s Photo/Art quote is from Robert Mapplethorpe.
“The more pictures you see, the better you are as a photographer.” Robert Mapplethorpe
He was a controversial photographer because of his chosen subject matter. (ALERT! if you find the male or female nude figure offensive do not click on this link to Mapplethorpe’s Portfolio. There is some exquisite photography that is not controversial of some of his floral work direct from here as an alternative. Mapplethorpe’s Flower Portfolio.
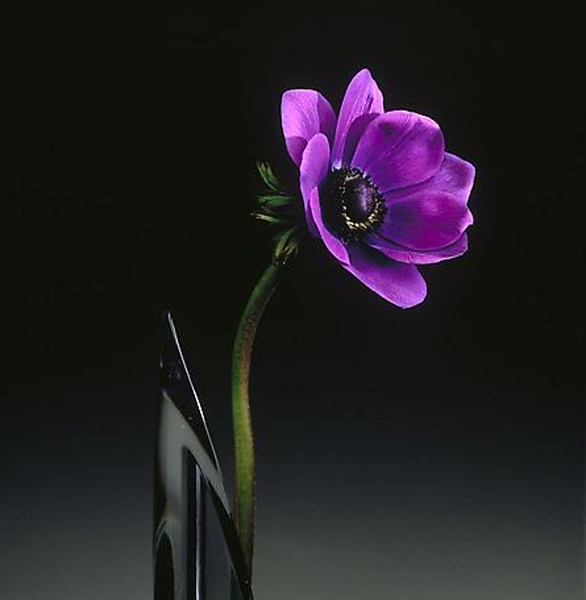 Robert Mapplethorpe’s exquisite flower photograph Anemone, 1989
I want to take this a giant step further and posit that the more art you view, whether it is photography or oils hanging in a museum, that you will become a stronger photographer the more you study. Now I don’t necessarily recommend that you take it to the level I have… My wife doesn’t want to go to art museums with me any more because I will spend some serious time in front of a painting that interests me. From five to forty five minutes (see Monet blog post) I have been getting to every museum I can to view the Masters of Impressionism like Monet, Classic portraitists like Rembrandt and Renoir to study their portrayal of light and shadow to create form. Looking to understand how colors placed side by side effect one another or a few final finishing strokes turn a nice image into one with deep depth and dimension.
When I see a painting or photograph that captures my attention I’ll view it from 5 feet away. Then move very close to see intimate details. Then go to ten or fifteen feet away to see how the detail i the image resolves into a totally different look. This is what I personally am trying to bring to my image making. You can look at these same images online and in books but you only get a taste of the images not a full meal. There is something about seeing great, and some not so great, works of art up close and personal that really brings them to life.
I supplement the live viewing with artists I haven’t yet had the pleasure to experience in a museum or to refresh my memory of a particular painting or style of painting. I try to view a few new pieces of art several times a week before falling into slumber. I first heard this idea from a fabulous artist/photographer by the name of Arthur Rainville. It’s a great way to have your brain work on new ideas and assimilate color and composition ideas while you slumber. I have seen Arthur speak several times and highly recommend you put him on your list of programs to see.
So back to Mr Mapplethorpe’s quote, “The more pictures you see…”