I enjoy the ability to create time-lapse video in the Lumix line of cameras. Built into the cameras are settings that many cameras need an add-on to complete the captures. One of these is an intervalometer which makes it possible to set the number of images to record and the timing in between each capture that is made. Even better is the in-camera processing to see your videos almost immediately without having to download images to a computer for processing.
In today’s post, I’m going to look at three versions of in-camera processing and then another version where the jpeg files were downloaded, processed through Adobe Camera RAW and then run through Time-Lapse Assembler for a different look. Time-Lapse Assembler is a free download.
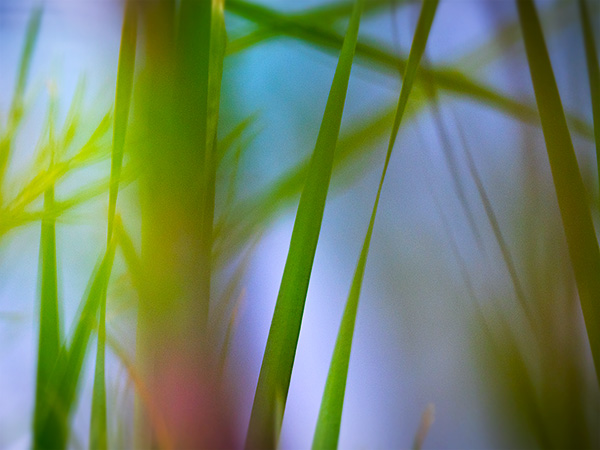
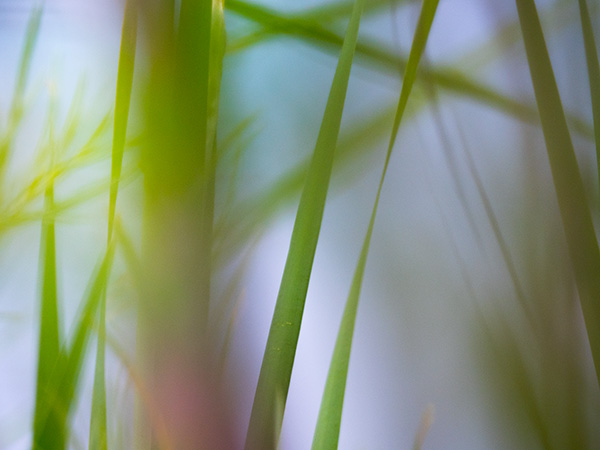
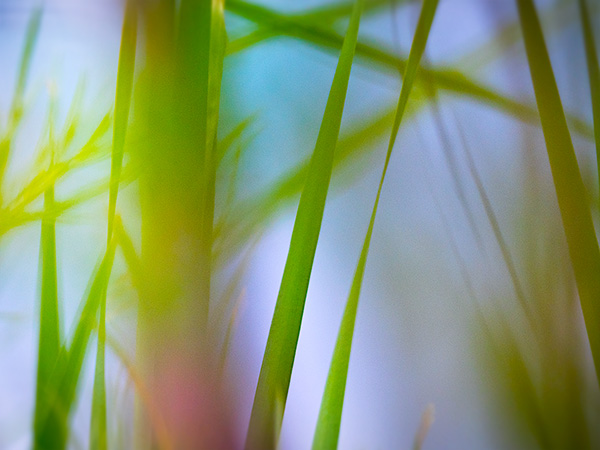
First, let’s take one of the original jpegs that I processed through Adobe Camera RAW and added a little zip and pizazz with the MacPhun Plugin from their Creative Suite called Focus CK.
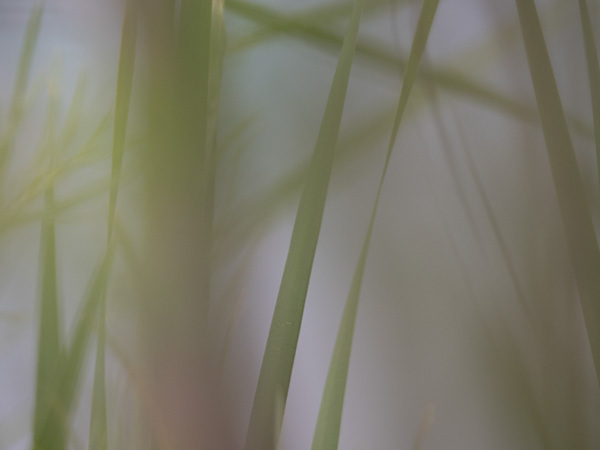
Original SOOC (straight out of camera) capture
Cropped to 16×9 aspect ratio and added some clarity and saturation in Adobe Camera RAW. Then finished off with MacPhun’s Focus CK plugin to add a bit more snap and intensity.
Here are the three versions processed straight out of the Lumix GX8 camera sized to 4K. You can choose any number of settings for size along with the number of frames per second. I used 6 fps, 12 fps, and 24 fps. Because I made these in 4K I am able to add additional movement to the videos without loosing quality.
Images were resized to 16×9 aspect ratio and saturation along with clarity was added. They were then saved out to jpegs. The files were processed into a six-image fps and twenty-four image fps videos. These were not able to have panning and additional movement as they were processed to HD size.
Turning a Simple Image into Something More Complex
It’s always a push to try out new gear and push the boundaries a little bit. I was taking the Lumix GH5 out for a spin with the Leica DG Vario-Elmarit 100-400mm lens which works well for wildlife and images that need a long reach. I was curious how I could use in my everyday art photography.
Since I was out in the wetlands and the birds were not cooperating I started playing. I had already experimented with motion while making exposures to get fantastic color palettes and forms. I would never have thought that a scene with great depth of field which I’m showing down below would have started with a lens of this reach. Here’s the scene. The Wind is blowing. Grasses are swaying gently. I focused in the middle on a single blade of grass. This emphasis point made for an overall softness on the scene due to the depth of field and the foreground being way out of focus and moving. The sharp piece of grass in the middle followed by more falloff and motion and in DOF with the background grasses.
First image Straight out of Camera as a RAW File.
“OK, Bob, I don’t get it. What do you see that I don’t?”
Here you go with a little processing in Adobe Camera RAW you will start to see where I am going with this.
Added a little Saturation, Clarity, Contrast, Shadows, Highlights and Whites up and Blacks down to get to this point.
Photoshop for a little clean-up on the grass stalk that had some scratches on it with the next stop MacPhuns’ Focus CK plugin to add a bit more sharpness and color and a slight vignette. Final settings were a change of Mode to Multiply and the use of MacPhun’s Luminar to add some more color and snap. I enjoy the feeling of depth and dimension achieved by this process. I’ve got a deal below for you to get Luminar and some other goodies below!
Luminar + Creativity Mega Preset Pack, Essential Pro Secrets for Unleashing your Creativity eBook, Ultimate Posing Card Collection, Overlays Variety Pack and first 3,000 customers will also receive a collection of Light and Bokeh Overlays for $69. Total value $250.
If you are already a MacPhun User pay only $49 when you use my coupon code or $59 if you are not already a Macphun user.
You Get:
Luminar, The Supercharged photo editor for Mac that adapts to your skill level.
Creativity Mega Preset Pack – 26 beautiful presets from Presetpro to create stunning looks in Luminar
Essential Pro Secrets for Unleashing your Creativity ebook by Ian Plant – Creative lessons and techniques for how to make your photos match the depth of your passion
Ultimate Posing Card Collection – Hundreds of ideas for boudoir, family, indoor, newborn, wedding photography and more
Overlays Variety Pack – Sky, snow, rainbow, leaf, and fireworks overlays to create a unique look in your images
ADDITIONAL BONUS FOR FIRST 3,000 CUSTOMERS – Light and Bokeh Overlays
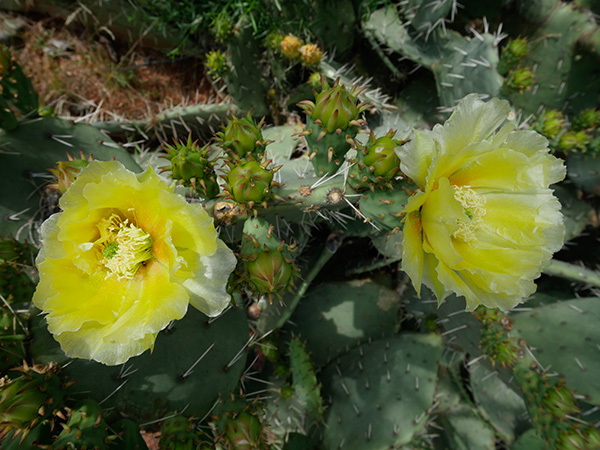
This winter and spring have been wonderfully wet in the southwest leading to one of the most wonderful flower bloom seasons in many years. With that said I have been chasing some of those blooms, especially the cactus as they are absolutely beautiful.
I’ve been testing the Lumix GH5 and the Post Focus Mode in which the camera leverages a 6K Photo Mode wherein the camera creates a short video clip using all two-hundred and twenty-five focus points. Any one of these points can be pulled as an eighteen MegaPixel file. Or a range of images choosing a set of focus points. Or even better, it will combine all of the focus points into a fully focus stacked final image. This is an amazing technology to secure a look that is not possible in a regular capture with a camera. I love leveraging this tech to create artistic images.
Let’s take a look at some of the possibilities using my cactus flower friends.
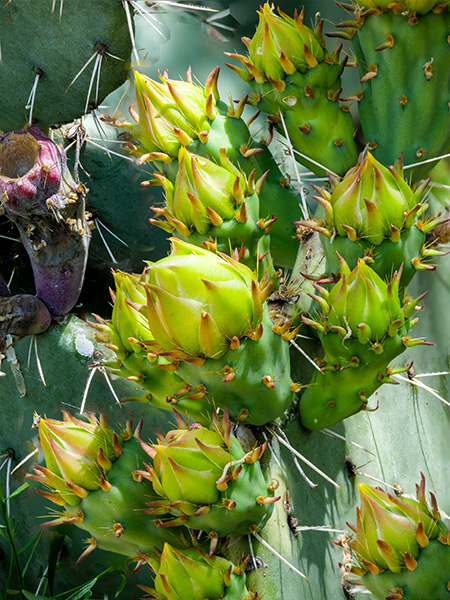
This image has been processed using all the focus points processed in-camera from front to back. This is not necessarily a good look for this particular image as to the field of focus makes too much of the image in focus.
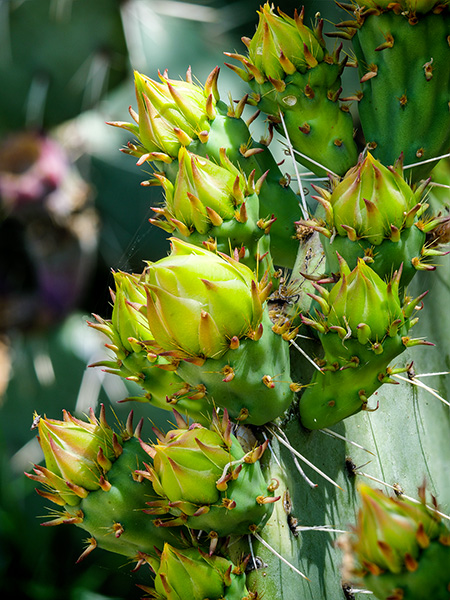
Another image using the same Post Focus capture but processed with a range of focus points which helped to isolate the subject of the flower buds from the background. The beauty is that this can be processed as many times using different sets of focus points for very different looks. All in the camera!
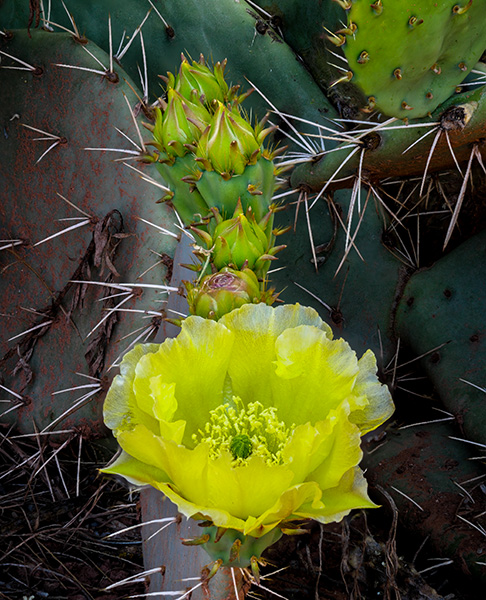
Here is another image with everything in sharp focus. Depending on the story you want to tell this can be a perfect rendition of the scene with all of the thorns in sharp focus. Very prickly.
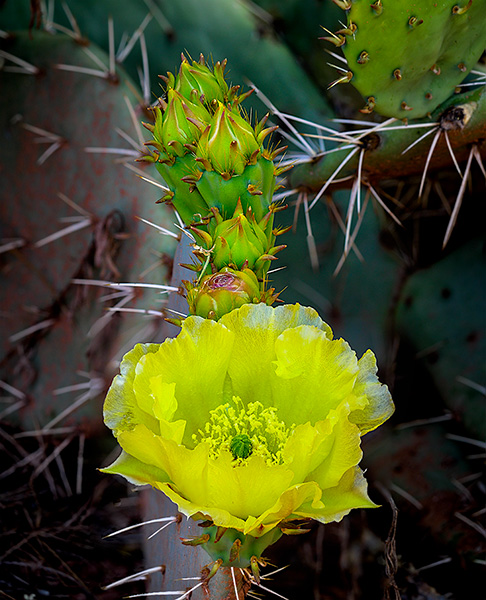
This image has all the important information in focus with the background allowed to be more soft which has a different feel even though it was from the same video capture.
The other day I shared some traditional images from the beautiful Sedona Wetlands off of Highway 89A on the right if you are heading to Cottonwood. Here’s some more info from the previous post.
In addition to the straight images, I like to try something just a little more creative. It can be fun to push the images to an artier level. I guess that’s a word because my Grammer checker gave me the word when I tried more arty in the sentence.
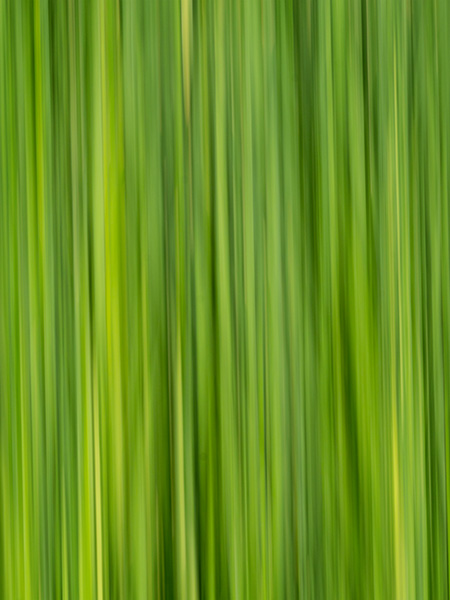
Here are some wetlands grasses that are transformed into blended shapes and colors by moving the camera up while making the exposure.
Very different effects can be created by changing the shutter speed or the speed of movement of the camera. Experiment until you get the image for which you are looking. There can be many pleasant surprises along the way.
Here’s an example of an even slower shutter speed than the image at the top of the post which allows the colors to blend into an even more abstract look.
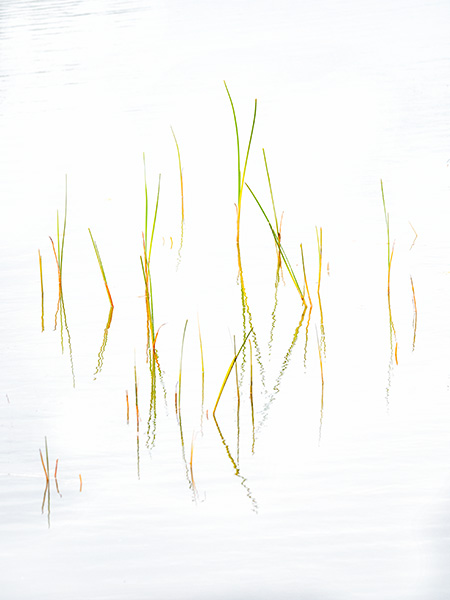
I get a very peaceful, easy feeling (Que Eagles song) when I look at this simplified composition of some new grasses poking their heads through the water.
All images were made with the Lumix GH5 and the 100-400mm f4.0-6.3 Leica DG Vario-Elmar lens. This camera lens combo is one I am enjoying for any shooting situation that allows for a bit of distance between the subject and myself.
Difficult to believe that there are wetlands in the high desert of Sedona. But, there are! And it’s becoming one of my favorite places to test out new cameras and lens combinations.
The Sedona Wetlands Preserve is approximately 27 acres in Effluent Management Area 2, located south of the Sedona Waste Water Reclamation Plant. The wetlands have six basins, with a total water surface area of approximately 12.2 acres or 9.6 million gallons. They basins are set up to have different depths of water from very shallow up to four feet which make for excellent habitat for a variety of critters. There are some thoughts for making sure all who go enjoy the experience, including the wildlife I pulled from the wetlands website.
Wildlife Viewing Etiquette
• Our viewing behavior can also harm the animals we are looking for unless we take special care.
• Please keep these considerations in mind.
• Observe from a distance, so the wildlife being watched are least disturbed.
• Never chase wildlife or pick up their young even if the parents are not visible.
• Leave feathers, eggshells, nests and even dead animals where you find them.
• Respect other viewers to avoid intruding on another person’s enjoyment.
• Limit the time you spend closely viewing any animal
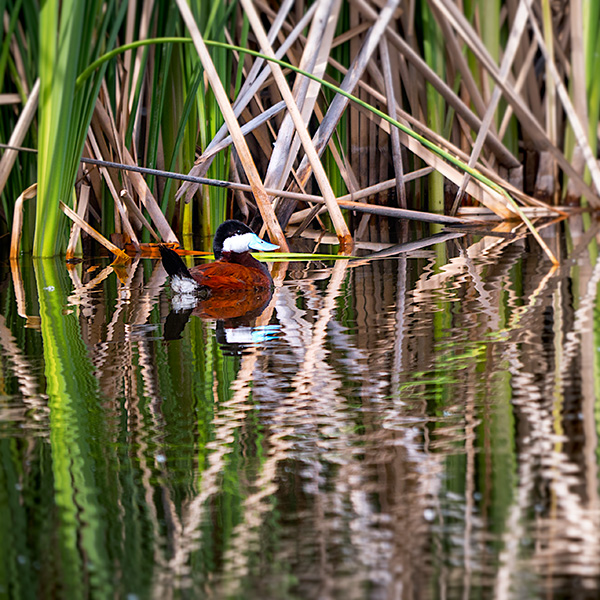
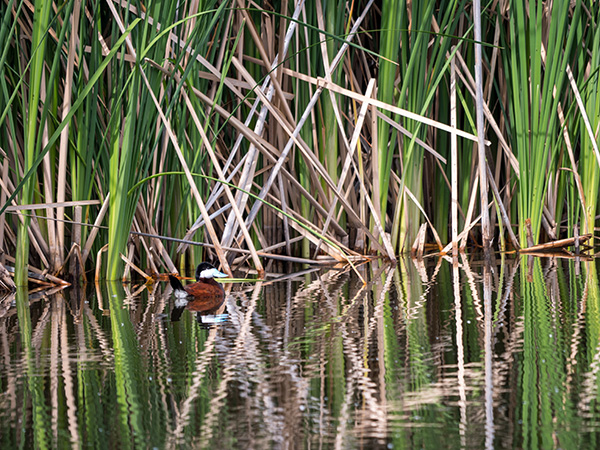
I took the Lumix GH5 for a spin with the Leica DG Vario-Elmarit 100-400mm lens yesterday afternoon when I had a few minutes to work (er’ play) trying out the stabilization and handhold-ability with this combo. Remember, due to the Micro 4/3rds chip, I’m holding an 800mm equivalent lens and very comfortable with the resulting images.
This image is a severely cropped image of a Ruddy Duck which can be printed to about 18 inches square.
(see full size below)
Full-size capture of the Ruddy Duck at the Sedona Wetlands
These flowers are quite small. Using the 100-400mm lens extended all the way gives an almost macro feel to the photo. The blooms are about the size of my thumbnail.
A tiny flower puff around the scale of a fingernail. It is kind of a life amongst past life with the fading buds.
In a day or so I’ll share some more images with a bit more of an artistic flair to them. This camera and lens combination is extremely versatile.
I was in Washington speaking to the Professional Photographers of Washington showing a quick lighting demo using a three light setup with Fiilex LED Bricks.
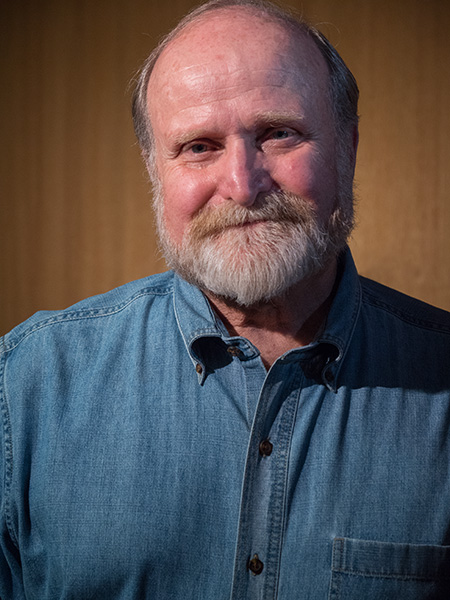
Subject with no light in the eyes gives a less than stellar appearance.
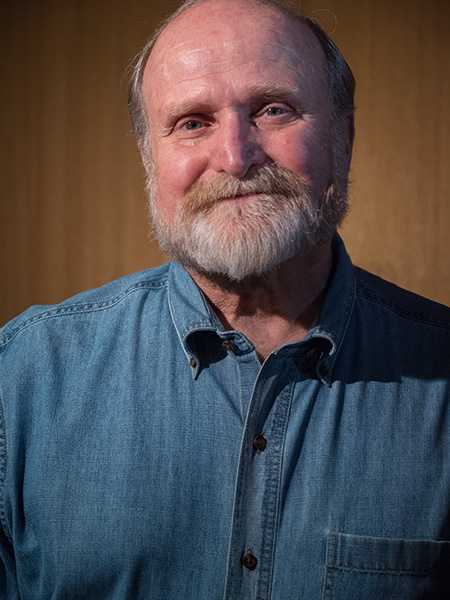
Once you have lights in position, it can be a very small movement of your subject to get a better image. In this case, changing the head to a slightly higher angle allowed the light to show in the eyes. Catchlights in the eyes adds a lot of life to a portrait. A small change. Big difference.
The small change in position allowed the light to leave a catch light behind for a more ‘alive’ look.
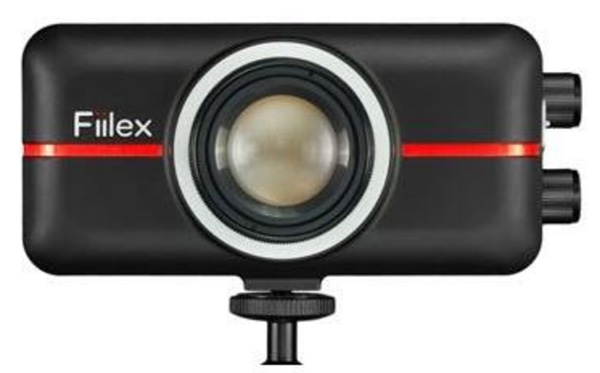
Fiilex P100
I choose the Fiilex LED’s P100 (AKA the Brick) because they fit easily in my suitcase, are battery powered (approx 2 hours battery life per charge), and have adjustable color and power. With a Color Rendering Index (CRI) of just under 90, there is a large spectrum of color available that is important to look for in LED lighting. Very versatile.
For infrared conversion of my cameras I use LifePixel. Infrared allows you to put an older camera to use and opens up a new time time of day for productive image creation.
Learn Photoshop in a fun environment. Aaron Nace applies the right amount of fun with easy to understand and follow tutorials. Actions and brushes are included with lessons!
Best embroidery ever. Give Queensboro a try, get a $20 instant credit to get started by clicking on the logo! They specialize in great quality custom logo apparel and promotional products with the best customer service.
Platypod has become a great resource for being creative in getting your camera gear easily into unusual places. As an Platypod Pro I get to work/play with the gear even before it comes out. Head over to Platypod, subscribe to the newsletter and you will get special discounts reserved only for subscribers.

 Original SOOC (straight out of camera) capture
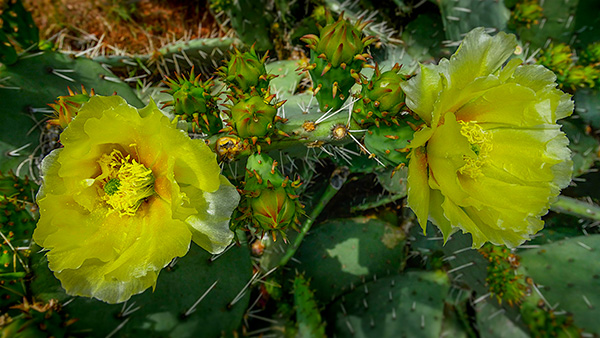 Cropped to 16×9 aspect ratio and added some clarity and saturation in Adobe Camera RAW. Then finished off with MacPhun’s Focus CK plugin to add a bit more snap and intensity.