The Lumix G6 is coming in very handy now that it is converted over to infrared capture by LifePixel. Midday is not the best time in the world for catching beautiful photos with standard color capture. But move to infrared and the middle of the day is a whole new world.
I was out scouting some new areas to photograph with wildlife and really didn’t think I would be capturing any images but I had the new Lumix GX85 and the 100-300mm lens and had some fun there in spite of the time of day. (check the post here) And I also had the G6 in IR. This is one of the advantages to shooting with micro 4/3rds gear. I was able to have all these options with me with no strain when hiking around and scouting. Used to be I would leave gear behind until I was absolutely certain I wanted to make images. Now opportunity abounds and I’m having more fun and getting more images.
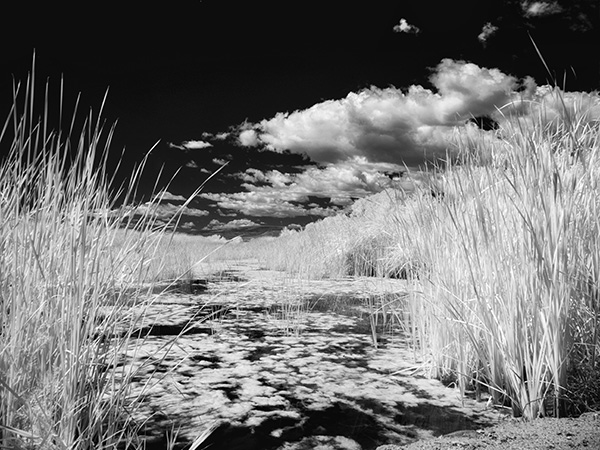
Sedona Wetlands (learn more about them here). Designed land to help with the processing of wastewater while creating habitat for wildlife. There are quite a number of species taking advantage of the new ‘watering holes’!
I’ve started to narrow down my processing of infrared images. I have bee taking the RAW file and lowering the color and tint sliders to 0. Dialing in highlight and shadow to taste. A pinch of Clarity. Add some black. Add some white. Then tweak the contrast. Open the image and take it to NIK Color FX Pro 4 for a little Glamour Glow and we are looking pretty good. Once I am pretty certain this is the processing path I want to take I’ll set up a preset in ACR which will dial in all the goodies to get me close then tweak. When I set that up I’ll share it here on the Successful-Photographer blog. You can see a bit more in-depth info on this IR conversion in this post on LifePixel.
There is a new Firmware version out for the GX85 the leverages the 4K video feature called Post Focus. Post Focus will run a little video capture that will make an image with approximately forty focus points. You can pull any of the still frames, and each frame of the video is focused in a different place. You can then play back the video in camera and select any frame you wish and save as an eight megapixel still frame. See the video below.
You ask, “Wait a minute Bob, why is this a nice feature?”
Number one, it enables you to choose what’s in focus in the image after the fact. For example, you are capturing an image of someone’s face with a VERY shallow depth-of-field without a lot of time to check on your focus point. You can dial in the corner of the eye or the beginning of the iris or the other eye if you’d like for creative possibilities. Here’s the cool part. You can take a few of these images and put them together with a process called Focus Stacking and control exactly what is in focus or out of focus in your photo.
Single still frame with just the middle portion of the image in focus bringing attention to the Plus 25 bar placed on the red bag.
Number two on the cool list, we can now do the focus stacking right in camera and have it saved as a jpeg right to the card. This can save a bunch of time. Before you had to take the video into another program, save each image as a single frame and then run those frames through Photoshop or another program to obtain your stacked focus image.
This image was Focus-Stacked in-camera to show detail throughout the entire range. Total time for processing about thirty-seconds
Nuber three, you can use this feature the way I have been to get a hyper-focus image but stacking all the images together. This will allow you to use a macro lens which can give incredible detail. Usually, that detail is very shallow depth-of-field, but with Focus Staking you can get focused detail from the front to the back of the image.
Here’s the video showing all the points of focus that were captured. The original is a little over one second long. I slowed it down to about twenty percent so you can see it move through all the focus points.
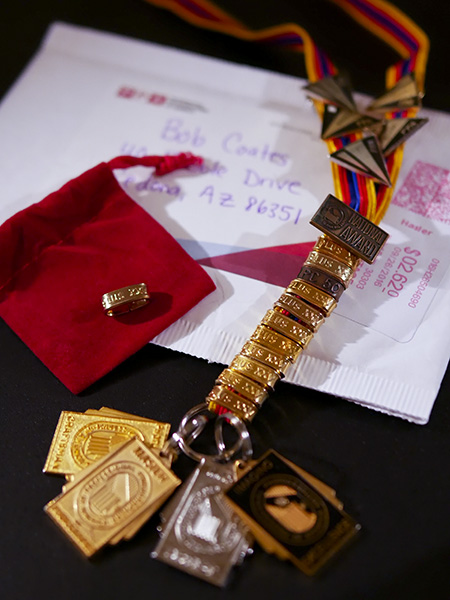
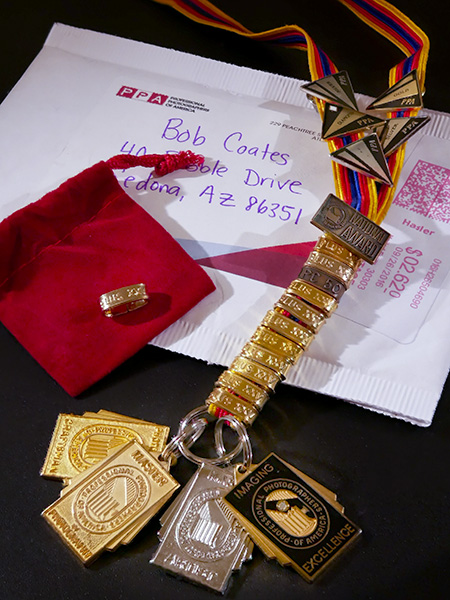
This is a photo of the representation of my achievements and service to photography through Professional Photographers of America (PPA). The bar on the red bag is the newest sent to me and shows 25 merits earned through service, education, and imaging competition. The medals on the bottom of the ribbon are degrees earned and the small rectangle in the PPA National Award presented by Arizona PPA. As members of the association, we are charged with wearing the medals at conventions and PPA events. It is a message to other members that we are accomplished photographers available to answer questions.
I have only had this camera in my hands for a couple of days, and I’m liking it! The Lumix GX85 was built on the same chassis as the GX7. It’s a body that is small but very comfortable, in my opinion, to handhold. I remember when I took the GX7 out for a test spin about three years ago and didn’t like the feel of the grip when first using it. But as part of the Luminary Team, I was given the assignment to take the camera cross country and make images and send them out for two days. First half day I was uncomfortable with the camera’s feel. By the end of the first day, it was, “I kinda like this camera.” By the end of the second day, I was pleased and comfortable with the feel of the camera.
The other bonus was/is that this camera is very low profile. Combined with the smaller lenses of the micro 4/3rds system I found almost no one who said no to the request of making their picture. A decided difference from the equivalent full frame DSLR gear.
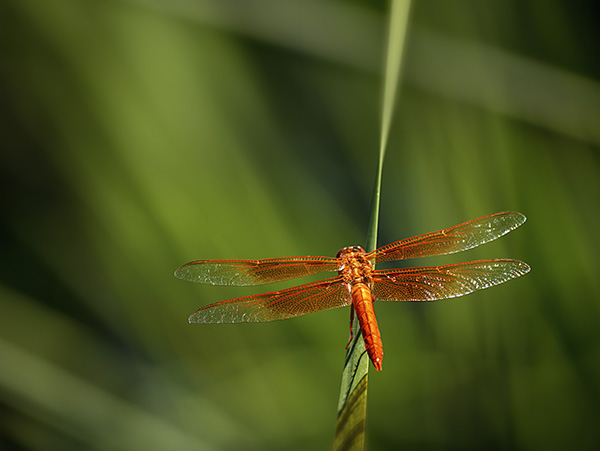
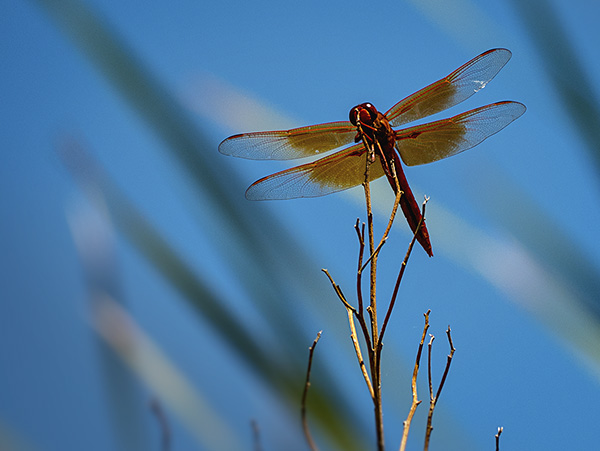
Fast forward to yesterday and photographing some wildlife. I was out scouting a wetlands area just south of Sedona. (who knew, right?) It was the middle of the day, and I wasn’t planning on making any images but just in case I set up the GX85 with the 100-300mm. The camera stabilization is fabulous, and the pictures I took are tack sharp. When photographing wildlife, I like precise detail and was excited by the results from handheld photos. It can be tough using a tripod when chasing flying critters around the marshes.This little guy is called the Flame Skimmer or Firecracker Skimmer for obvious reasons. I found chasing dragonflies is a lot like photographing birds in that you need to study behavior patterns to obtain well composed interesting images.
Here’s a detail of the dragonfly. A little bit of sharpening was added in post using MacPhun’s Creative Kit Focus
Here’s the under-carriage of another dragonfly. Amazing little critters!
I moved to a different area with more water at a place called Bubbling Springs over in Page Springs and found this huge family of Mallards out for an afternoon swim.
Mallard duck detail.
Images were captured with the Lumix 100-300mm Vario f 4.0-6.3 lens. That’s a whole lotta reach for about $550 – Especially when you consider it’s the full frame equivalent of 200-600mm.
Yours in Creative Photography, Bob
PS – Can’t wait to try out the new Lumix G Leica DG Vario-Elmar 100-400mm Lens with this camera.
PPS – Please remember that using links to make your Amazon purchases helps to support this website. Cheers!
It’s fun to find new art and artists (to me) once you start poking around. I’m happy to share Paul’s painterly photography work with you today on the Successful-Photographer blog.
Paul’s Thoughts on Painterly Portrait Art.
“A portrait describes what the subject looks like in a painting, a photograph or a sculpture. Portraits might include other objects which help to explain the subjects, A portrait, like all art, is something to “read”.
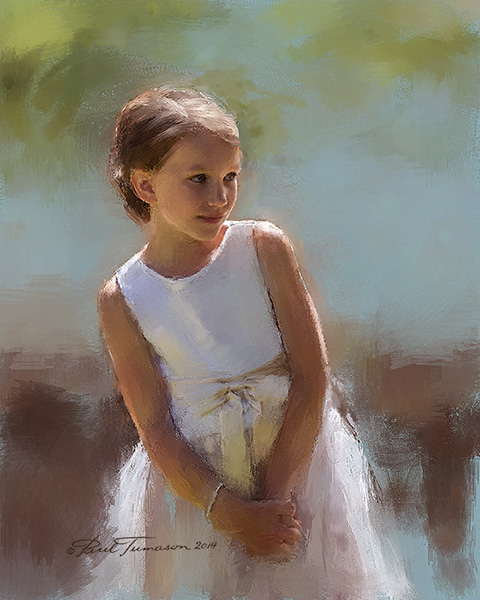
Cristi & the Boys before – Notice that Paul is starting with a very nicely posed and lit image before he begins the painting process.
I enjoy being engaged with the story of the subjects. Of course, so much is left to our imaginations, but the artist gives us clues about what the subject is thinking, what they do, or the emotions held deep inside them, what they feel about themselves, and of course, what they look like.
Some of us just think of the likeness that shall be portrayed, But to me, it’s what the subject tells us in confidence about themselves that makes portraiture so interested to me. Yes, beauty is in the eyes of the beholder.
On the creating my “painted” images, I start with my photograph, not always a formal portrait, as I like the candid type of unaware subjects. Like every one of us, we have particular likes and dislikes, and preferences. We just like certain things. I find this hard to explain: but I’ll attribute it to human nature. I try to make everything left in the image count for something.
The painting process for me is to soften some things, leave some sharp, lose some edges, define as little as possible while leaving as much as possible for the viewer’ imagination.
Much of my work is for my enjoyment. I like to print images, sometimes to study, but often to show to prospects, hoping that they would really like them and commission me to do a portrait for them in this style. In a way, it’s a method of marketing and separating myself from the competition.”
Paul has taught portraiture, including composition and lighting to photographers since the 1980’s including some Corel Painter classes here and there. He doesn’t work at this as a regular gig. If you are interested in Paul’s style, let him know if you’d like to have a class. He would love to schedule something for you. Otherwise, you are always welcome for a brief phone conversation to talk about our painterly art, or if you’d like to hire Paul as a tutor.
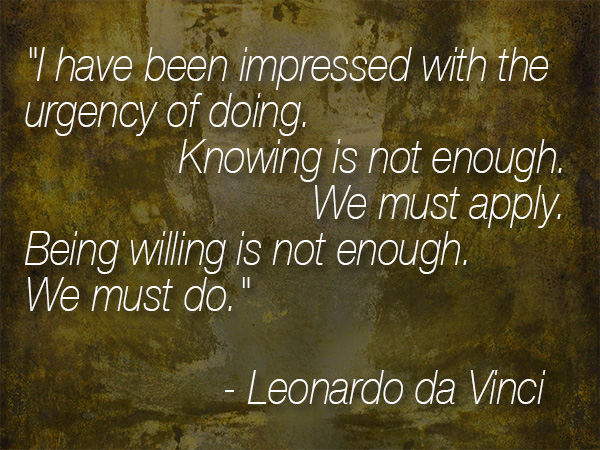
Today we’ll use the quotes of a couple of art contemporaries from around the 1400-1500’s. Both men are inspirational to me. We’ll start with a quote from Leo.
“I have been impressed with the urgency of doing. Knowing is not enough. We must apply. Being willing is not enough. We must do.” – Leonardo da Vinci
I guess the short word here would be practice. A regular theme here on Successful-Photographer. I feel Mr. da Vinci says it in a more powerful, in-depth way. “…impressed with the urgency of doing.” I’m trying to extend my vocabulary and writing skills to be as succinct and powerful with words as these.
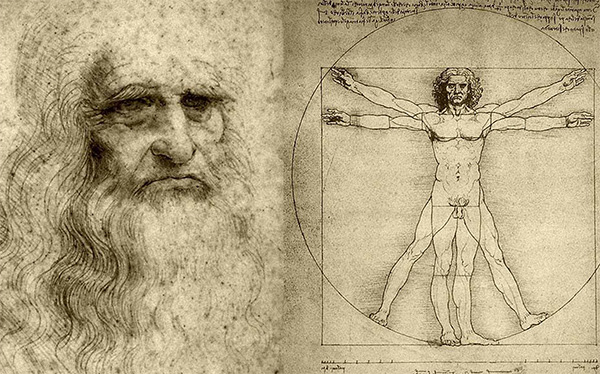
Thought to be a Leonardo self-portrait, Man in Red Chalk and his Virtuvian Man.
Many photographers, including myself, have the knowledge but have not put it into practice enough. If I may suggest that when you go to a seminar or program and you see, for example, a new lighting idea that you immediately upon returning from the presentation try to replicate the lighting. Can’t tell you how many times I thought I ‘knew’ about a technique because I had seen it performed but when trying to create it on my own at a future date found that, well, I didn’t.
I try hard not to make that mistake anymore. If I see a lighting technique that interests me.
I try to recreate it.
In a PRACTICE session.
NOT on a paid client.
Doing is the secret.
There’s another quote out there from Benjamin Franklin, “Tell me, I forget. Teach me. I remember. Involve me and I learn.” Involve yourself when trying to master any new techniques.
Which brings us to the quote from Mr. Buonarotti
“If people knew how hard I had to work to gain my mastery, it would not seem so wonderful at all.”
– Michelangelo Buonarotti
Do you hear the echoes of these words? One of the greatest artists of all time lets you know he had to work his butt off to achieve the things he did.
Clouds of all shapes and sizes dance and glide through the area on a regular basis.
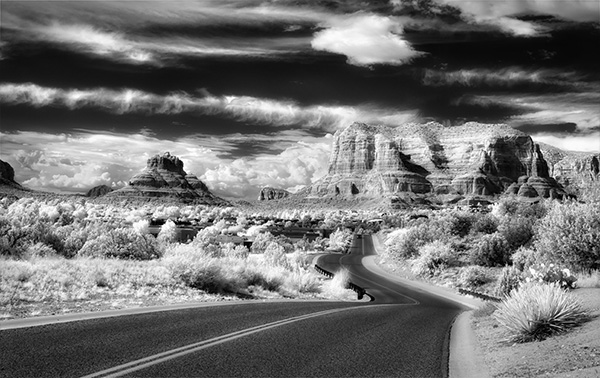
Normally, mid-day is not the best time to be out photographing in full sun. With my Lumix G6 camera converted to infrared the middle of the day becomes a playground of absolutely beautiful high contrast. I love this look and the possibilities it brings.
Infrared black & white image Village of Oak Creek, Sedona, Arizona
The camera was converted to infrared by LifePixel. It took a slightly older camera and gave me a new look for images in my photography life. The way I capture is in RAW plus jpeg and bracketing by three stops. For this image, I processed the three jpegs and layered them together using the information from each using Masks in Photoshop. I took the layer showing the highlights and moved it into NIK Color FX Pro 4* and added a Glamour Glow Filter to get the “IR Glow.”
Yours in Creative Photography, Bob
* You can download the entire series of NIK filters at no charge. Go get ‘um. There probably won’t be any updates but they are an incredible set of tools for use right now.
For infrared conversion of my cameras I use LifePixel. Infrared allows you to put an older camera to use and opens up a new time time of day for productive image creation.
Learn Photoshop in a fun environment. Aaron Nace applies the right amount of fun with easy to understand and follow tutorials. Actions and brushes are included with lessons!
Lightning, waterdroplets, sound, time-lapse, HDR sequences, smiles and much more control for your camera!
Cameras Get Smarter -
A High Speed Smart Camera Remote
Best embroidery ever. Give Queensboro a try, get a $20 instant credit to get started by clicking on the logo! They specialize in great quality custom logo apparel and promotional products with the best customer service.
Platypod has become a great resource for being creative in getting your camera gear easily into unusual places. As an Platypod Pro I get to work/play with the gear even before it comes out. Head over to Platypod, subscribe to the newsletter and you will get special discounts reserved only for subscribers.
 Sedona Wetlands (learn more about them here). Designed land to help with the processing of wastewater while creating habitat for wildlife. There are quite a number of species taking advantage of the new ‘watering holes’!