Make one camera do the job of two or three. I’ve been thinking about this possibility for a while. And now I’ve figured some of it out.
In this test i’ve captured a couple of my favorite musicians performing at our local restaurant. It’s the Millers on guitar. Robin Miller the father and Eric Miller the son. You can hear the magic as you can see they ‘get’ each other. Almost as if they can read each others musical mind. This song was written by Robin. I think the title is Change in the Weather. It’s a crowd pleasing winner of a song.
Because we now have the ability to shoot in 4K during capture we have a video that’s four times the size of 1080p. What this enables is moving around inside the frame which means we can create Ken Burns movement effects and zoom in for close-ups in different areas of the frame. It’s like having the look of several cameras from a single camera position.
The video below was captured with the Lumix GX8 and the 12-35mm f2.8 lens in 4K. Please don’t worry too much about the color as I shot this on the spur-of-the-moment hand-held while hanging out. The video was processed in Adobe Premiere Pro 2015.
Robin & Eric Miller live in Sedona, Arizona
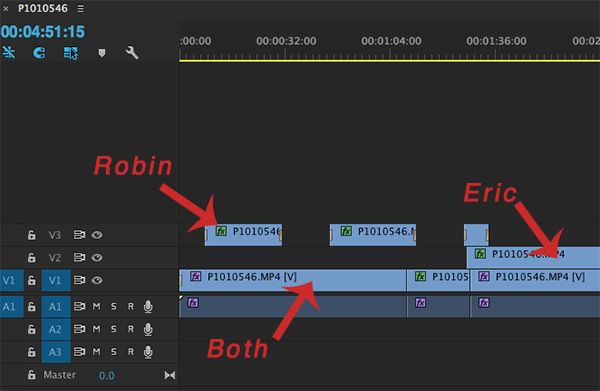
Timeline from Adobe Premiere Pro. I copied the video layer two times and used one of the layers as close up of Robin and the second copy as Eric. The bottom layer was the two of them and the overall stage.
If another camera was added with a different lens you could rove the room getting even more angles and tight detail shots for a full production look to the video. This just practice and play to learn new techniques.
By the way, I would also have better sound in a real production. Sound for this video was captured on the fly by the camera with a little tweaking in Premiere… and it ain’t too bad!
Creative possibilities abound in this new 4K world. What are you doing with it?? Let me know…
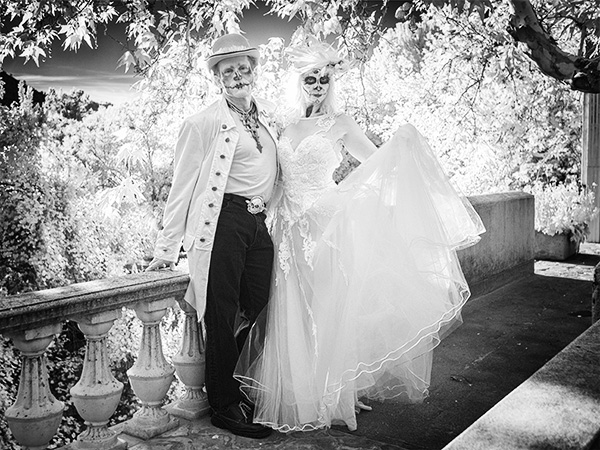
This couple was having a blast dancing with Mexican musicians providing music. They stopped and graciously posed for people as they wandered through the event. I asked if they wouldn’t mind posing for me where I could make the Infrared capture shine with deciduous trees as part of the background. Up the stairs we went…
Asking the couple to move to a different background made all the difference compared to just asking them to pose in among the crowd.
I’m still taking multiple exposures to make sure I still have detail in the highlights and the shadows, dark skies and bright leaves then process the files by blending them with Layers and Masks in Adobe Photoshop. This was a simple blend with the darker Layer on top I made a Feathered oval Selection using the Marquee Tool and Refine Edge. This allows you to see and tweak the results before applying the Mask. Even with the Bracketing I did end up loosing detail in the bride’s hair on the sunny side.
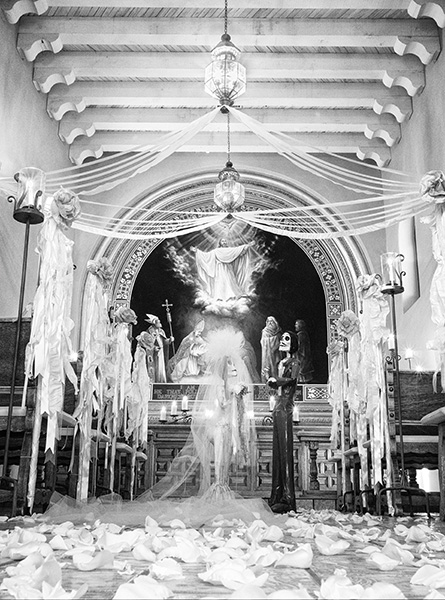
The wedding theme continued at the Chapel that was set for a Day of the Dead wedding.
As you might see I am really enjoying using the Lumix G6 that has been converted to Infrared by Life Pixel. I choose the standard (750nm) filter for my conversion because I wanted to get the traditional IR look exactly as I’d like it.
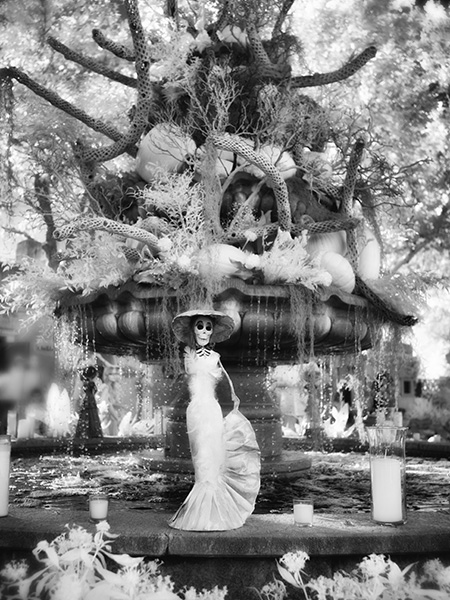
Obviously infrared imaging is not for people photography. Dead eyes. Super high contrast. Blown out highlights. Definitely not for people… Unless you are doing something artsy with the scene being most important and people are a relatively small element in the overall image OR you are at a Dia de Muertos(Day of the Dead) Celebration.
And, I just happened to attend one at Tlaquepaque in Sedona on Saturday and found a few people in costume and face paint to pose for me.
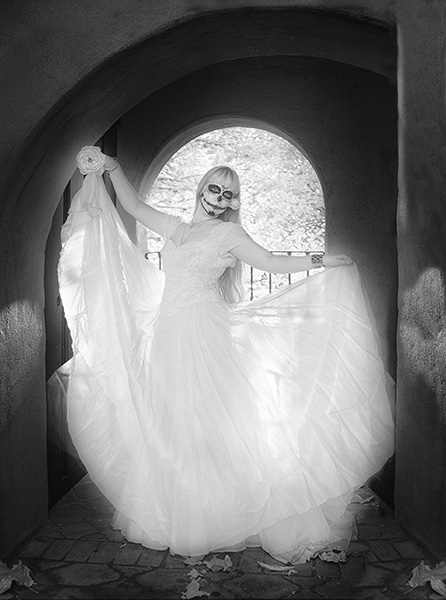
Had a lovely ‘Day of the Dead’ model join me for a quick photo session in a back lit alcove.
Paper mache Caterina on the fountain. Seems like it was a day for brides as I worked…
If you are unfamiliar with the Day of the Dead celebration it is a Mexican Holiday when families get together and morn and celebrate the passing of loved ones. The celebration is to help those who have passed to move on in their journey beyond.
Images captured with the Lumix G6 and 20mm f1.7 pancake lens. Converted to IR by Life Pixel. I had the
Proper tool for the job. I think infrared works for this situation. How about you??
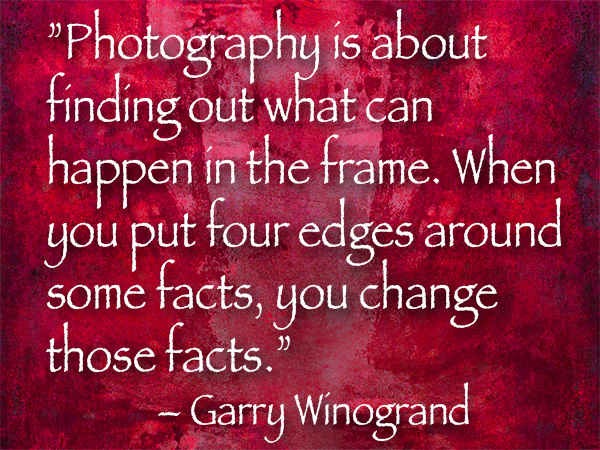
You’ve seen this line used in many books and movies by criminals, or those thought to be criminals.
Much the same idea Gary Winogrand brings forth the thought that what we choose to put in or leave out of the frame can change the story and impact of an image. It can be as simple as taking the time to think about the background and taking slight a step to the right or left to simplify the area behind the subject. Or it could be taking the subject to a totally different environment to tell a completely different story.
“Photography is about finding out what can happen in the frame. When you put four edges around some facts, you change those facts.” Gary Winogrand
Winogrand was a street shooter, advertising photographer, photography instructor and student of the photographic medium. He’s worth a look at to inspire some deeper thinking in how we use photography to skew our stories, for good or bad, when we press the shutter button.
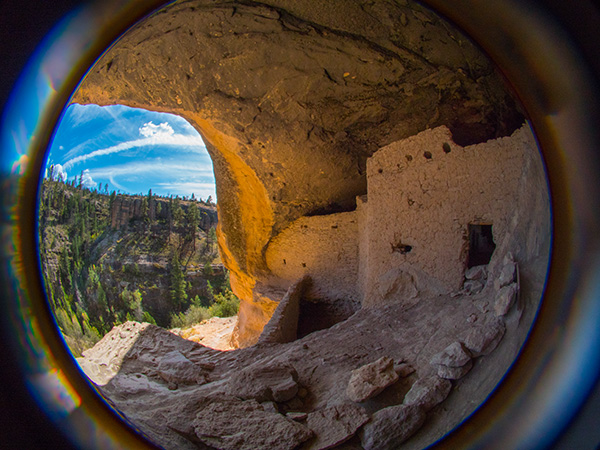
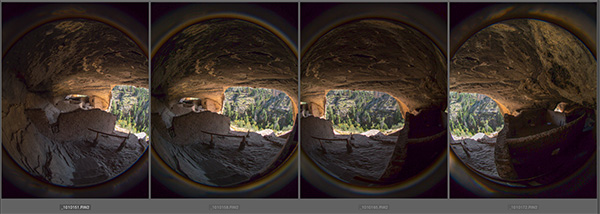
I got all the way up the hill to the cliff dwellings and realized I left the fisheye from Lens Baby in the car. Gotta tell you I almost didn’t go get it. I also gotta tell you it probably isn’t such a great idea to run 15 minutes up a steep hill at 7500+ feet. I was sucking some serious wind when I got back up to the top.
Annnnyy waayy… I thought I try some different things with the fisheye lens because of the relatively small spaces in the caves. Once I got my breath back I mounted it on the Lumix GX8 and here’s what I started to play with.
Here’s a ‘straight’ Circular Fisheye image from the dwellings. The full fisheye effect is a little cut-off because of the micro 4/3rds format.
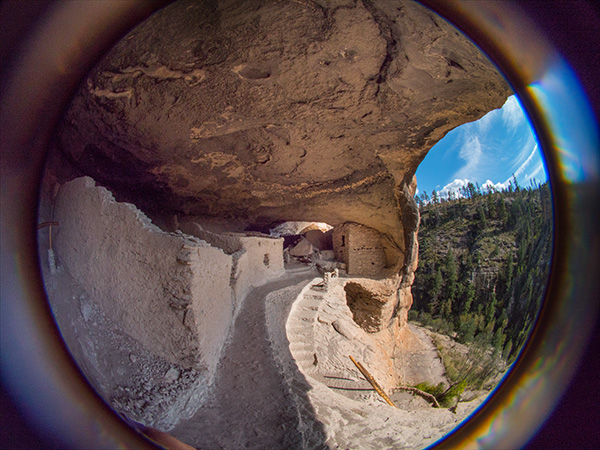
Gila cliff dwellings photo captured in a different way with the Lens Baby
Then I thought I’d try to push the envelope a bit further an do a panorama. Here’s the individual captures…
And the stitched image… Don’t try to have Photoshop stitch this for you it locked up on me. I guess the circular edges gave it fits so I did the stitching the old fashioned way… by hand with masks.
I enjoy trying new and different things and was surprised by the final result.
While on the mountain trip we rode off through the wilderness. Can you say “Curvy Roads!” boys and girls?
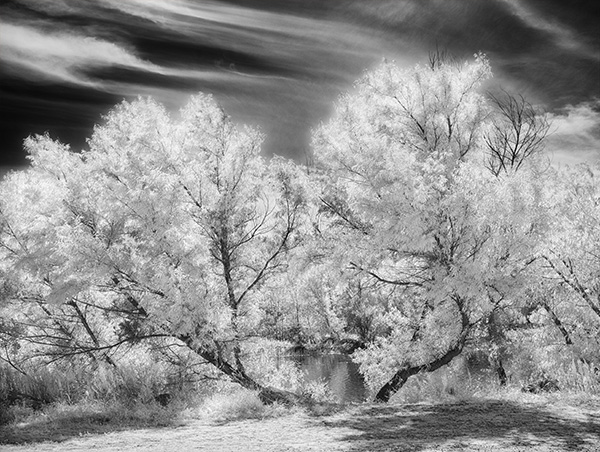
Lots of winding roads through the area but it led to some beautiful places. I had the Lumix G6 that has been converted to Infrared capture by LifePixel. It gives the image a pinkish cast straight out of the camera. I’m starting to find my groove in processing for the final Infrared photo look I am going for…
I enjoy how these trees framed a little window into the water beyond.
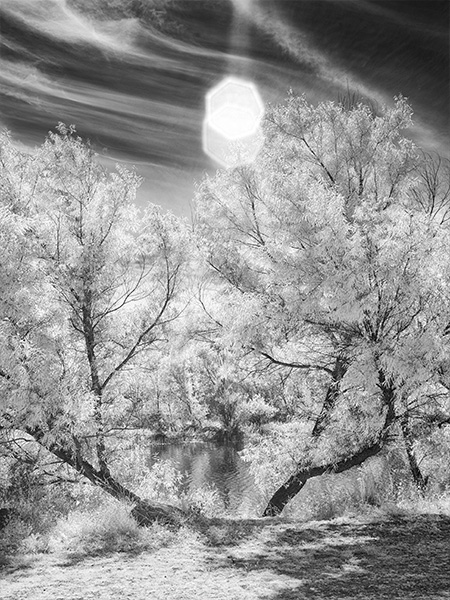
Same trees different composition with a witness to how careful you need to be in shielding your lens from a direct sun hit. Although in this case I think it’s a happy accident and enjoy the flare that found its way into the frame.
Here’s my workflow at the moment as I learn more how the camera ‘sees’ IR light. I capture the scene in RAW plus jpeg with the camera set to capture a black and white image. This give me a pretty good preview of what the IR image will look once it is processed. But since I am capturing the RAW images at the same time I also get all the information that was presented to and captured by the camera for tweaking in post processing. Having all the color information in different channels allows for some very specific processing that would not be available if only the Luminous information was saved.
In addition to the RAW plus jpeg I also bracket exposures. At the moment I am bracketing by seven stops to learn how far to over and/or under expose any particular scene.
Then I choose two of the separate RAW captures with one giving me the tones for the foliage and one for the sky. I process these in Adobe Camera RAW. Then using Masks I blend the two images together feathering the areas using the Brush Tool. I Save the file and merge all into a Layer on top preserving the Masked Layers just in case.
Then I take the file into NIK Silver FX Pro2 to process for Black and White because I still have the color information in the file I have more options for tweaking individual tones. Then I will process the color Layer one more time to vary specific areas even more. Then with the tow BW processed Layers I blend those together using Masks for the final tone blend. Then depending on the look I am going for I may process this Layer in NIK Color FX Pro4 using Glamour Glow and Mask those changes where necessary.
For infrared conversion of my cameras I use LifePixel. Infrared allows you to put an older camera to use and opens up a new time time of day for productive image creation.
Learn Photoshop in a fun environment. Aaron Nace applies the right amount of fun with easy to understand and follow tutorials. Actions and brushes are included with lessons!
Best embroidery ever. Give Queensboro a try, get a $20 instant credit to get started by clicking on the logo! They specialize in great quality custom logo apparel and promotional products with the best customer service.
Platypod has become a great resource for being creative in getting your camera gear easily into unusual places. As an Platypod Pro I get to work/play with the gear even before it comes out. Head over to Platypod, subscribe to the newsletter and you will get special discounts reserved only for subscribers.