by successfulbob | black & white, musician photography, people photography, photography, photography education, photoshop tutorial
If you send out press releases or images for ads that will be appearing in newspapers I highly recommend a few steps to ensure that you get good looking images when the paper goes to print.

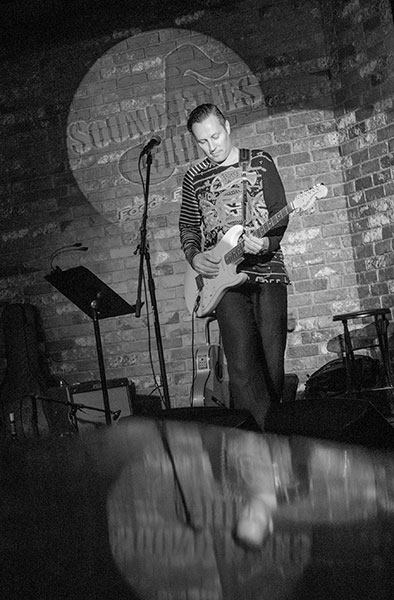
Eric Miller image converted to black and white using the LAB mode in Photoshop with a curves bump.
Number one – Do not send a color image unless it is possible the image is going to be printed in color. Many times in the newspaper world since they are on deadline and shorthanded the conversion from a color image to black and white is to desaturate the image. Period. There is no consideration for the tones or where they fall or what colors are going to come forward. I highly recommend using a method I have made with a Photoshop Action.
Convert the file to LAB Color Mode In the Channels Palette Select the B Channel and Delete it. Then Select and Delete Channel Alpha 2. Convert the file to Greyscale Mode. Convert the file to RGB Mode. Add a Curves Adjustment Layer. Pull down on the 3/4 tone and up on the 1/4 tone in the Curves Dialog box adding contrast to the image.
This makes for a pretty clean BW and with the Curves Adjustment Layer you can make changes to the highlights and shadows if necessary before saving the file. If you would like this action already complete rather than building it yourself send me an email and I’ll get it to you.
The other thing that will help your image stand out in newsprint is to sharpen your image until it almost looks too crunchy on your screen and when printed with the spread of ink it will be sharp in print. If an image is not ‘over sharpened’ this way the spread of ink will make it look soft. Here’s what I do…
Flatten the image. Go to Filter > Sharpen > Unsharp Mask with these settings – Amount 500% Radius 1.7 Threshold 7. Your image will look frightening! Wait there’s more… Go to Edit > Fade Unsharp Mask Change the Mode to Luminousity and fade to 40% Opacity. Your image will look a bit sharp but will print beautifully on newsprint at these settings. Want that action? Email me.
Conversion and sharpening will make your images stand out from the rest…
Yours in Creative Photography, Bob
by successfulbob | fine art musician portrait, Lumix GH3, Lumix GH4, Lumix Lounge, musician photography, photoshop tutorial, success education
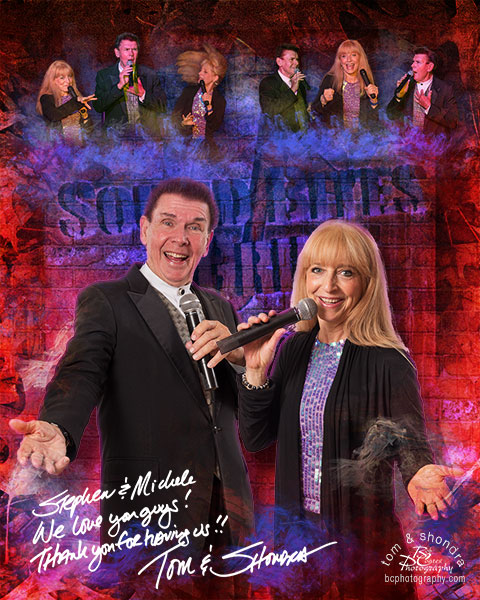
Stalwart entertainers Tom and Shondra did a show at Sound Bites Grill here in Sedona, Arizona. These guys (I use that term loosely) do a highly energetic show that the audience really gets into. Steve asked me to photograph them for the ‘Wall of Fame’ and it was my pleasure to do so! Even though it is only two performers I thought their energy needed more than just one photo to help tell the story… This is what I put together.

Tom and Shondra on stage at the Sound Bites Grill Wall of Fame image.
The Lumix GH3 worked well for capturing Tom and Shondra’s performance. Because their expressions changed quite rapidly during the live performance I used the 5 frames per second bursts to have choices. I used the Lumix GH3 for this shoot because I sent the Lumix GH4 in for service… not that there was anything wrong but more of a precautionary measure.
I was photographing along Oak Creek and went to cross the creek and slipped on the rocks and the GH4 was submerged while I was trying to right myself which took long enough to put water into every available opening in the camera. I dried it off as much as possible at the scene and then headed for home. I dried it more. Got out the hair dryer and searched for moisture in every compartment. I kept rotating and finding more water but with the heat on medium and I made sure I got every drop I could. The camera turned back on and operated wonderfully. But I sent it in for a chek-up and all was well. The weather sealing on that camera is better than I thought. I still don’t recommend submerging your camera to test it like I did. But it showed me we should be pretty good in a moist environment…
Multiple images were put together using Adobe Photoshop CC 2014 using blend modes, textures and masks. I also added some smoke with brushes that I obtained from Woody Walters who is an amazing Photoshop artist and instructor. Go check out his stuff. (I don’t receive any commission from Woody but I can save you 15% if you decide to sign in for more than his free Photoshop tutorials use coates15) He has amazing info to share with you!
Yours in Creative Photography, Bob
Remember using links from this site help support the sharing of photography knowledge.
by successfulbob | people photography, photography education, photography software, photoshop tutorial
I often have to remove subjects from basic white backgrounds and thought I would share a technique using the Channels Palette to create the Alpha Channel to separate the subject very cleanly from the background with little fuss and muss. There is some Photoshop Magic involved. If you haven’t seen this technique before you will be pleasantly surprised by how much of a time saver it is!
Special thanks to my subject Tom Tayback of Tom Tayback and the Daddy O’s who does a 50’s & 60’s Graffiti Gold Show that is pretty darn cool. If you are in Arizona and see the show will be playing, go, I know you’ll enjoy it!
by successfulbob | Lumix GH4, Lumix Lounge, musician photography, photography education, photoshop tutorial
Sound Bites Grill hosted Daniel and the Lion in the show lounge last Tuesday for Dance Night. There were quite a few people out on the dance floor and I’m pretty sure I heard talk of them coming back for another performance. Make sure you watch out for it if you are in the Sedona, AZ area! Or check their web site for other dates. BTW they are opening for the Counting Crows this summer.
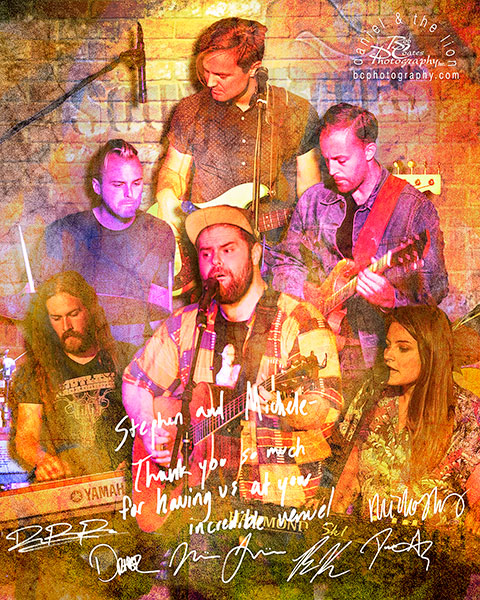
If you follow my blog you know I create art images of the performers at Sound Bites Grill here in Sedona. Here is the image that made it to the ‘Wall of Fame’…

I capture all the musicians individually and try to get their personality worked into the photo.
The individual musicians are selected in Adobe Photoshop then composed into the art piece adding drop shadows and others effects. Different texture images are also layered over the master with different Blend Modes applied. The signatures are done with black Sharpie on white paper. Then the signatures are scanned and laid out individually. I Invert the color and change the Blend Mode to Screen and the black disappears leaving just the autograph.

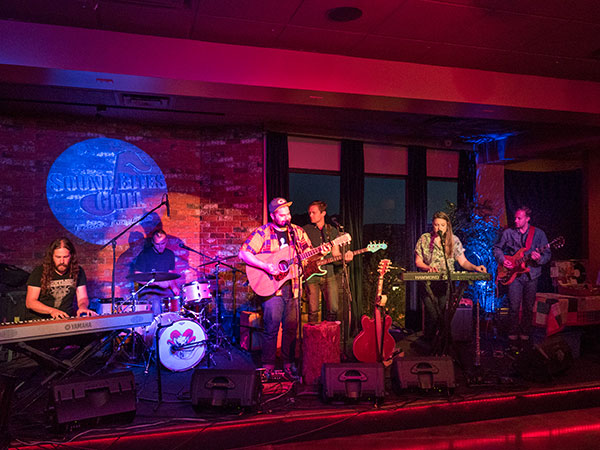
This is more of a straight capture of the performance of the band. Lumix Vario lens 12-35mm settings 15mm f2.8 1/30th sec at 3200 ISO
I’m using the Lumix GH4 which makes it easier to capture the large range of lighting that occurs in a live venue using LED lighting. This is a single capture. The image was then taken in to Adobe Camera RAW. Highlight slider was brought down to tame the blown out areas and the shadows slider was brought up to bring some detail out of the darker areas. This camera has a tremendous density range. If I was going to really work this image to control the light even more I would have blended bracketed photos together for even more range of density. It is very possible to accomplish this in one capture because the camera shoots at 12 frames a second and can bracket up to seven stops of light with one push button of the shutter.
Yours in Creative Photography, Bob
by successfulbob | Lumix GH4, Lumix Lounge, photography, photography education, photoshop tutorial, video
Finally started playing with the 4K video capture to make still images on my Lumix GH4.
Why would you want to do that? Well having access to 30 fps images allows you to capture micro expressions during a fast moving shoot of a baby or if you want a photo from a video you made and couldn’t grab stills from. I didn’t realize how useful this could be until I started trying to photograph hummingbirds at the new feeder my wife put up. This is a pretty good image that will print fairly large. If you are using the entire frame you can grab an eight megapixel image from 4K video.
After grabbing the Frame for the video I opened the file in Adobe Camera Raw so I could use those controls by highlighting the image in Adobe Bridge and hitting Cmd R (Cntrl R for PC users). After some additional adjustments for color and sharpness and removing the bird feeder in Adobe Photoshop here’s the still photo result.

This image came in at 15 MB after cropping. Depending on the output media this could easily make a 20 inch or larger print.
Here’s the video.
YouTube Video on the original 4K video capture.
I’m thinking that his has more applications than I originally thought. When I first heard about this idea I was thinking there’s no way I’d want to dig through that many images for an expression or specific moment. Found out it wasn’t that hard stepping through the frames in Adobe’s Premeire Pro CC.
The photography landscape is changing as the lines between video and still capture get closer together.
Yours in Creative Photography, Bob
by successfulbob | graphic design, people photography, photography, photography education, photoshop tutorial
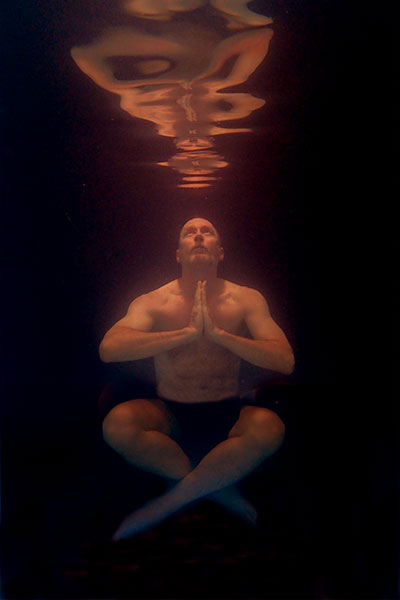
Pierre Stephenson was presenting a program on photographing underwater portraits. So being the shy guy that I am I asked if he could grab one of me cause I was looking for something different… And boy did I get that.
Pierre immediately said, “Yeah that would be great! I see you in a cross legged Buddha pose.” I’m all over it so off to the pool we go…
 Because it was very hard to hold position this is two combined photos. One for the legs and lower half of the body and one for the upper half and reflection. Image © Pierre Stephenson used with permission.
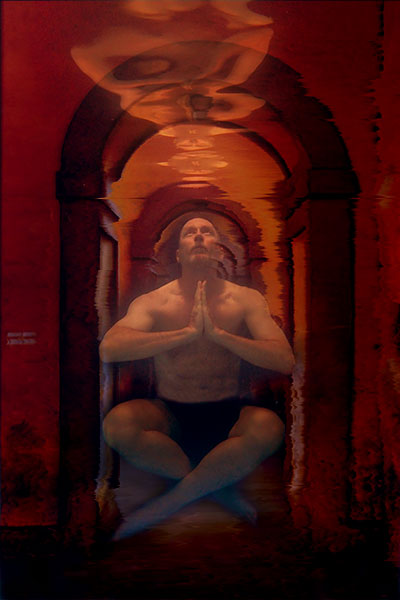
When I showed Pierre the image (he gave me the files to play with) He said, “Wouldn’t it be cool if you were in a grotto?” I remembered a photo in my files of a set of arches from a shoot in Tuscany and started work blending it into the underwater photo image.
 Added the ‘Grotto-ish’ background using masks and blend modes in Adobe Photoshop.
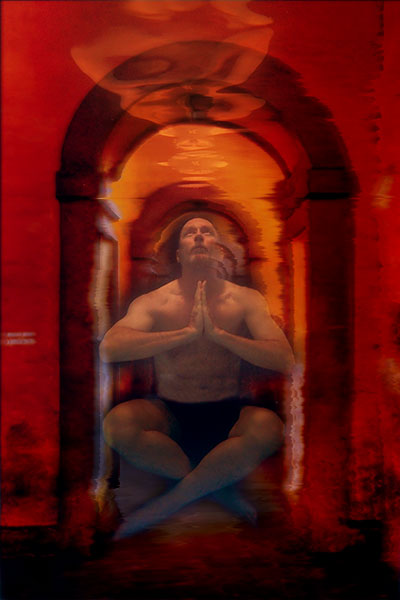
 With a bit more Adobe Photoshop tweaking and color work this is pretty close…
This is a case of playing with an idea and developing it through playing with ideas. Is this complete? Not yet. It needs some refining as most of this was done on small files with very quick selections. I’m going to check in and see if Pierre likes the direction I hope he likes it…
Yours in Photography, Bob

