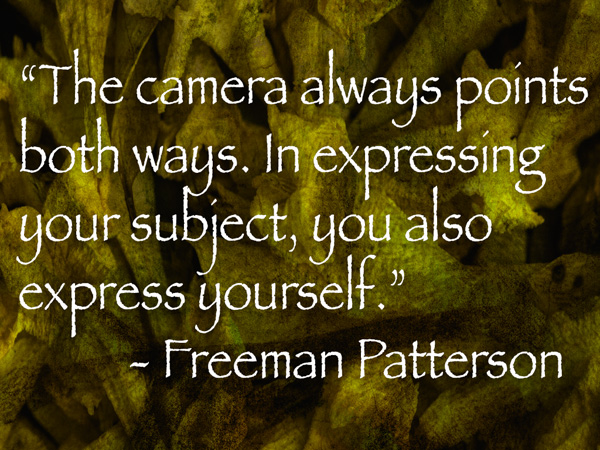
I was caught by the message portrayed by the neon light. I think it’s a good one by the way!! Seen in the entry to the Hard Rock Cafe in Atlanta, Georgia.
When we are shooting digital (and who isn’t for the most part?) we sometimes have what I call ‘Light Creep’. It is a phenomenon of different types of lighting and the frequency of the patterns or waves creating that light. In the neon example below you will see lines appear on the image indicted by arrows. This shows up when the pulsing of a light is slower than the shutter speed of the capture. It is very apparent in neon and florescent lighting situations. The pulses of light are slow but not apparent to the naked eye and shown by the camera. But, when a proper shutter speed is used for a lighting situation the camera will record a scene as the eye does. IE the shutter speed needs to be slower than the pulse of light…
Arrows show the dark lines where the light is not being recorded.
Proper shutter speed (slower) allows the entire lighting spectrum to show in the neon sign.
Be aware if you are capturing images under lighting conditions that are florescent, sodium, neon and possibly others. Slow down your shutter speed or add your own light to the scene or suffer the consequences.
Yours in Creative Photography, Bob
PS – Remember, no nuclear weapons are allowed in Hard Rock Cafe! (a good rule!)
An interesting thought for today’s Photo/Art Quote from Freeman Patterson. It’s not really something I’ve thought about much over the years. I guess as I’ve been exploring photography as more of an artistic endeavor verses a realistic process I would be attracted to this thought.
“The camera always points both ways. In expressing your subject. You also express yourself.” Freeman Patterson
I’m going to guess that this is the reason if you give ten photographers the same subject to photograph you will end up with ten different images. I also believe that the story given when the subject is presented to a photographer can have a huge impact on the final outcome.
Witness Canon giving six photographers the same person to photograph who told each photographer a different story about his life and got six VERY different photographs in return.
Canon video of six stories and six results. One subject.
Spend some time thinking about this and please share your thoughts. This is one of those things that fascinate me.
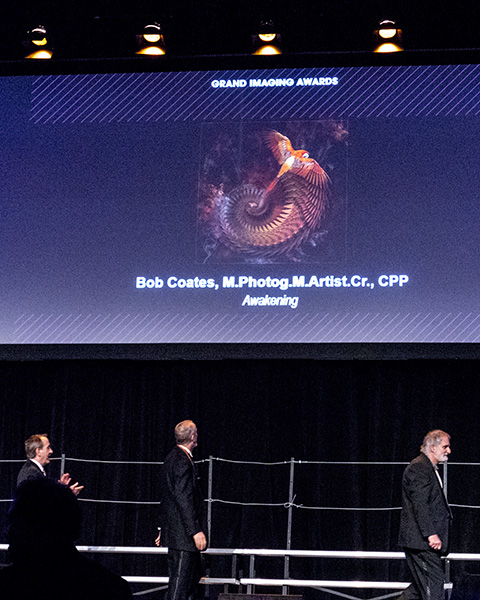
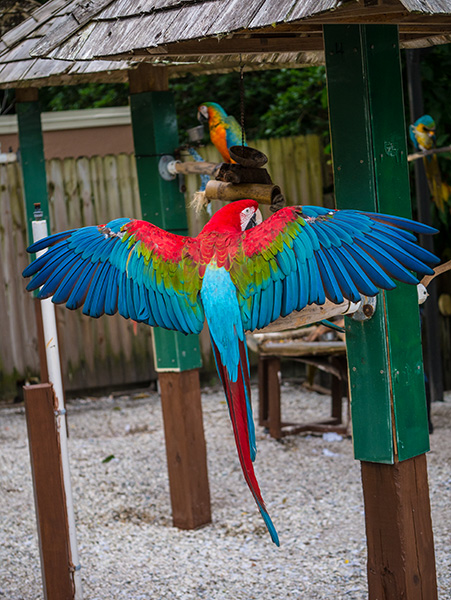
I was excited to receive a call while on vacation with my wife in New Mexico from PPA headquarters. They were calling to share the news that I was named to the Top Ten in the Illustrative Category. I learned I was eligible for a Grand Imaging Award. Unfortunately, I did not earn a GIA Award but I was named to the World Photographic Cup – Team USA It was quite and honor to have an image be recognized at that level.
A photo taken by a friend as I headed across the stage during the Grand Imaging Awards at the PPA Convention in Atlanta, Georgia last week.
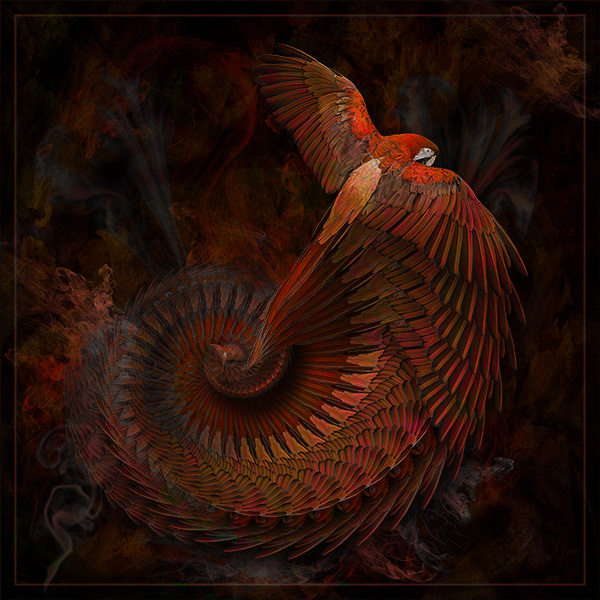
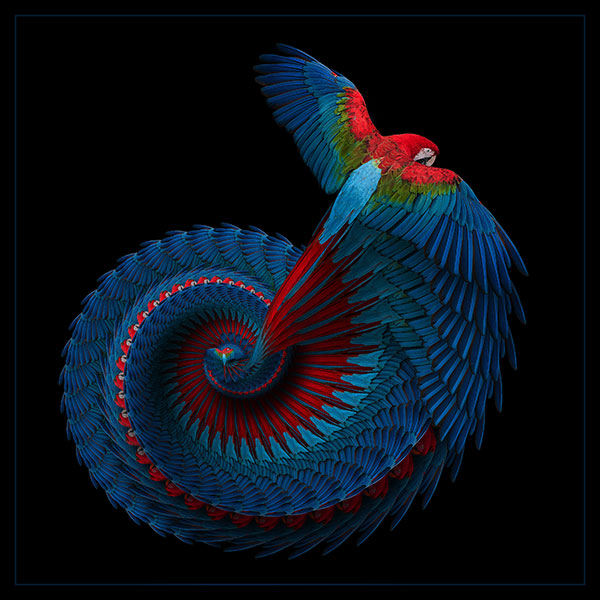
Here’s a better look at the image. It was created using a macaw that I photographed at Sarasota Jungle Gardens in Florida. The bird was extracted from the scene and duplicated numerous times into a spiral nautilus composition. Texture, smoke, shadows and color layers were added to add more depth and dimension.
This is the final image.
Here is an earlier version on the way to the final.
Original capture – Tech info from original capture Lumix GX7Lumix Vario 35-100mm f2.8 1/250 sec f2.8 ISO 400
And, I can’t tell you how many times I heard, “Oh, you’re from Sedona! You are so lucky to have such a beautiful place in which to live!”
Now I don’t actually dispute that statement because I am lucky and I do live in a beautiful place. But, photographically we all live in beautiful places. Why do I say that? Because it is the light in which makes a beautiful photograph not necessarily the subject matter. Believe me I’ve seen plenty of butt-ugly photographs of the red rocks of Sedona.
The other part of the equation is that I believe we are inspired by the unfamiliar. When we see the same things before us day after day I believe our eyes and minds become fatigued by the repetition. Moving out of my comfort zone to new visuals on a regular basis via the travel I do when presenting programs around the country I find stimulates my creativity. Just by virtue of seeing something I am not used to can lead to creating new imagery that is interesting to me.
Wherever You are is Beautiful
Wherever you are is quite interesting when seen with new eyes. There have been many times a photographer from out of town has come into my neighborhood and shown me new ways to see the beauty around me. And I have shown others beauty in their own neighborhood.
I have found I really enjoy seeing new things. I think the secret is to use the same eyes at home as we do on the road. I suggest you and I try to not wait to travel to look at our own city or town with new eyes… I guarantee you will start creating more and better images. Although it doesn’t hurt to get a little ‘refresher’ by taking a little trip as a reminder.
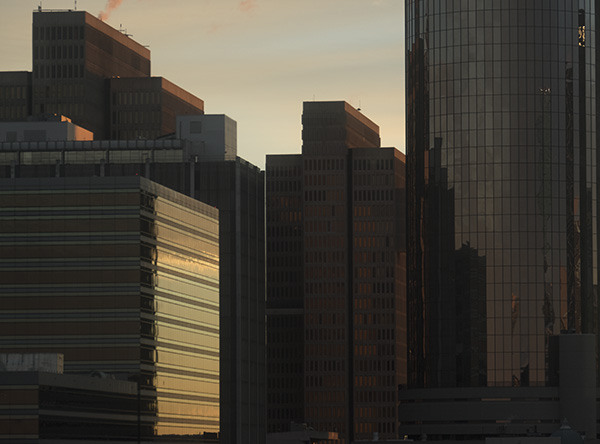
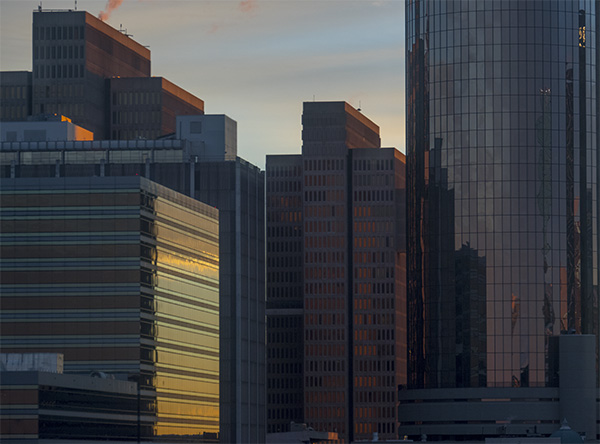
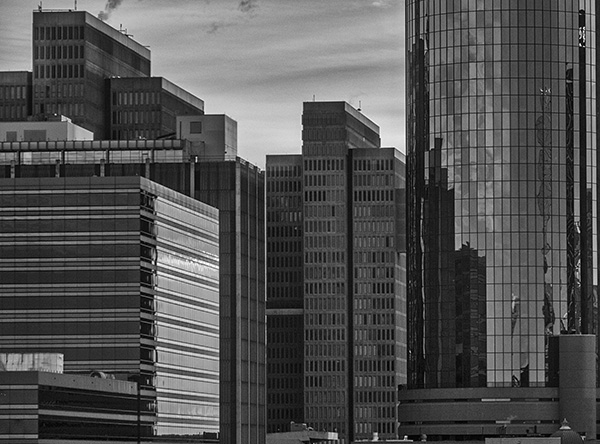
One Image from the City of Atlanta
The convention was in Atlanta, Georgia. This image was captured from the Onmi Hotel 11th floor. I enjoy the architecture, lines, forms and light as I look out over the city.
This is pretty much SOOC (straight out of camera)
This version is with color correction and a bit of artistic adjustment.
Using NIK Silver FX Pro 2 to create a black & white version makes tone and form more of the star than the color.
All three images have a slightly different feel due to different processing. I’m sure there’s even more but that’s all the time I have today. I be sharing more of my ‘city safari’ images in posts next week.
For those who have inquiring minds about gear and settings for the capture… Lumix FZ1000 1/200 sec f4.5 ISO 200 in Aperture Priority
Conventions. If you aren’t getting out for face to face learning opportunities I feel you are missing out on a vital link to running a successful business. It’s true that there are many ways in this day and age to learn more photography, art and business skills via DVD’s, online learning with things like UTube, Linda.com and Kelby One etc… BUT, in my mind you are missing out on the personal connections and being exposed to new sights and sounds outside your normal working environment. That stimulation can be key to having wonderful breakthroughs in the art and science of running your business.
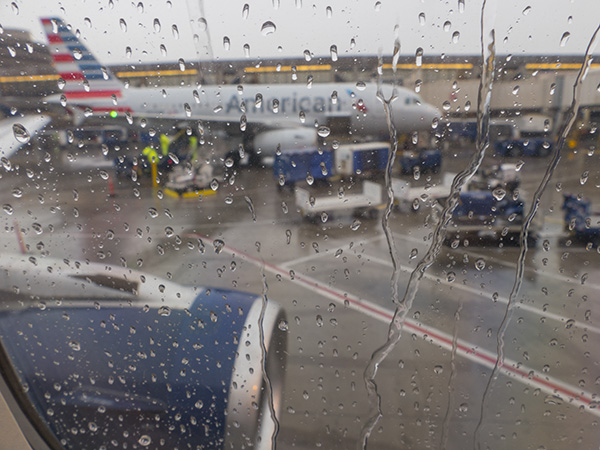
Here’s the view out the porthole of the plane on the way to Atlanta. Used the Lumix FZ1000 set to macro mode to get the camera close to focus on the rain trails running by my view…
On the tarmac waiting for liftoff in Phoenix, Arizona
If you are here at Imaging don’t forget to say ‘Hi’!
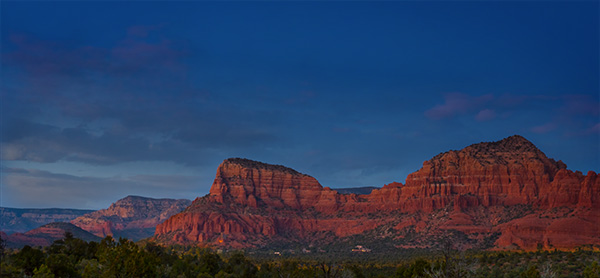
When making a time lapse (view time lapse video here) image you can leverage a thing I often do to create a solid look of a scene by using images captured over a time period to get the best of all worlds. As our eye can change the size of the pupil in any scene when looking into the shadow or highlight area we sometimes need to arrest time and blend it into a single image to represent what the eye would actually see. I call this an advanced form of HDR imagery as the images are not captured in one go but with the camera on a tripod blend images that were made while the sun was up, as it was going down, and long after it had crept below the horizon.
Here’s the final image.
Here are the images combined and used to create the final. The photo on the left was used for the treeline across the bottom. Next image was used for the cloud formations. The third image was used for the red rocks. and the final image was blended for the deep colbalt-blue sky.
Why use Multiple Images?
I went back and selected images based on the subject matter that was exposed exactly for the area of the scene and using masks blended them together for the final look.
The use of images captured over time verses capturing all the images in a single HDR capture is the quality of the information in the highlight areas and shadow areas as they are captured exactly as they should. This will give you less noise in shadows and cleaner highlights, allow the glow of light in a scene and more.
Gear
A Lumix GH4 was mounted on a tripod with the 7-14mm f4 Vario lens. Images were captured every three seconds over a long time period for the time lapse video. If I was using this for the ultimate capture of a scene verses also for a time lapse I would set the interval for more like an image every five minutes or so.
Yours in Creative Photography, Bob
PS – this technique can also lead to multiple iterations and mood of a scene… Try it you’ll like it!
We are photographers but within our chosen medium we have many ways of bringing attention to our subjects. Composition, lighting, color, tone and contrast all plat a part. But if we examine our work a bit more in depth we will see we at, any one time, one of these tends to come forward more often than not in our images.
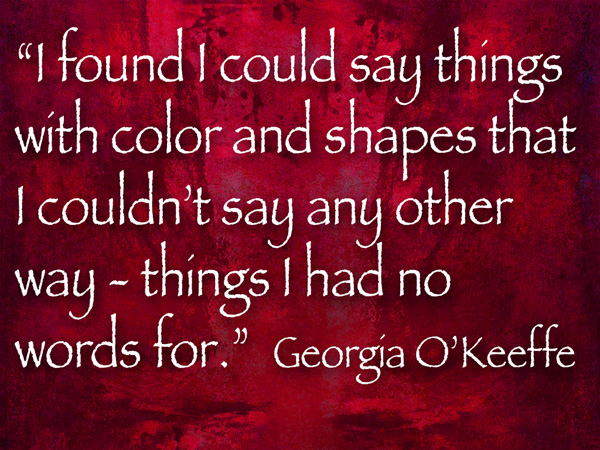
Which brings me to today’s Photo/Art Quote by prolific artist Georgia O’Keeffe.
“I found I could say things with colors and shapes that I couldn’t say any other way – things I had no other words for.” Georgia O’Keeffe
So may I suggest when creating your art you give thought to the idea, whether it be portrait, fine art or move to the forefront, your message in the creation of your images. I believe if you think with this in mind you will begin to see your creativity grow.
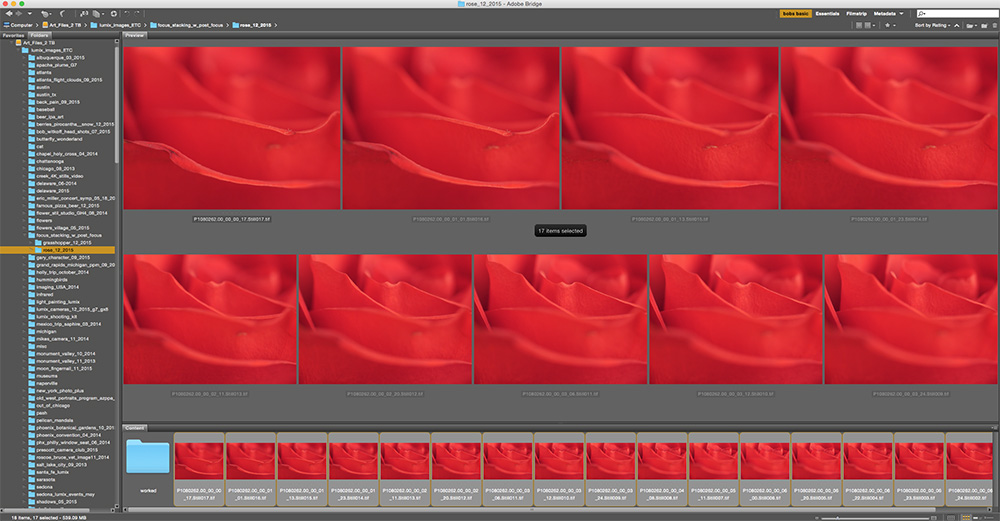
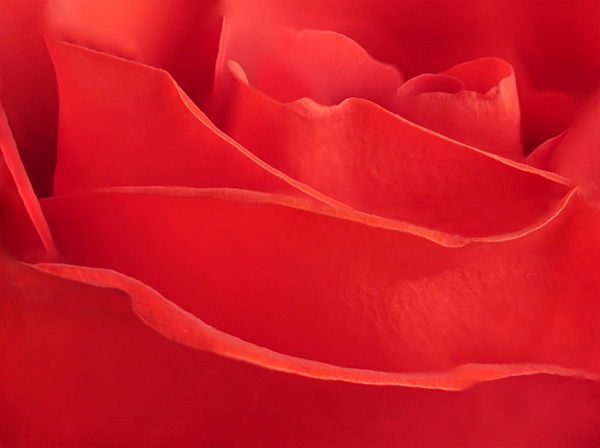
It’s a feature I wasn’t sure I had a reason for but again in the studio I used the Post Focus Setting on the Lumix-G7 to focus stack to get a different look from my 45mm Macro lens. This image started with a seven second video clip with the focus point being moved by the camera as the camera searched through all of it’s focus points. I’ve found the camera to capture as little as one second of video to as much as ten seconds depending on subject matter and how deep the focus goes through the scene.
This is my favorite rendition of the rose.
Create the Image from the Video
The steps I used were to download the video. Open it in Adobe Premiere Pro and select the still frames I wanted to work with and saved them as TIFF images. I wanted a soft and sharp movement through the final image. All 17 selected images were loaded into a single Photoshop document by using the Adobe Bridge command Tools>Photoshop> Load Files into Photoshop Layers after selecting all the images. Once the images are in Photoshop all layers were selected and under the Edit menu the Auto-Align setting was applied. Then under the Edit menu Auto Blend Layers was selected with the settings Stack Images with the Seamless Tones & Colors checked. This will take all the ‘Sharp Bits’ Of the image and mask them in.
The set of images saved out to individual files for the Post Focus video capture.
Layers Palette after adding images to file, aligning images and blending. Photoshop automatically created the masks.
Rose photograph after blending and cleaning up imperfections in the flower. Used Photoshop Tools then moved in to NIK Color EFX Pro 4 for further modification.
Talking Photography Tools
The tools we have to work with like Photoshop & NIK Color EFX Pro 4 can take images to an entirely new level and I keep trying to push to see what I can do. I hope this has been a help to you and at the very least given you some inspiration to think about image making in a new light.
Yours in Creative Photography, Bob
PS – The Google NIK entire collection of software plugins is only $149. Great suite of tools!
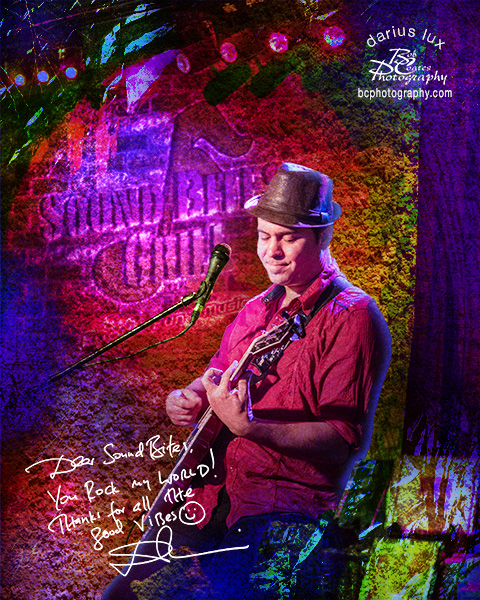
A new member for the Sound Bites Grill ‘Wall of Fame’ in Sedona, Arizona. Sound Bites is the largest live entertainment restaurant in Sedona and over the years have brought in some great entertainment. I have been fortunate to record many of the fine musicians and entertainers and create photographic art to celebrate their performances. Here’s one of the latest, guitarist Darius Lux.
Darius Lux ‘Wall of Fame’ Art
For the curious, here’s how I create the images for the ‘Wall’.
Capture live performance while trying to get good poses that tell the story of the artist. For example, Darius bill himself as ‘Acoustic Spirit & Soul’. That’s why I choose a shot of his eyes down in a thoughtful position. To capture the stage show I use the Lumix GH4 usually mounted with the 35-100mm f2.8 Lumix Vario lens. This makes it possible to capture the action with no flash and from low profile so I don’t disturb guests who enjoying the show.
The artist signs his or her autograph on a blank white sheet of paper with marker that is then scanned into the computer. Using Adobe Photoshop I invert the color so the words and signature are white and the paper black. Then the signature is moved to the file and changed to Screen Mode. This has the effect of making the paper ‘disappear’ and the text remain. This is resized to represent a regular autograph. This would not be possible after the fact as many of the musicians are from out of town. At the very least even of they are from Sedona getting up with them for the signature would take quite a bit of time.
The artwork is accomplished in Photoshop by selecting other images that contain textures and using more Blend Modes, color layers and masks to get the final look. While there is a unifying feel to all the images no two are created in the same way.
For infrared conversion of my cameras I use LifePixel. Infrared allows you to put an older camera to use and opens up a new time time of day for productive image creation.
Learn Photoshop in a fun environment. Aaron Nace applies the right amount of fun with easy to understand and follow tutorials. Actions and brushes are included with lessons!
Best embroidery ever. Give Queensboro a try, get a $20 instant credit to get started by clicking on the logo! They specialize in great quality custom logo apparel and promotional products with the best customer service.
Platypod has become a great resource for being creative in getting your camera gear easily into unusual places. As an Platypod Pro I get to work/play with the gear even before it comes out. Head over to Platypod, subscribe to the newsletter and you will get special discounts reserved only for subscribers.
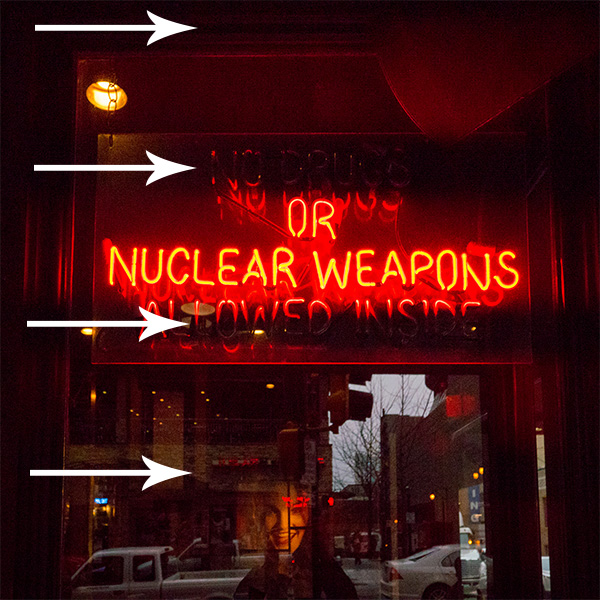 Arrows show the dark lines where the light is not being recorded.
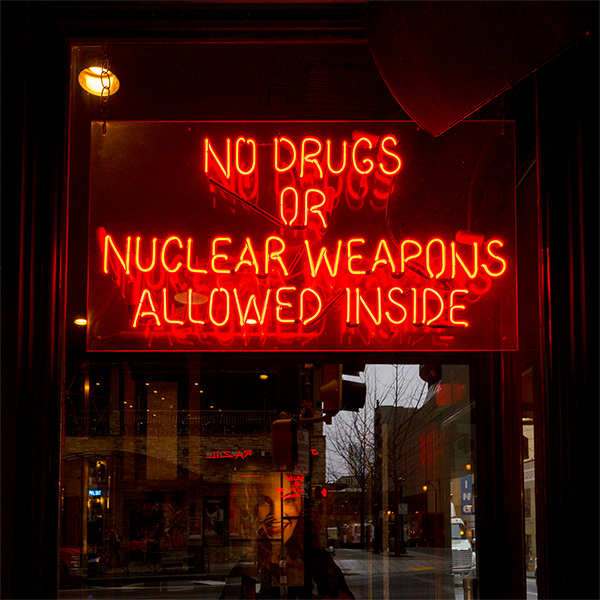 Proper shutter speed (slower) allows the entire lighting spectrum to show in the neon sign.