by successfulbob | photographer profile, photography education
Genuine.
Warm.
Friendly to the point of knowing no strangers, only friends he has not met.
I’d like to introduce you to Levi Sim of S Designs Photography. He is a truly wonderful human being. But, I’ll let Levi tell you a bit about himself from his web page…
“I’m the Levi who is a Photographer in Lake Oswego, Oregon, previously of Logan, Utah. I’m the Levi who wears hats. I’m the Levi who makes Steve Jobs tribute portraits after the style of Albert Watson. I’m the Levi who grew up in Colorado Springs. I’m the Levi who was a park ranger, soda jerk, lab assistant, curator, adventure guide, foreign English teacher, Taiwan missionary, wood shop manager, buffalo meat company manager, wireline hand, electronics engineer, and world traveler. Did I mention I’m a photographer?”
I have attended a couple photography related events with Levi and I’m always impressed and inspired by my time with him. Here’s a photo I call Levi squared… Story to follow.
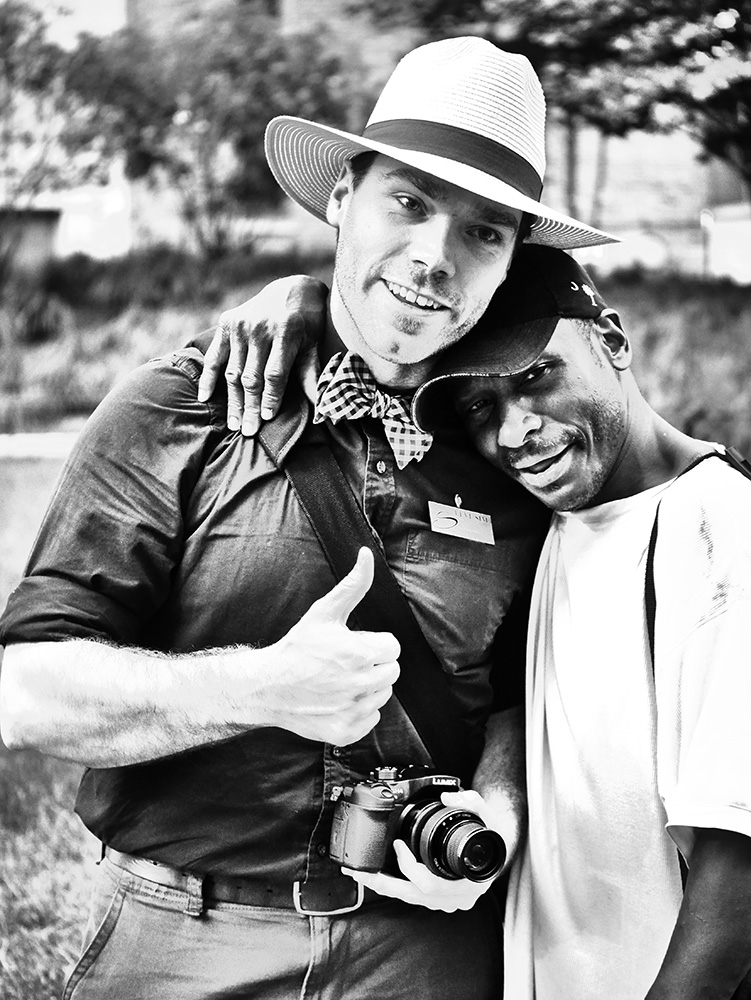 Levi Squared!
We were leading some of the Out of Chicago Conference attendees on a photo walk. Levi is the absolute best person at walking up to strangers on a street and in moments having them pose for his camera. He has such a genuine way about him that people just open up tell their stories and allow him to make their images. While on the street photographing people this man came up to Levi and said, “What’s your name?” When Levi replied he ran down the street, came back with his ID in his hand and said, “I’m Levi too! Can I hug you? Can I put my head on your shoulder?” And of course the photo tells the story… and tells you a lot about Levi.
Want to learn to get over your shyness in asking people you find interesting to pose for your camera. Take a photo walk with Levi. I’m not exactly shy around people but Levi makes me look like a wallflower! He would have people doing almost anything he asked. Many of the people who were on the photo walk said adamantly that they would never feel comfortable approaching a stranger to ask about making a photograph… and most proved themselves wrong and jumped some pretty high hurdles by making it happen.
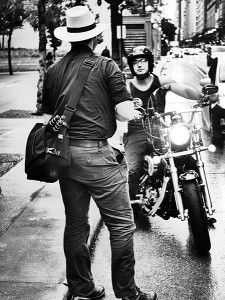
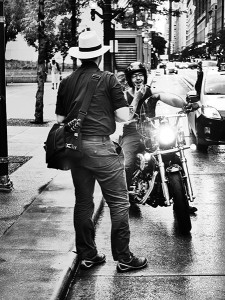
Total stranger posing on a motorcycle, in traffic, and maneuvering his bike for the background Levi wanted to have behind him. By the time he was done the guy was inviting us to join him at dinner down the street.
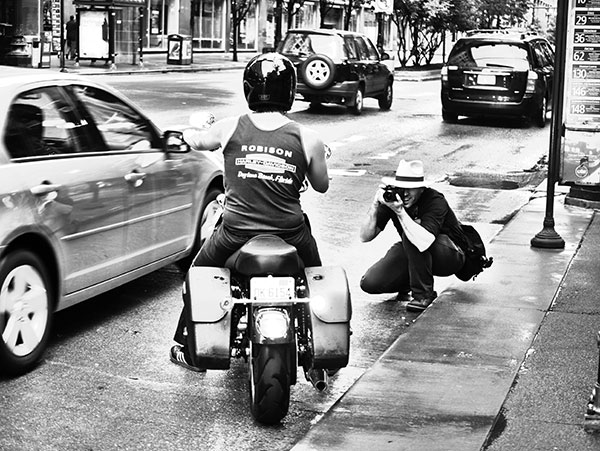 Levi workin’ it…
If you ever get the chance to attend a seminar or workshop with Levi you won’t regret it. He also coaches and runs Customized Workshops and speaks at conventions. If you are in charge of photo education for your group Levi is available…
And he gives back, his words again ’cause I can’t say it better.
“Guest Speaking opportunities are also lots of fun for me and my audience. I’d be happy to speak to your school class, or Boy Scout group, or church group, or quilting circle. Call me and we’ll make an appointment–it’s a small way for me to do a little giving back.”
Levi is a photographer to follow and I hope you will give his work a look it’s definitely worth it. https://www.facebook.com/levi.sim on twitter @photolevi
Yours in Photography, Bob
PS – Waking up on my last day at the Out of Chicago Conference I found an envelope from Levi with a note about working together over the weekend… Who writes handwritten ‘Thank You’ notes anymore? That would be Levi…
by successfulbob | photography - art quote, photography education
“That’s not really photography!”
“You cheat!”
“I never crop I only show what was in the frame originally.”
“I show exactly what was captured by the camera…”
Today’s Photo/Art quote has a lot to do with vision. What does the final image look like? Does it really matter how it arrived in it’s final form? I don’t think so…
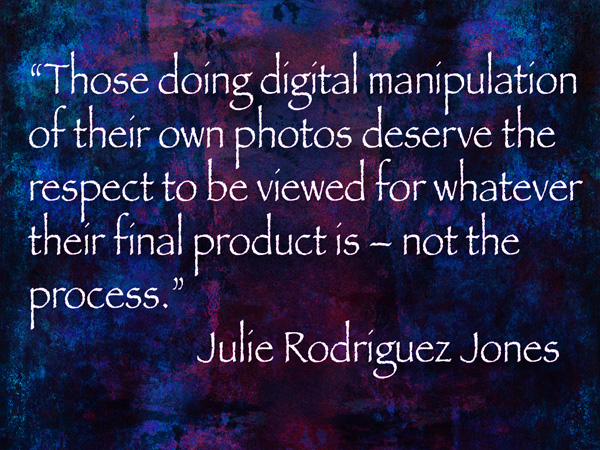 “Those doing digital manipulation of their own photos deserve the respect to be viewed for whatever their final product is – not the process.” – Julie Rodriguez Jones (more quotes from Julie)
If you follow my work you know that I am an anything goes kind of guy when creating my artwork. I use multiple layers, textures, blend modes, masks, hue saturation layers and anything else I can think of to get the vision in my head out into the world.
When working on my commercial images I have no problem creating different exposures of the same scene and blending them together with masks to give a better rendition, closer to what the eye will see in that scene, than any one single exposure might.
To those who believe that any photography is “pure photography” I wish for you to think hard about it. All thoughtful photography is art and is very subjective to the maker even if there is no ‘visible’ manipulation.
Many things factor into a photographic image. Lens choice. Choosing what to leave in – or out – of the frame at time of capture. Exposure. ISO. Format choice. Time of day. Add light? Block light? Focus. Depth of field. Black & white, sepia tone or color? High angle or low? When prepping to print – Retouching. Dodging and burning. Choice of medium to print on. The artistic choices are endless…
I don’t feel that someone who has taken an image further via digital methods should be penalized for their choice of tools. Now do some digital images not appeal to you? Maybe not. Or ‘straight’ prints not appeal to you? OK, fine… Please don’t judge how an image was created. Judge the effect the final image has on you regardless of the creation methods.
Ansel Adams is often put forth as one of the great ‘straight’ photographers. But an in-depth study of his work and understanding of how Adams manipulated his medium of film and printing will tell you that his images stand out not because of being straight with his photography but pushing the limits of the tools he had available at the time. He did special exposure and development of his film. He choose the grade of paper on which to print. He spent days manipulating the final image from a negative by dodging and burning a print until it was what he wished it to be.
In 1984 when his autobiography came out he said, “I wish I could be around in 20 years to see what people could get from my negatives via electronic means. It would not be the machine that would be responsible for the final print, but the operator of it. While the images would not necessarily look like mine I believe they would be able to get much more information from the negative than through traditional means.”
Celebrate great imagery no matter how it is created…
Yours in Photography, Bob
by successfulbob | architectural photography, black & white, Lumix GX7, Lumix Lounge, photography education
Now this is Graffiti I can get into….
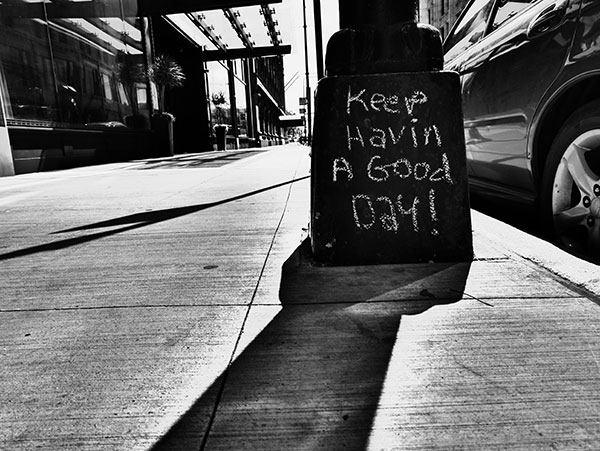 Keep havin a good day! Image made with Lumix GX7 and 12-35mm f2.8 Lumix Vario lens.
Impressive Art setting pushed to black and white to get the graphic feel.
Found this on my wanderings around Chicago after the Out of Chicago Conference this past week while working my way through the streets toward the Art Institute of Chicago.
I can only wish you the sentiment expressed on the streetlight. What could be better? “Happy 4th of July!!
Yours in Photography, Bob
by successfulbob | architectural photography, black & white, Lumix GX7, Lumix Lounge, photography education, photography seminar
While roaming the streets of Chicago during the Out of Chicago conference I was led to a place to capture a ‘Batman’ image. One of the organizers was on our photo walk and had found this great spot to play with the architecture and come up with this…
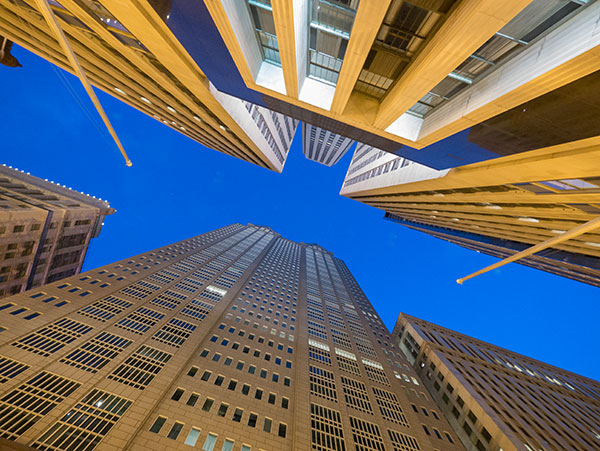 Check out the blue sky for the batman logo formed by the buildings.
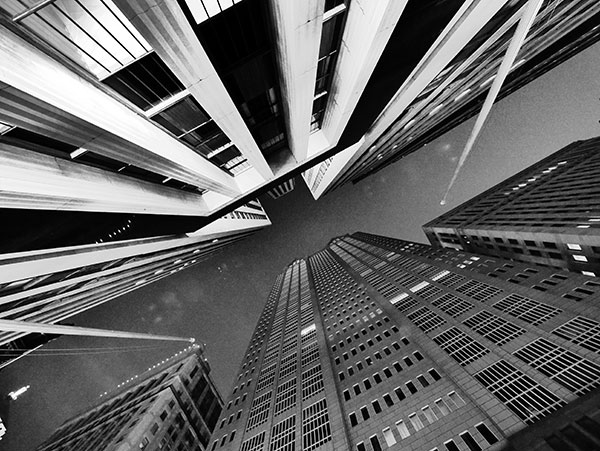 Had to experiment for a different look.
Using the Lumix GX7 with the 7-14 f4 Aspherical Vario lens (a sweet and sharp lens with no distortion) in Illustrative Art mode set to Black & White and under-exposed by about a stop led to this more graphic rendition on the same scene. Totally different feel don’t you think? Don’t be afraid to get in there and play with the camera presets, especially since you can tweak them Remember to shoot in RAW plus jpeg so you get the arty image as a jpeg but also get all the information present at the time of capture so you can tweak away in post for a totally different look.
How do you find it? Just go down the streets looking up everywhere you go – you’ll eventually find it! Actually you can head out on a photo tour with Teresa Peek of Tour Through a Lens. She was the one who hooked us up with this spot giving very specific instructions on where to stand and what to look for. I promised I wouldn’t tell so you can wander around looking for it on your own or check out her photo tours.
Yours in Photography, Bob
by successfulbob | photography education, photography seminar
A big salute to Chris Smith for putting on the Out Of Chicago Conference. Well attended and enjoyed by the participants. I’ve only heard good feedback and as long as he is going to go through the pain of putting on an event (if you’ve ever done it, you know what I’m talking about) I would highly recommend looking for this and signing up next year. In the meantime I recommend following Chris on his web site! http://outofchicago.com
Here are a few images from the photo walks…
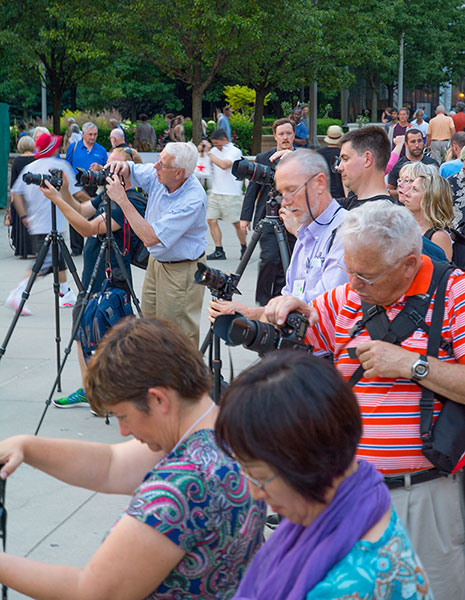 Working and sharing camera settings and compositions near the ‘Bean’. (photo Lisa Sly)
 Here are the attendees getting last minute instruction before heading out to the
streets of Chicago for the photo walk.
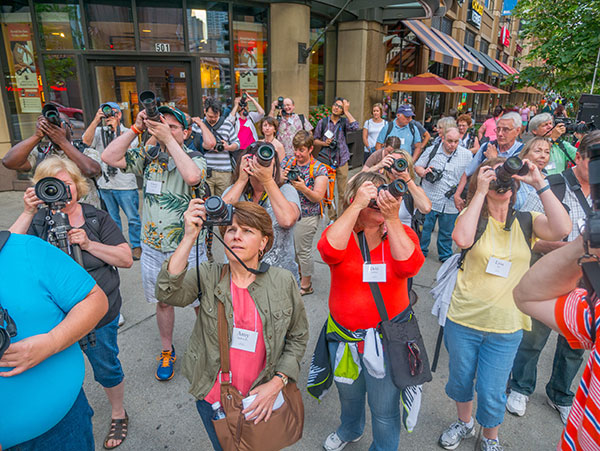 Hitting the streets with with a semi-posed fun shot before we started spreading out.
Always keep getting out to shoot, share and get more education with fellow photographers. It will help you become a much better photographer. And it’s fun!
Yours in Photography, Bob
by successfulbob | architectural photography, black & white, graphic design, Lumix GX7, Lumix Lounge, photography education
Had great time in Chicago at the Out of Chicago Conference put on by Chris Smith. What an incredibly successful event with over 160 people registered in it’s first year. You’ve missed it for this year but I suggest keeping an eye out for next year’s dates and get them on your calendar.
While out and about on one of the photo walks I moved to the Illustrative Art Mode on the Lumix GX7 and tweaked it to Black and White. This gives a very high contrast look with a bit of a glow. I enjoy this look for architecture with a graphic twist. But I had to try something just a bit different on top of that. Capturing images in RAW plus jpeg allows me to get to the full color information presented to the camera and I’m starting to play with mixing them and adding a gradient on a mask to blend them together.
 Splitting the photo into Black and White and color. Bottom to top.
 Reversed the gradient for this photo.
 Tried the split on this one and it lost it’s ‘Cartier Bresson Decisive Moment’ feel so I took away the color.
Experimentation is key to growing your photography. Does the split color work? For some images maybe but as I play with it some more I may find the perfect place to use this technique. Let me know what you think!
Yours in Photography, Bob
by successfulbob | photography, photography - art quote
I’m at the airport in Chicago after presenting at the Out of Chicago Conference so this Photo/Art Quote is getting published a wee bit late. Thanks for bearing with me! Here we go…
Let’s head to the funny papers for some inspiration this week. Ever read the cartoon Dilbert? Scott Adams is the author and I found a quote by him about creativity that we can use. It actually contains two ideas strung together that I believe wholeheartedly.
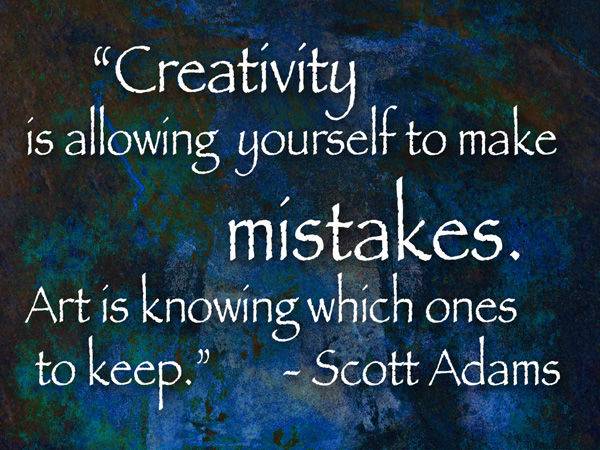 “Creativity is allowing yourself to make mistakes. Art is knowing which ones to keep.” – Scott Adams
Creating art can be accelerated by experimentation. Trying new things and giving yourself permission to fail is key. There is a tendency to keep recreating things with which we have had success. We set lights in the same place most of the time, or worse, lock them down without thought of who the subject is and what changes could really highlight the best features of our subject.
Or when we work with our manipulation programs like Adobe Photoshop we repeatedly use the same settings. I encourage you to take some chances. Play with Photoshop. Try new things. Play some more! By the way if you haven’t upgraded to Photoshop CC yet know that they have the $9.99 a month rate for getting the Lightroom & Photoshop bundle. Learn more here.
Get on you computer and mash down some buttons you’ve never tried before. Use new blend modes. don’t worry if it doesn’t work out perfect. You can always try again!
Yours in Photography, Bob
by successfulbob | landscape photography, Lumix GX7, Lumix Lounge, panorama, photography, photography education
Been enjoying the hikes more and more. This is on the Templeton Trail along Oak Creek in Sedona, Arizona. With the Lumix GX7 camera so light I’ve got it with me all the time… No excuse for seeing something I want to share and not having a camera at hand…
Used the Panorama setting to get in more of the creek view I was seeing.
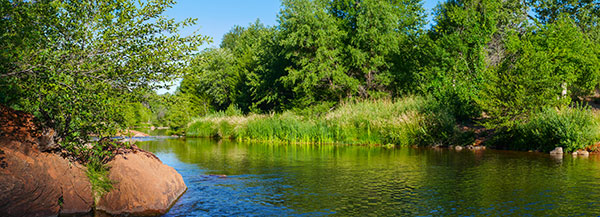 From the Templeton Trail Near Cathedral Rock.
Lens 35-100 f2.8 Vario at 35mm. Camera was held in the vertical position to get a taller file while still maintaining the panoramic photo dimensions. ISO 200 Exposure Settings – 1/640 sec. F 4.5 (pre-set by the camera) More panoramas and information on shooting panoramas here. https://chd.lzi.mybluehost.me/panoramic-photo-red-rocks
Hit the trails or hit the streets it’s a great time to be making images…
Yours in Photography, Bob
by successfulbob | landscape photography, Lumix GX7, photography education, photography seminar
Morning hikes in Sedona are a great excuse to test out some of the features of the Panasonic Lumix GX7.
Yesterday’s test involved one of my favorite features in the camera – in panoramic stitching. The images below are of Courthouse Butte on the loop trail from Bell Rock Vista trail-head in the Village of Oak Creek. Both images were captured from the exact same place with the exact same settings. The camera was set to capture vertical panos to give a bit taller image. Exposure compensation was at minus 1/3 of a stop to increase saturation just a bit. The camera must be set to capture in jpeg because the file is being processed in the camera. RAW doesn’t cut it in this situation. If you wanted the value of RAW capture you would have to make multiple exposures and the process the files in Photoshop or another stitching program a much more labor intensive deal.
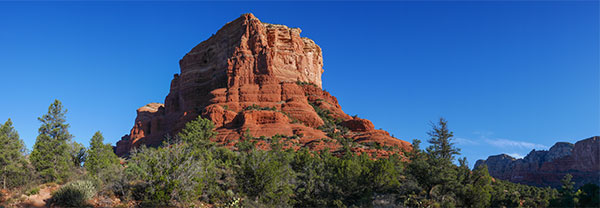 Panorama of Courthouse Butte in Sedona, Arizona panned at a fast rate of speed. Image was 54MB when opened
“Wait a minute Bob! You said these were both shot with everything the same on the camera but they are very different…” Yep they are and that’s the point of today’s post. The technique you use when making the capture is important. On the bottom image I moved very slowly so more on the frames were overlapped. In this case I felt I wanted a more “panoramic photo” aspect ratio so I did it again at a faster rate of speed starting further to the left and was able to capture a lot more of the landscape. Regardless of how fast you pan good technique is key to getting a good pano. Hold the camera tight to your forehead with elbows down. Point your feet toward the end direction of the image. Then coil your waist back to the starting point. Begin shooting while keeping the camera level. Use stomach muscles to rotate through the end of the pan. Check your results by reviewing the image on the camera. Happy with the result. Move on. Not sure? Try again at a different speed of rotation.
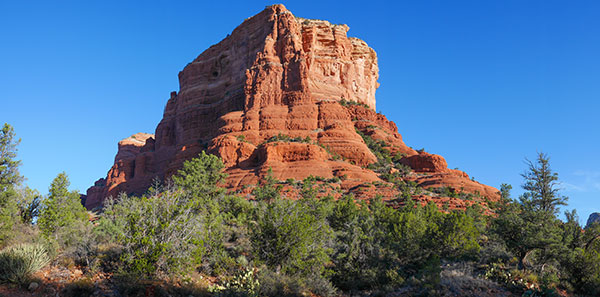 Panorama of Courthouse Butte in Sedona, Arizona panned at a slower rate of speed during capture. Image was 38MB when opened.
Just because you are shooting in jpeg doesn’t mean you can’t use Adobe Camera RAW to help process and tweak the image. From Adobe Bridge highlight the image(s) you would like to process and hit Cmd ‘R’ on MAC or Crtl ‘R’ on the PC and you can work on the images. In this case I used the Shadows Slider to open up the shadows just a bit to reveal some more detail and gave the Saturation a little bump.
If you have any questions about this technique or any other you’ve read about on Successful-Photographer don’t hesitate to ask. Interested in attending a workshop in Sediona? Let me know. I’m starting to gather ideas for an intimate workshop with 1-4 people that would include hiking trails, & Photoshop concepts and art ideas…
Yours in Photography, Bob
by successfulbob | people photography, photography, photography - art quote, photography education
Wikipedia on photography reports, “The word “photography” was created from the Greek roots φωτός (phōtos), genitive of φῶς (phōs), “light” and γραφή (graphé) “representation by means of lines” or “drawing”,together meaning “drawing with light”
Many of us have heard the term stretched a little bit more as ‘Painting with Light’. Whichever definition you use LIGHT IS WHAT IT’S ALL ABOUT… And today’s Photo/Art Quote comes from someone who knew quite a bit about light.
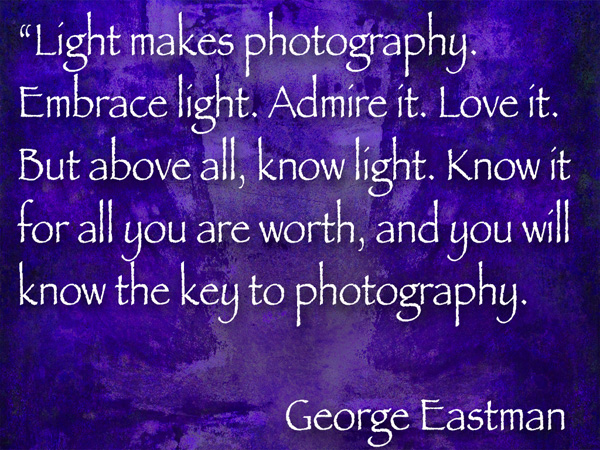 “Light makes photography. Embrace light. Admire it. Love it. But above all, know light. Know it for all you are worth, and you will know the key to photography.” – George Eastman
I think we become more aware and stronger as photographers when we give a language to light. Check out the portrait of Eastman from the Wikipedia web site. Can you talk about the quality of the light? Can you give a ratio to the light? Describe the lighting pattern on his face? How large is your lighting vocabulary? Why is it good? Or Not?
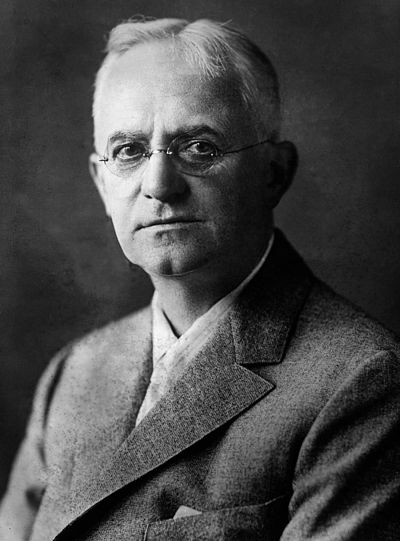
Photographic portrait of George Eastman from Wikipedia web site.
Once the brain learns more words for lighting it can offer more thoughts and combinations, mixing ideas and allowing you to see light in a new light if you’ll pardon the expression. I will be having more blog posts about the ‘Language of Light’ here on Successful-Photographer and I hope you’ll join in. In the meantime study the photograph of George and see what you photography vocabulary is like. Drop your thoughts in the comments here to get the dialog started. I’ll revisit this in a couple days with my thoughts in another post.
Yours in Photography, Bob

