by successfulbob | Lumix GH4, Lumix GX8, Lumix Lounge, musician photography, photographer of musicians, photography education
Miller and the Other Sinners Band
Take an electric guitar. Acoustic guitar. A bass guitar. A small sax… and a large one. Throw in someone who knows how to play the drums. Add in a voice that is pure magic and the namesake of the band. And what do you get?
A really good time listening to Southern Soul!
What is SOUTHERN SOUL?
A sweet blend of blues/gospel/americana/r&b with a splash a cayenne pepper.
Saturday night Miller and the Other Sinners performed at Sound Bites Grill and I had the fun job of photographing them for the ‘SBG Wall of Fame’. This group really rocked the house with a bluesy sound that had everyone bouncing in their seats.
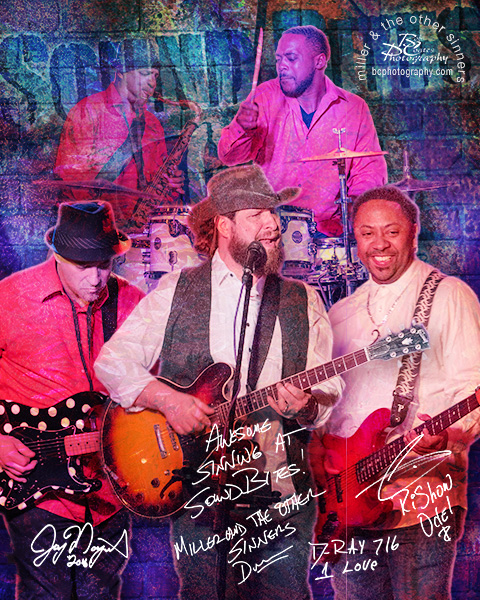 Sound Bites Grill Wall of Fame image for Miller and the Other Sinners
I used two cameras for the event.
I used the Lumix GH4 with a 35-100mm Vario f2.8 lens for the individual band member captures. I generally shoot at ISO 3200 in aperture priority with a minus 2/3rds of a stop exposure compensation in RAW. This will generally get me an exposure between 1/60th & 1/100 of a second. Taking the images into Adobe Camera Raw with just a little push up of the shadows slider and a reduction of the highlights I am able to get the entire dynamic range of the scene.
The second camera is the Lumix GX8 with a wide f2.8 12-35mm Vario zoom. These images are of the whole band and used for press releases and marketing. Same basic settings on the camera. A great feature of shooting with these cameras is the Live View function as you are seeing the image as it is being captured so it’s easy to make tweaks to the settings before firing the shutter.
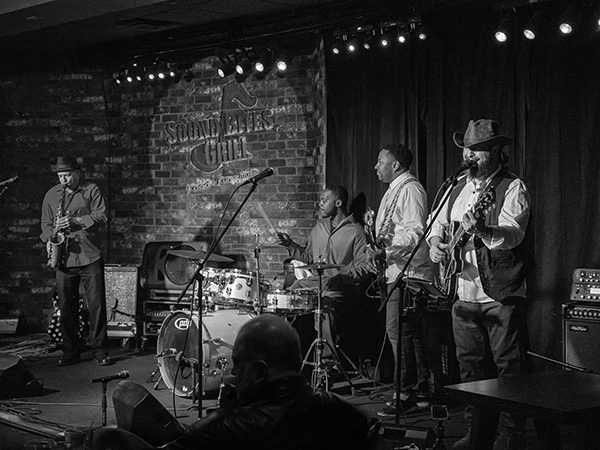
Marketing images are created in color but I specifically do the BW conversion myself so the best quality will be printed rather than someone at the publication just pushing the greyscale button. NIK Silver FX Pro 2 is the go-to software plug-in.
Knowing how the images are going to be used dictates how images are processed. I always try to create the best image file for the job at hand. Remember to ask questions in order to be able to provide the best product.
Yours in Creative Photography, Bob
by successfulbob | black & white, cloud photography, infrared photography, landscape photography, Lumix G6, photography education
As you can probably tell by my lack of posting the last few days it has been extremely busy in bob’s world. Had a full two day shoot for the Sky Ranch Lodge after their remodel. I’ll share some photos with you as soon as the processing is done along with some of the techniques I used to get the images.
In the meantime, I did have a chance to process another image from my infrared photography. I really enjoy black and white images and the infrared adds another whole new dimension to it. I converted my Lumix G6 through LifePixel with a 750 NM (standard) IR filter. This gives you images that are on the pink side and of course need some processing to get them into final shape of Infrared BW images. As I practice and process more I am able to get a better range of tones throughout the photo.
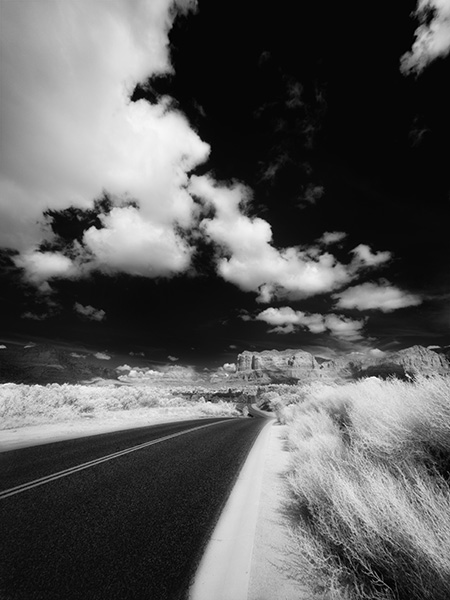
Captured in the Village of Oak Creek, Sedona, AZ. Courthouse Butte is the main rock formation.
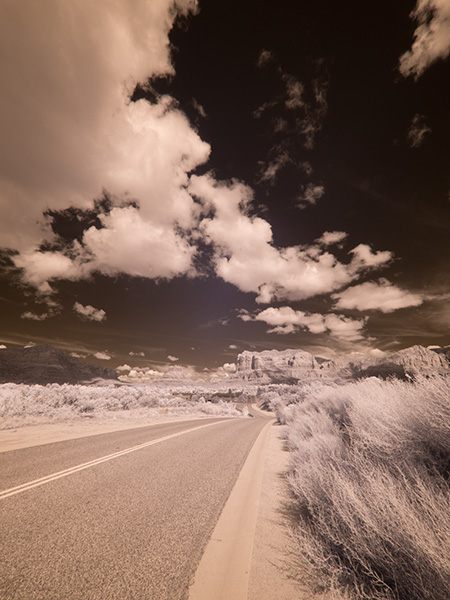
Here’s the IR image Straight out of Camera Note the pink cast. Finding I need to underexpose a bit in order to not loose highlights even though the histogram indicates it is with the scope. You have to remember that the histogram is letting you know about visible light not necessarily infrared exposure.
One of the really great things about having a dedicated IR camera is the ability to set recording for RAW + jpeg and have both images to work from in post production. If you shoot only in RAW you don’t get the processing from the camera. I set the camera to capture BW images so I can get a ballpark preview of the scene as I work.
You don’t need to convert a camera to IR you can always go ‘old school’ with a Wratten IR filter in front of your lens. The problem with doing that is your exposure time will be lengthy and focus can be a bit of a pain as IR light rays and visible light focus at a different depth on the sensor so additional calculations need to be made. (although the extended time might be cool for capturing cloud movement!) Might have to pick up an IR filter myself too…
Best part is infrared photography really opens up the mid-day time slot for creatively capturing images as it is usually too much contrast for regular photography.
Are you shooting IR yet?
Yours in Creative Photography, Bob
by successfulbob | black & white, infrared photography, landscape photography, Lumix G6, Lumix Lounge, photography education, photoshop tutorial
OK. I went back to the same file I worked on yesterday and reprocessed using a couple different techniques. Here is the new version captured with the Lumix G6 and the 7-14mm f4 lens.
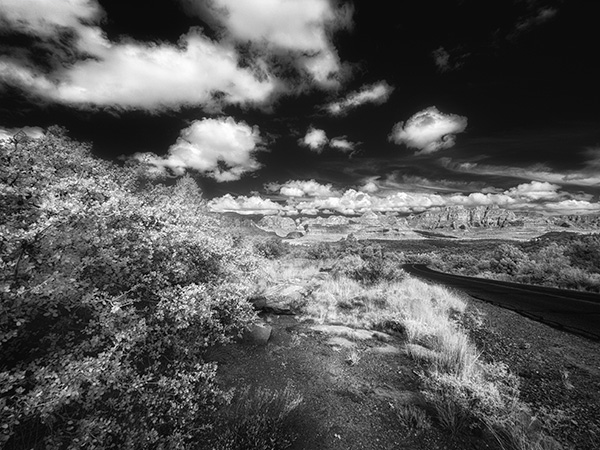
Different processing led to a cleaner more detailed IR image.
First I used Adobe Camera RAW to process the file twice. Once for the foreground which was in shadow and again for the background which was in full sun. Using a Layer Mask I blended the two files together. Then using the Channel Mixer I swapped the Red and Blue Channel information as this file is still comprised of RGB information. When you first open the Channel Mixer adjustment Layer you’ll see the Output Channel set to Red at 100%. Change this to 0%. Go to the Blue color and change it to 100%. Then change the Output Channel to Blue and make the Red color 100% and the Blue color 0%. This is to give a ‘blue sky effect’. I didn’t like that effect so I kept going.
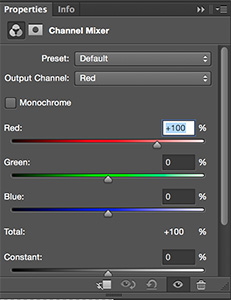
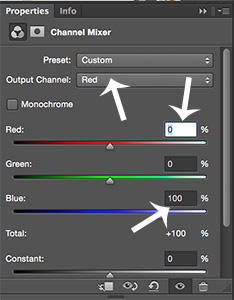
Swapping the Channels gave me a better image ultimately so I will keep this as part of my IR processing in the future.
Next using NIK Silver FX Pro 2 I converted to Black and White adding some mid-tone structure and fine structure. in NIK Color FX Pro 4 I added a bit of Glamour Glow with neutral color. This helped increase the IR look. A little goes a long way before you blow out some highlights so be careful here. Final bit of tweaking is a blank Layer set to Soft Light Mode using the Brush Tool with Black or White color to dodge and burn the image just a bit to control where the eye travels throughout the photograph.
Looking forward to working in IR more often. Gives a great look to noon-day sun images when you would normally refrain from making image captures.
Yours in Creative Photography, Bob
by successfulbob | black & white, infrared photography, landscape photography, Lumix G6, Lumix Lounge, photography, photography creativity, photography education
It’s a bit of a different world when you move into infrared imaging.
This is photography with a totally different look.
It used to be very difficult to capture infrared as the filters used to allow the non-visible light spectrum through were extremely dark making it difficult to see and frame your subject. The film was extremely sensitive and was quite susceptible to fogging ruining exposures before you even got them into the developer. In addition there was the need for focus adjustment as visible light focused on a different plane than the invisible spectrum which would often lead to out of focus images. And finally there was lots of grain in many of the captures.
Fast forward to today… I just received my Lumix G6 back from LifePixel after a conversion to allow the camera to capture infrared. It’s still not quite a piece of cake to create an infrared image but the capture sure got easy!
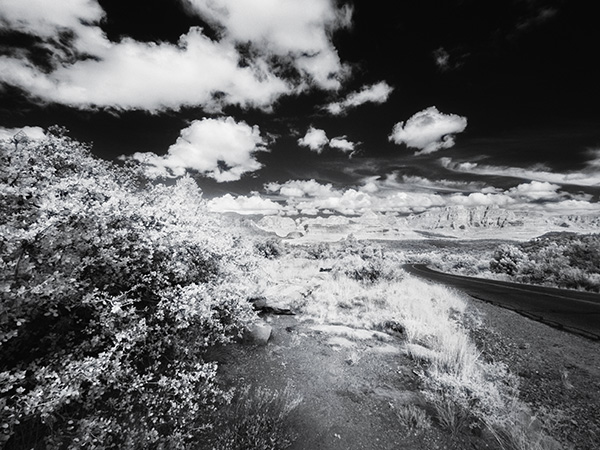
First infrared image from newly converted Lumix G6.
In this image the foreground area was in shadow so it wasn’t receiving the full infrared effect but the clouds, sky and rocks in the distance showed well. To combat this the image was triple processed. Once for the top half, and twice for the bottom to carry the infrared look through the image. Black and White conversion was made with NIK Silver FX Pro 2. Masks were applied to make the changes
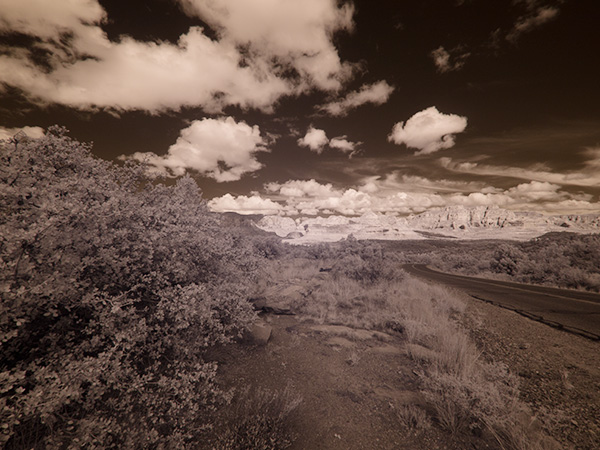
With the filter switched to a straight infrared filter you end up with a reddish sepia-tone image straight out of camera.
In order to have a better idea of what I was capturing as far as a final image of Black & White infrared I shot with a camera setting for Black & White. I then set the camera to capture RAW + Jpeg so I would have all the information presented to the camera but also have a quick BW in the jpeg.
There is another way to process the images (well probably as many ways as there are photographers) which I’ll share in another post using Photoshop Channels.
Yours in Creative Photography, Bob
Here are some links to my follow-up IR posts
https://chd.lzi.mybluehost.me/infrared-imaging-part-2/
https://chd.lzi.mybluehost.me/infrared-photography-part-three/
https://chd.lzi.mybluehost.me/gila-wilderness-infrared-photos/
by successfulbob | black & white, Lumix GX8, Lumix Lounge, people photography, photography
It is a lesson in asking.
When we are out and about we run across people who have character. People who have lived long and are happy to share about their lives if you only open the dialog. Over the years I have met or seen many people that I would have liked to have photographically captured an image of but was too nervous to ask.
I’m finding that I get more interesting conversations and life stories when I ask and share my wish to capture an image. People who know me might say, “Bob, SHY??! You’ve got to be kidding me?” But I have let situations go by where I just didn’t feel comfortable asking to create an image. usually it was all in my own head and I’m getting better thanks to spending time with Levi Sim. Levi is a wonderful person who connects with people in a great way. I enjoy his techniques for getting to know people and making them comfortable in front of the camera in a nano-second. When I was with Levi in Chicago I watched as he approached a guy on a motorcycle, in traffic, and had him maneuvering his bike in order to get a better background. The guy was happy to do it… Remember this is in traffic, in Chicago.
Here’s Gary…
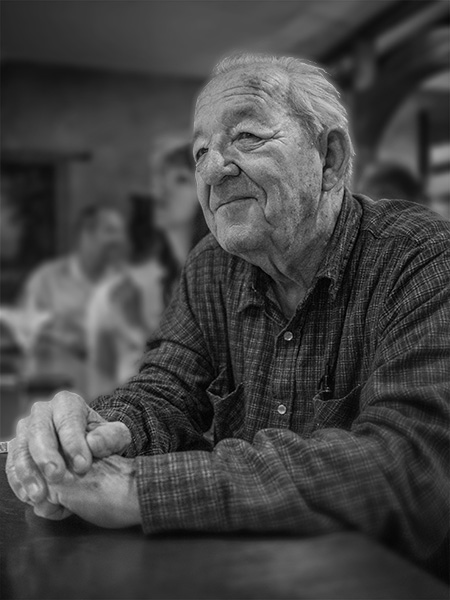
Met Gary at Bella Vita Ristorante in Sedona.
It was a wonderful conversation my wife and I had with Gary. He shared that he was born and raised in the desert. He loved tramping through the high Sierra Mountains where Ansel Adams created many of his iconic images. This came about because I had my camera (Lumix GX8) and after chatting with him asked if I might make a few exposures. He was flattered and we had a very pleasant time.
I had the 20mm 1.7 lens on and shot wide open. ISO 3200 This is a sweet piece of glass. I added just a bit of blur in the background to render the other people unrecognizable.
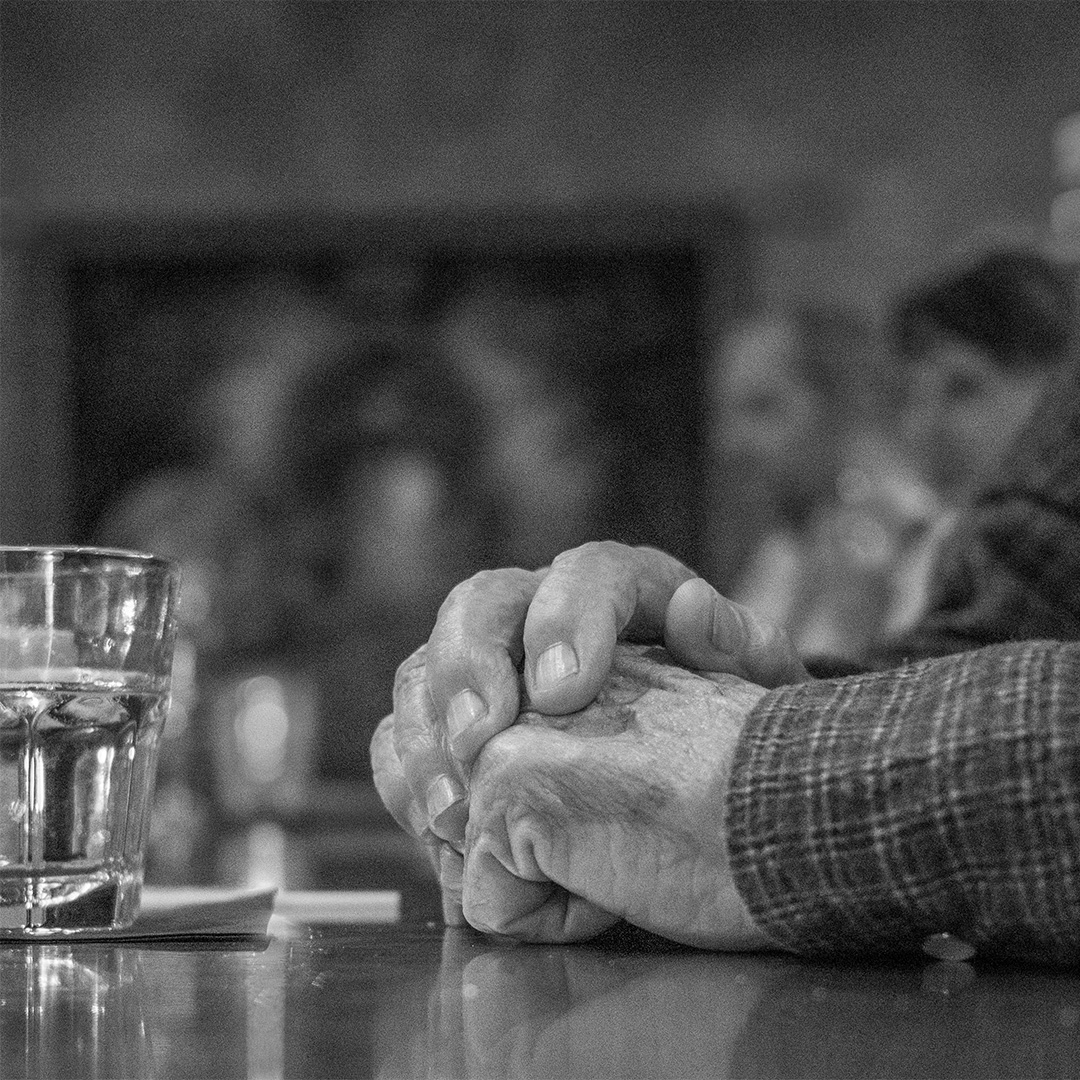
Word is eyes are the window to the soul. I find I enjoy seeing the results of the aging process on hands. Love the story I see here in Gary’s hands.
Yours in Creative Photography, Bob
 Sound Bites Grill Wall of Fame image for Miller and the Other Sinners


