
by successfulbob | black & white, Lumix GX85, Lumix Lounge, musician photography, people photography, photographer of musicians, photography gear
Live Entertainment Photography – Anthony Mazzella Black & White
Many times if I want to check that I have a good solid image capture I convert to black and white to see how the tones do without the distraction of color. The fact that I produce advertising and marketing images for Sound Bites Grill makes me check that even more often as many of the images I create will end up in a newspaper in black and white.
I recently photographed the Legends of Guitar show at Sound Bites featuring Anthony. You can check the color images in my previous post. Here are the black and white versions.
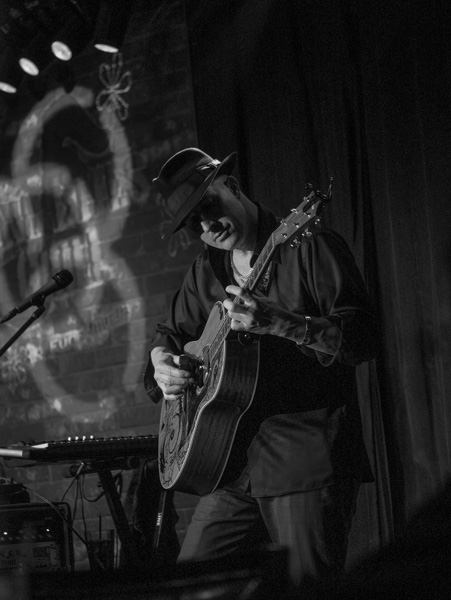 This image still carries the blues feeling. I remember working hard to get Anthony in a spot where there was a separation light on his hat.
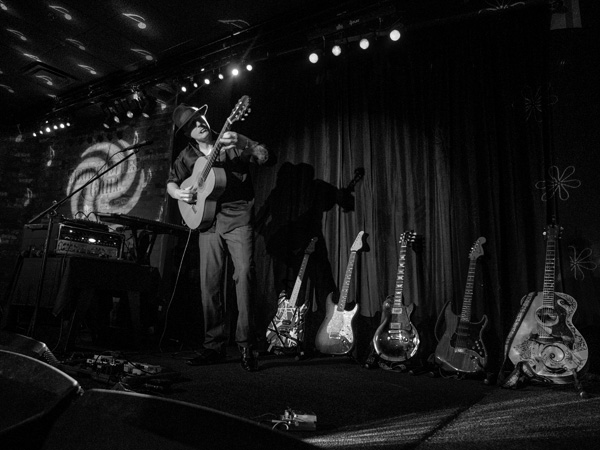 Shows the full line of instruments telling the story of the show.
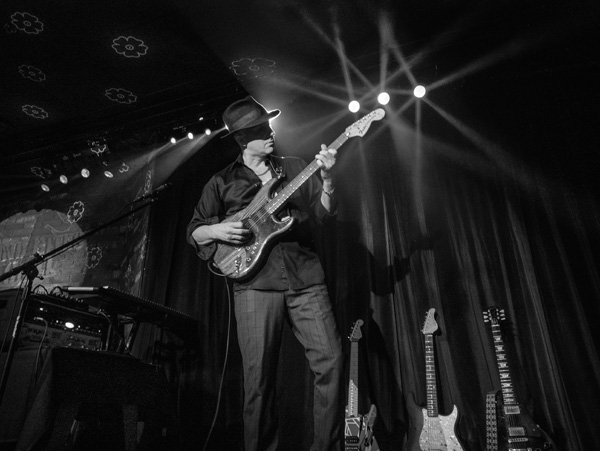 A little smoke machine action gives extra depth and dimension.
 Here’s one that needs the distraction of color. The hot spot of the light is too distracting in this image in black and white.
Check the color versions in the other post to get the most from this post. Images made with the Lumix GX85. The fact they removed the anti-alias filter give a better ‘grain pattern’ in my opinion. Makes for sharper images. And the five-axis image stabilization makes for better handhold ability in the low light.
Yours in Creative Photography, Bob
Save
Save
by successfulbob | bird photography, black & white, imaging competition, inspiration, Lumix GX8, Lumix Lounge, photography competition, photography creativity, photography gear, wildlife photography
Sunday Photo Art Quote – Thomas Jefferson
I’ve seen this quote attributed to Tom although I’m certain it belongs to him as there are variations in place attributed to others. I try to research my quotes for accuracy. With that in mind if you know who the originator of this quote was, please let me know.
 “I am a great believer in luck, and I find the harder I work, the more I have of it.” – Thomas Jefferson
You might ask, “What in the heck does this have to do with art, Bob?”
It all has to do with getting in there and doing the work. Whether you feel like doing it or not. Many times I will happen into a fortunate art situation just because I keep on trying even though things have not worked out crazy good in the past. If you see a concept, you need to keep acting on it until it comes to fruition.
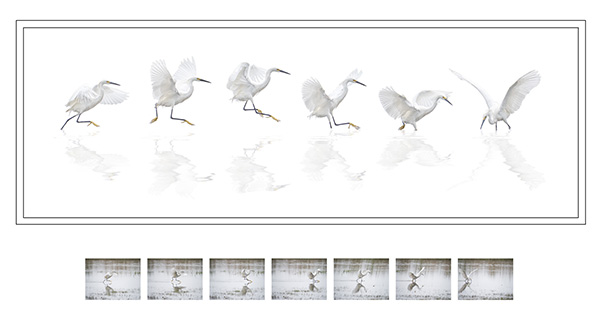
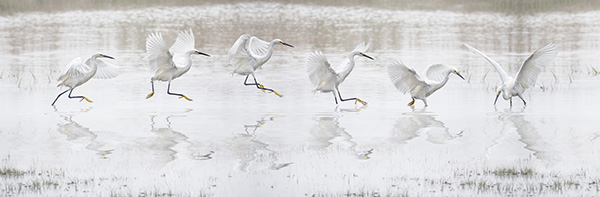
Here’s an example. I love photographing wildlife, especially birds. I enjoy the texture of their wings. Studying and anticipating their movements to capture more compelling images. The time alone searching out new behaviors. It can be very frustrating to try to come up with something original. That doesn’t stop me from going out and trying. Over and over. And over. Until that magic moment when the luck part comes into play. Because I was still there trying I was treated to this perfect moment of a Snowy Egret chasing fish.
I captured approximately 200 images of the bird working the shallows in front of me. And this is the composite I thought I wanted to accomplish.
 Working composite of Dance of the Snowy Egret
I had sifted through and extracted many images of the snowy egret to get this far but wasn’t happy with what was happening. It was the vision I originally had in my head while I was photographing the bird, but it just wasn’t working form, although my wife loved it. So I kept working.
So I kept working. And working.
And because I kept working on it even though I wasn’t happy I had another stroke of luck. In turning off the background to clean up my extractions of the birds, I saw the image in it’s simplest form. All attention became focused on the positions of the birds with absolutely no distractions.
 PPA Loan Collection Image – Dance of the Snowy Egret by yours truly
I entered the image in the International Photographic Competition from Professional Photographers of America, and it was judged into the Loan Collection in the Master Artist category. That judging is based on twelve elements (click here for more on the twelve) including composition, technical excellence, and storytelling. Also, how the artwork was accomplished is a significant part of the criteria which is why the reference images are shown.
I feel I was lucky on two fronts in the creation of this photo. But I did work hard to get ultimately get there
But I did work hard to get ultimately get there.
Yours in Creative Photography, Bob
PS – I think one additional piece of luck was the equipment I’ve been using. Because the micro 4/3rds format is so small and light I was able to handhold a 600mm equivalent lens and track the egret comfortably for a long period of time. Heavier gear would have required a tripod and been much less mobile. Lumix GX8 with the 100-300mm f4.0-5.6 lens

by successfulbob | landscape photography, Lumix Lounge, Lumix LX100, panorama, photography creativity, photography education, photography gear, photography software
Panoramic Photography – One More Time
Here’s one more use of panoramic photography that I haven’t mentioned in previous posts. Change the number of Mega-Pixels in your camera.
“Say what?” You ask? “And once you explain, tell me why I want to try that?”
Ok, here goes.
You can expand the number of pixels in an image in order to be able to make a larger print by making multiple images and overlapping the capture. After you get back to the studio move those images into your favorite photo stitching programs like Adobe’s Photoshop or AutopanoPro and put the images together. Photoshop has gotten very good at merging images together including a new feature called Content-Aware Fill that can automatically clean up the blank space that can sometimes surround your image.
This morning I had my Lumix LX100 with me. I call this the professional’s point and shoot because it has fast glass and is quite versatile with all important controls on dials just like the old days. No need to move into electronic menus to access your settings. All of this is in a quite small package. But the camera is only 12.1MP which yields a 36-megabyte file. In today’s example, I shot five exposures overlapping each by 30-40 percent. After merging the photos I ended up with a 97-megabite file. 97 divided by 3 equals a 32MP capture.
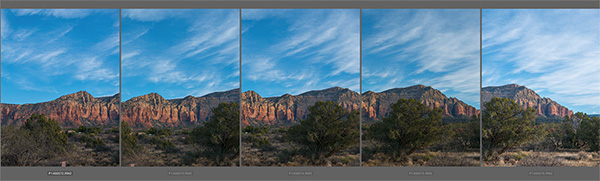 Here is a screen capture of the five images when highlighted in Adobe Bridge.
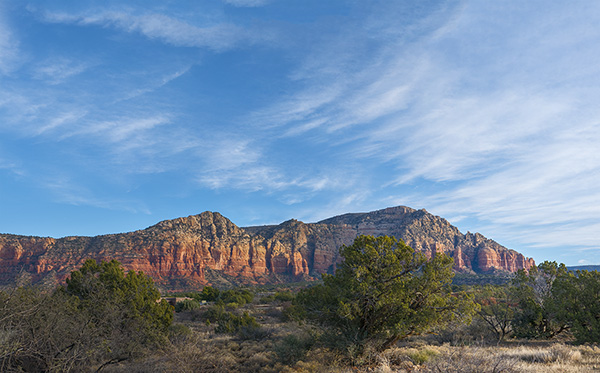 After the images above were assembled in Photoshop and massaged with Luminar from MacPhun.*
With this technique, you can get file sizes you have only dreamed about with a little extra work. Remember if you want to really make a huge file you can use a long lens and do row after row of images and blend them all together. Make sure you capture each row the same way. I always go left to right and top to bottom during my captures.
Yours in creative Photography, Bob
PS – * Luminar software is currently only available for the MAC platform but from what I understand they will be releasing a PC version later this year. Luminar can be used as a stand-alone processing program or as a Plug-in. There’s a sale on ’til the end of the year the link above will take you there.
PPS – The MacPhun software Aurora 2017 HDR is also on special until the end of the year. I’m enjoying the creative processing from MacPhun products.

by successfulbob | landscape photography, Lumix GX7, Lumix Lounge, panorama, photography, photography creativity
Let’s Talk Panoramic Photography – Part 2
In looking through my files for some examples of in-camera panoramic photos I came across some more examples I wanted to share. I feel the format adds another arrow to the creativity quiver. Here’s a few made with the Lumix GX7.
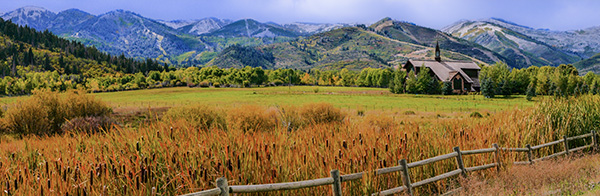
 Outside Salt Lake City – Panorama format is perfect for telling the dramatic landscape story.
 Another from the Salt Lake City Trip.
 A different way to share a scene.
As I was going through my photos, I realized I didn’t share a slightly different idea to leverage the in-camera panorama feature. Sometimes the resulting photo just doesn’t quite cut it as far as capturing the scene. Or you want a file that will have a different aspect ratio but is still a panoramic image. Or, you need more pixels but don’t have time to create a full set of images for future stitching. So here’s two rows followed by the final.
 Showing the dome.
 Showing the base.
 Here’s the final with the two stitched in-camera panorama images using Adobe Photoshop.
 From the Red Butte Arboretum in Salt Lake City.
 One more.
Think about the ways you can use the panorama feature. I don’t have one at my fingertips, but you can also make the panorama vertical.
Yours in creative Photography, Bob
by successfulbob | inspiration, Lumix G7, Lumix Lounge, photography creativity, photography gear, time lapse, video
Stop Motion Video – Aloy Anderson
Through the Internet, I have met an avid advanced amateur photographer/videographer named Aloy Anderson. Aloy is always pushing to learn new and creative ways to use his cameras. I have never attempted stop-motion video myself even though it is a capability built into the Lumix Cameras. When Aloy shared his project with me, I asked if he’d mind sharing some of his thinking and his process with me. And now with you.
I invite you to check out his stop-motion video called Jungle Movie “Be Brave” and turn the rest of the post over to Aloy. Enjoy!
Jungle Movie “Be Brave” from Ray Anderson on Vimeo.
“My name is Aloy; I’m a photographer and Youtube content creator from Miami. From an early age watching Sesame Street, I’ve always been curious about how to make stop-motion animation films. In those days it took a 35mm camera with “miles” of film to develop which was out of my reach. When I realized my new Lumix G7 had the feature built in I was pleasantly shocked. I had to give it a try. My video “Jungle Movie” my first attempt at a storyline video.
When you enter the stop motion menu on the Lumix camera choose whether you will snap each shot independently with the shutter button or the camera can be set to shoot at your preset interval. I do a little of both to give me time to reposition the set pieces and camera placement. For simplicity, I chose 5 seconds between each shot to give me time to move the characters quickly and get out the way.
Stop-motion can be very tedious and time-consuming, and it’s tempting to take the easy way out by leaving the camera on a tripod in one spot. That would be a mistake akin to watching a whole movie from one angle. I suggest different scenes and locations for variety, using a wider lens to show establishing shots and standard lenses for shallow depth of field moments. Before you begin, have a definite storyboard in mind. I like to use manual focus and exposure for each shot.
Here are some tips.
1) Don’t to move each piece too far between each shot as I did in some of my Jungle Movie. The resulting video will have choppy movement. A few centimeters is a good start.
2) Keep the camera on a tripod or table-top to maintain a solidly grounded scene.
3) Every few shots check to make sure your exposure or focus point hasn’t changed.
4) As you improve, you will know what not to do next time and come up with more complex ways to tell your story.
5) Imperative before you begin, set your camera’s aspect ratio to 16:9 which will allow it to play back full widescreen rather than a smaller 4:3 photo size.
6) Finally, have fun!
I guarantee your first 10-second video attempt may look like a five-year-old did it but you will have a good laugh watching it play back with all its faults.
The good thing about the Lumix is when you’re finished making captures the camera will ask you how to customize your video rendering such as how many frames per second it will be and at what resolution. It will then stitch all those photos together into an MP4 file. The only downside is it will be a “silent” movie. In my case, I imported the MP4 into my video editor and added music and text titles to polish it off. It is crucial to add some form of audio to keep your video engaging. This information is not an exhaustive tutorial by any means, but the fun is learning as you go.
I invite you to visit my Youtube product review channel and my Flickr Photography album. Most importantly I would like to thank Bob Coates for inviting me to write this piece. Hopefully, you will have a good time learning this type of creative way to use your camera.”
Aloy Anderson.
Thanks to Aloy for sharing his first foray into stop-motion.
Yours in Creative Photography, Bob
PS – Most Lumix cameras have the stop-motion and time-lapse features built into the camera. If you have any questions about which camera might be best for your needs let me know.
Save
Save