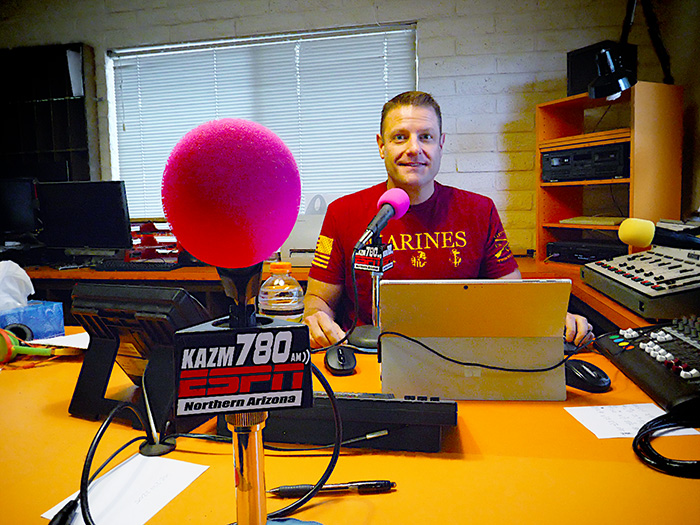
Post Focus is a handy mode to have in your toolkit. It makes it possible to create a hyper focus image with depth of field that rocks the house. Here’s an example I made when I was recording the Tech Talk Radio show with Mike Tabback at KAZM Radio in Sedona.
Here’s the Tech Talk Show which aired on May 10, 2017. We chat about the new technology in the Lumix GH5 including an almost endless focus available in using the Post Focus Mode. Find the demo capture and final image below.
KAZM – Tech Talk Show with Mike Tabback and Bob Coates Photography
First, here’s the video clip created with Six K Photo Mode. The recorded clip is less than two seconds. I have extended it to about six seconds in order you to see the camera making its way through the 225 focus points.
Above is the image fully merged using the in-camera settings of show host Mike Tabback.
Sharp front to back! And everywhere in between
Creates an almost image size of almost 5000 pixels.
There would have been no way to have the KAZM logo on the microphone in focus as well as Mike further into the scene no matter what f-stop was used in a single capture. When a lens gets stopped down to the smallest aperture diffraction and diffusion get introduced to the image which can hurt image quality.
Image was made with the Lumix GH5 camera with the 12-60mm f2.8-4.0 Leica DG Vario-Elmarit Lens
Yours in Creative Photography, Bob
PS – If you have questions about using this technique or any ideas for future blog posts don’t hesitate to give me a shout. As a Lumix Luminary, I get the opportunity to work with a lot of the new technology including the GH5 Camera and some of the newer lenses that have been released. Leave a comment on this post or email bob@bcphotography.com
Difficult to believe that there are wetlands in the high desert of Sedona. But, there are! And it’s becoming one of my favorite places to test out new cameras and lens combinations.
The Sedona Wetlands Preserve is approximately 27 acres in Effluent Management Area 2, located south of the Sedona Waste Water Reclamation Plant. The wetlands have six basins, with a total water surface area of approximately 12.2 acres or 9.6 million gallons. They basins are set up to have different depths of water from very shallow up to four feet which make for excellent habitat for a variety of critters. There are some thoughts for making sure all who go enjoy the experience, including the wildlife I pulled from the wetlands website.
Wildlife Viewing Etiquette
• Our viewing behavior can also harm the animals we are looking for unless we take special care.
• Please keep these considerations in mind.
• Observe from a distance, so the wildlife being watched are least disturbed.
• Never chase wildlife or pick up their young even if the parents are not visible.
• Leave feathers, eggshells, nests and even dead animals where you find them.
• Respect other viewers to avoid intruding on another person’s enjoyment.
• Limit the time you spend closely viewing any animal
I took the Lumix GH5 for a spin with the Leica DG Vario-Elmarit 100-400mm lens yesterday afternoon when I had a few minutes to work (er’ play) trying out the stabilization and handhold-ability with this combo. Remember, due to the Micro 4/3rds chip, I’m holding an 800mm equivalent lens and very comfortable with the resulting images.
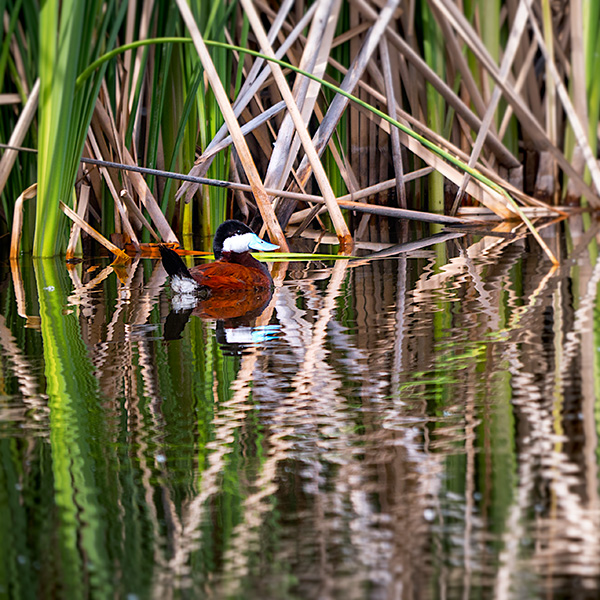
This image is a severely cropped image of a Ruddy Duck which can be printed to about 18 inches square.
(see full size below)
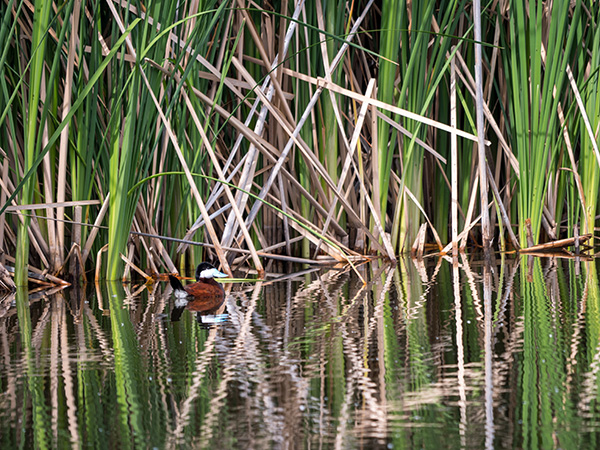
Full-size capture of the Ruddy Duck at the Sedona Wetlands
These flowers are quite small. Using the 100-400mm lens extended all the way gives an almost macro feel to the photo. The blooms are about the size of my thumbnail.
A tiny flower puff around the scale of a fingernail. It is kind of a life amongst past life with the fading buds.
In a day or so I’ll share some more images with a bit more of an artistic flair to them. This camera and lens combination is extremely versatile.
Care and Feeding of Batteries for Digital Photography
There’s nothing worse than running out of battery power in the middle of a job or while out and about making images. I’ve come up with a fairly simple way to ensure that when I need more power for my cameras it is always at the ready. Check out the video.
Hope you find this helpful in keeping your batteries ready to go at all times.
This video was recorded with the Lumix GH5. Fiilex LED lighting with a softbox was used to supplement overhead room lighting. I set the camera for 4K Video and used the tracking mode for focus since I was using a tripod. The camera was triggered using the iPhone and the Panasonic Image APP to control settings, focus, and start/stop during the session.
I was in Washington speaking to the Professional Photographers of Washington showing a quick lighting demo using a three light setup with Fiilex LED Bricks.
Subject with no light in the eyes gives a less than stellar appearance.
Once you have lights in position, it can be a very small movement of your subject to get a better image. In this case, changing the head to a slightly higher angle allowed the light to show in the eyes. Catchlights in the eyes adds a lot of life to a portrait. A small change. Big difference.
The small change in position allowed the light to leave a catch light behind for a more ‘alive’ look.
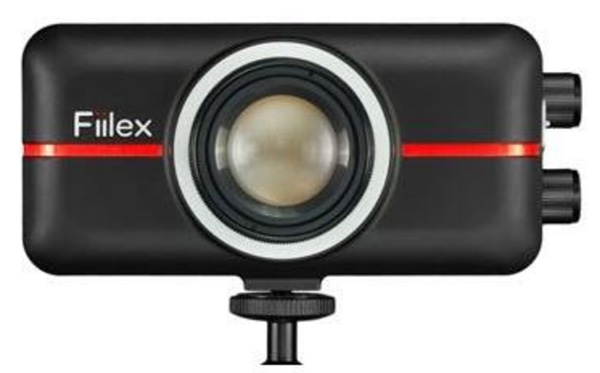
Fiilex P100
I choose the Fiilex LED’s P100 (AKA the Brick) because they fit easily in my suitcase, are battery powered (approx 2 hours battery life per charge), and have adjustable color and power. With a Color Rendering Index (CRI) of just under 90, there is a large spectrum of color available that is important to look for in LED lighting. Very versatile.
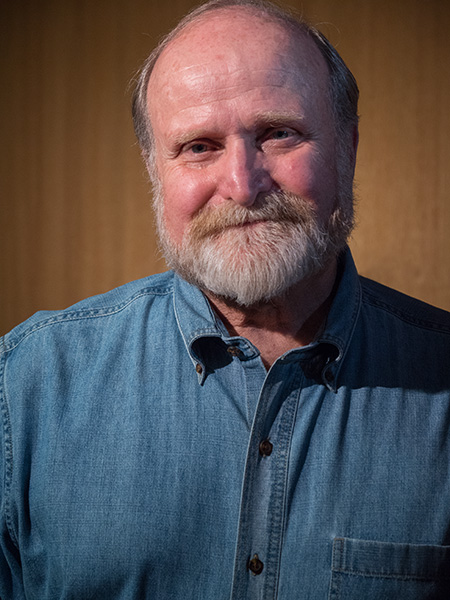
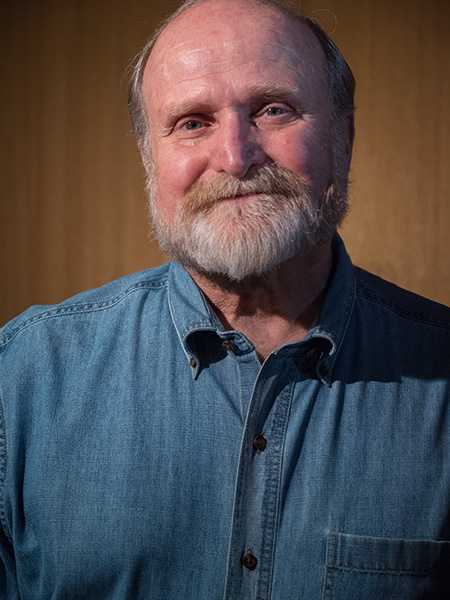
One of the great pleasures of traveling to speak to photography groups is the fellowship with photographers. I met Ernst Ulrich Schafer while at the PPW Conference in Yakima, Washington. Ernst and I went out on an adventure and had a blast getting to know each other.
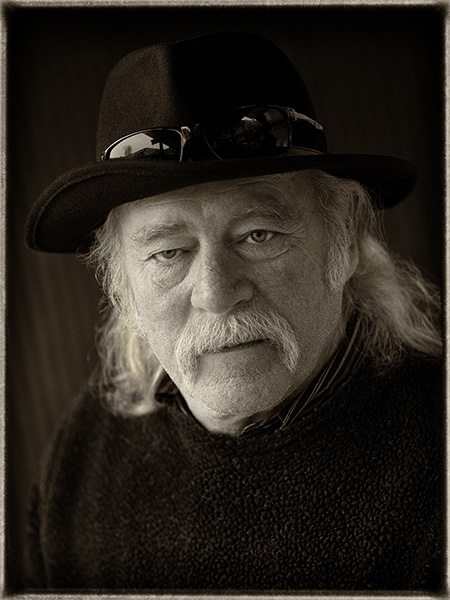
I asked Ernst to take a moment to pose for me to make a portrait. Found a decent spot for a nice lighting pattern on his face but the final portrait was completed in post-production. Here is the story of ‘The Making of Ernst”.
Final image of Ernst
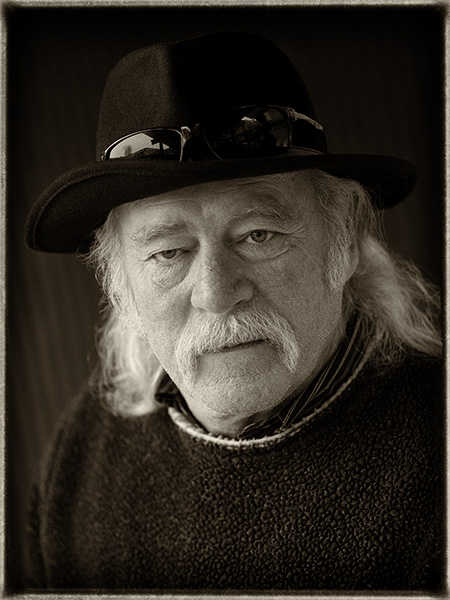
Original capture. Looking for a soft split light pattern.
I looked for a background that had a little bit of a gradient and a soft shadow transition from light to dark. Accomplished but finding an overhead light block with two open sides. I placed Ernst closer to the left-hand side to make the short side of his face the lighted portion. The light coming from the other side worked as fill. If aI wanted a sharper contrast I would have moved him further left. Less contrast further right. Since we can’t move the lights in a situation like this moving the subject is the only way to go.
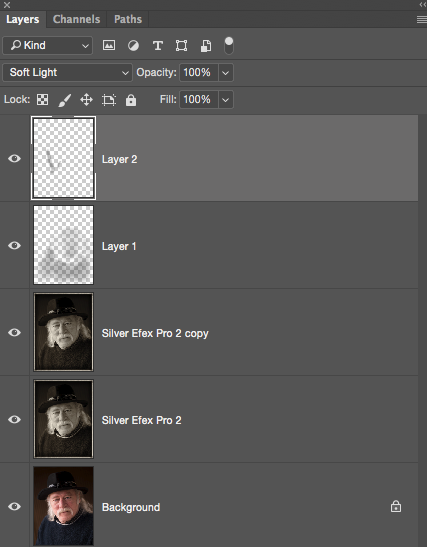
Process in NIK Silver FX Pro 2 with Sepia Tone. Note the difference between this image and the final at the top of the page. The white rim on the collar was removed as it was a distraction. Additional dodging and burning was done to lightly increase contrast and control some of the highlights. Check out the Layers Palette Screen Capture for more details.
If you don’t already have NIK filters be aware that they are a free download from Google. There is a great variety of filter effects available in the Suite. I often use Silver FX Pro 2 for my black and white and sepia tone conversions.
Layers Palette
Background is the original capture. Silver Efex Pro 2 is the Sepia Tone conversion. The copy Layer shows some retouching with the removal of the white collar. Layer 1 is a Soft Light Layer to burn in the sweater and add contrast to the shadow side of the face. Layer 2 is another Soft Light Layer to control some highlights and add a little sparkle to the eyes. I use the Soft Light Layer Mode to dodge and burn my images.
As you can see Adobe Photoshop with a pit stop in Adobe Camera Raw is a large part of my workflow.
Image made with the new Lumix GH5 and the 42.5mm f1.2 Nocticron lens @f1.2 1/320th sec ISO 200
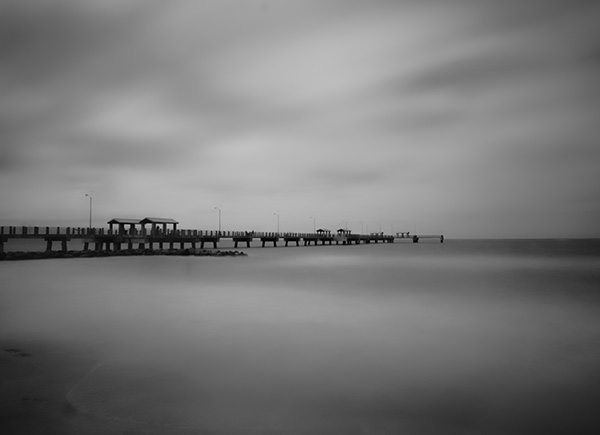
Had a good time making photographs in Tampa with Rob Bird a couple of weeks ago. We were on the beach at Fort Desoto Park, and I was working with my Tiffen ND Pro 100 Landscape filters. I used the 10 Stop plus the three Stop filters stacked together under overcast skies.
Made with Lumix GX8 camera and 12-35mm f2.8 G Vario Lens with a sixty-second exposure. Added a bit more blur to enhance the scene in post processing in Adobe Photoshop
I like the ability to add a sense of time to my images by using the deep ND filters. Clouds and water merge into an otherworldly look. I’ve only just begun to experiment with this type of photography and look forward to getting better.
When working with the Tiffen Filters, I feel confident that the glass will protect the actual filter material. In the past, I had been using plastic filters and often ended up with scratches making replacement frequently a necessity.
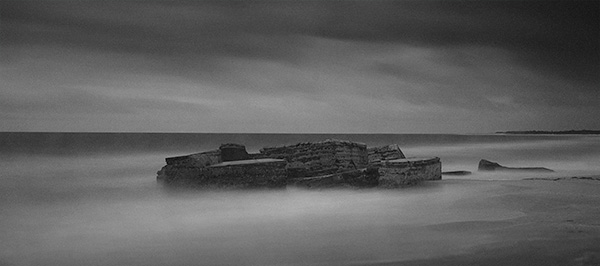
This image had the same settings and gear as above. Added just a bit of grain in post-production. Also removed a tower that was in the background that was a distraction.
Please note that this is not documentary photography. I am working toward giving you the vision I have for the final art piece. I am always adjusting my artwork to suit my vision. With that said, I am onboard with Julianne Kost in using the term ‘Lens Based Artist’ or ‘Lens Based Art’ to differentiate this work from my more realistic work.
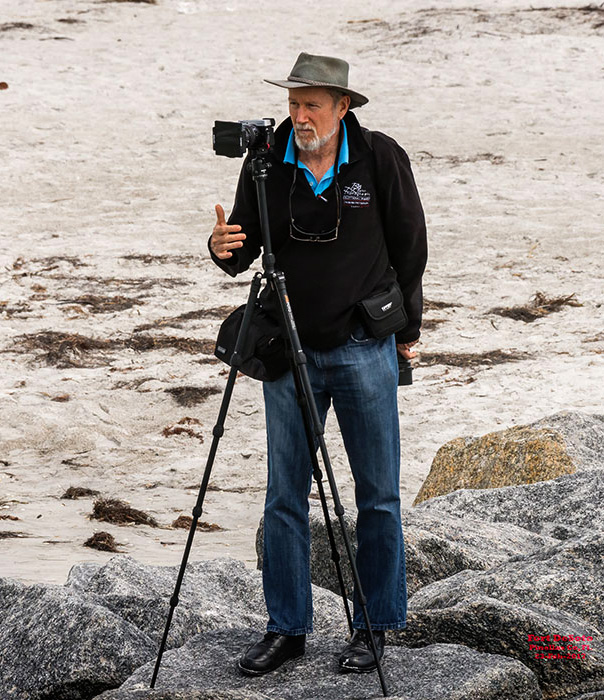
I work light when on location. Here’s my gear list that is pictured above. MeFoto Road Trip Tripod. Lightweight yet solid. Packs up small for travel. Think Tank Mirrorless Mover belt bag. Hold three lenses, spare batteries, lens cloth, mini-tripod and extra SD Cards. Lumix GX8. 12-35mm f2.8 Lumix Vario Lens, 7-14mm f4 lens, 35-100mm f2.8 Lumix Vario Lens, 20mm f1.7 Lens. Also on my belt the Tiffen Filter kit mentioned above. On my shoulder is a Lumix GX85 and the 100-400mm Lens.
“The artist who aims at perfection in everything achieves it in nothing.” – Eugene Delacroix
That said, one needs to have a solid grasp of the technology and science behind the capture of the image. The more one understands the science and how the film or chip receives information the easier it becomes to stretch and push creative boundaries. Not to mention the post-production capabilities in manipulating the information captured after the fact.
It’s a great time to be a creative in the photography industry. I am going to start using the terminology I first heard from Julianne Kost that helps describe what I feel I do now.
I’ve been really enjoying the program from MacPhun to create HDR images. I feel I am able to get more realistic images and still be able to tweak photos for the ‘traditional’ HDR look. This month gets you a deal to not only get the software but to get Trey Ratcliff’s instruction on how to get the most out of it. Check it out.
Aurora HDR 2017 + Trey Ratcliff’s Complete HDR Tutorial 3.0 for only $89. Total value $189 Savings over 50%
Upgrade pricing starts at $49 for users of Aurora HDR, and is $69 for Aurora HDR Pro users
You get:
Aurora HDR 2017, The world’s most advanced HDR photo editor for Mac.
Trey Ratcliff’s Complete HDR Tutorial 3.0: Perfect for everyone who wants to learn to shoot HDR images from beginners to advanced users.
6+ Hours of instruction
Trey’s RAW image files
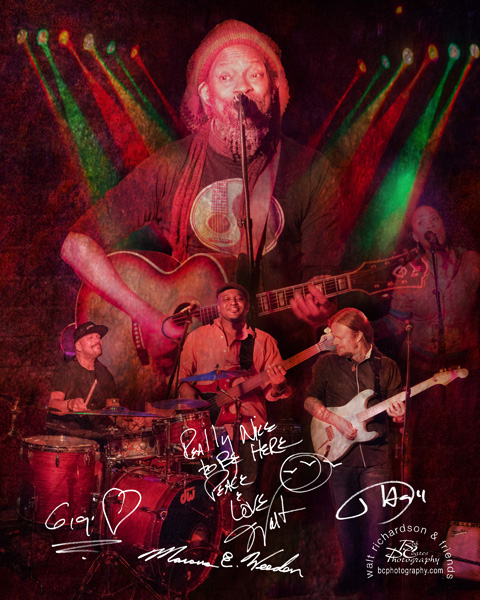
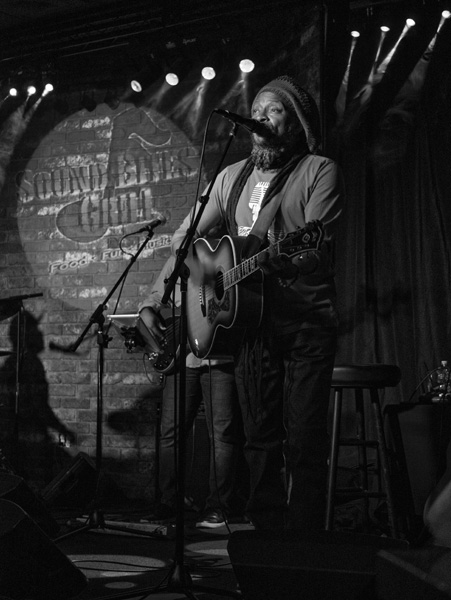
Walt Richardson & Friends at Sound Bites Grill Sedona
What a great show! Walt is known for his reggae music, but he is so much more. He’s a legendary songwriter with a big heart, and it shows during his performance. His friends are entertaining and talented musicians. There’s a reason Walt is in the Arizona Music & Entertainment Hall of Fame.
Walt’s own words say it best, “I am a Soul, Living out my life as a Songwriting, Storytelling, and performing Musician.”
Learn more about Walter Richardson & Friends.
Art with signatures for the Wall of Fame
If you have followed my work you know I photograph the musicians live while they are performing for marketing of future performances. In addition, I create an image for the ‘ Sound Bites Grill ‘Wall of fame’. These art pieces are created with each individual member of the band recorded and then extracted from the image and rebuilt. It’s a great challenge to render each performer and band in a slightly different style. Here in a nod to the reggae, the red and green lighting pattern was utilized in the spot lights. The singer-songwriter and personality of Walt was highlighted by picking an expression with that little smile and wide open eyes.
Non-logoed version of the art.
Most of the images were captured with the Lumic GX85 and a 35-100mm G Vario lens.
Image of the full band for future marketing and appearances at Sound Bites
Back-stage view at SBG.
Walter Richardson black and white photo.
When I am creating the marketing photos I always make the conversion to black and white as well as a color version. There is more to creating a dynamic black and white image for printing than just desaturating the image to monotone. You need to control the contrast and the highlight and shadows properly to make a solid photo.
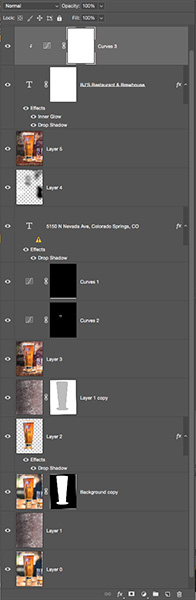
BJ’s Brewhouse Art Piece – ColoadoSprings, Colorado
Had a great time sharing Adobe Photoshop techniques from my PhotoSynthesis program for the Professional Photographers Guild of Colorado Springs. During my All Day hands-on class, I was charged with creating artwork from scratch live in front of the attendees including making selections and sharing the thought process as I created the image.
Here’s the image I made for the class with a few elements cleaned up for clarity
This technique was one I created for art application but I keep finding that it is working its way into my commercial work as well. You can see the original photo below. The textures I used were images that we had gathered on-site that morning. The idea is you can create a significantly different image using many different techniques, textures, masks and blend modes.
Here’s the Photoshop Layers Palette in a screen grab illustrating some of the techniques used.
The text was created using the fx palette. A large font was used for the name to attract attention. It was ‘dressed’ with bright color, an inner glow with a bright edge and a drop shadow. All of the text effects were chosen to help make the name stand out. The text for the address was more informational and was rendered white to be in high contrast with the rest of the image.
Here is the original capture SOOC ( straight out of camera) when my beer was delivered at the bar. Made with the LumixGH4 and the 35-100mm f2.8 G Vario lens
For infrared conversion of my cameras I use LifePixel. Infrared allows you to put an older camera to use and opens up a new time time of day for productive image creation.
Learn Photoshop in a fun environment. Aaron Nace applies the right amount of fun with easy to understand and follow tutorials. Actions and brushes are included with lessons!
Best embroidery ever. Give Queensboro a try, get a $20 instant credit to get started by clicking on the logo! They specialize in great quality custom logo apparel and promotional products with the best customer service.
Platypod has become a great resource for being creative in getting your camera gear easily into unusual places. As an Platypod Pro I get to work/play with the gear even before it comes out. Head over to Platypod, subscribe to the newsletter and you will get special discounts reserved only for subscribers.

 Above is the image fully merged using the in-camera settings of show host Mike Tabback.